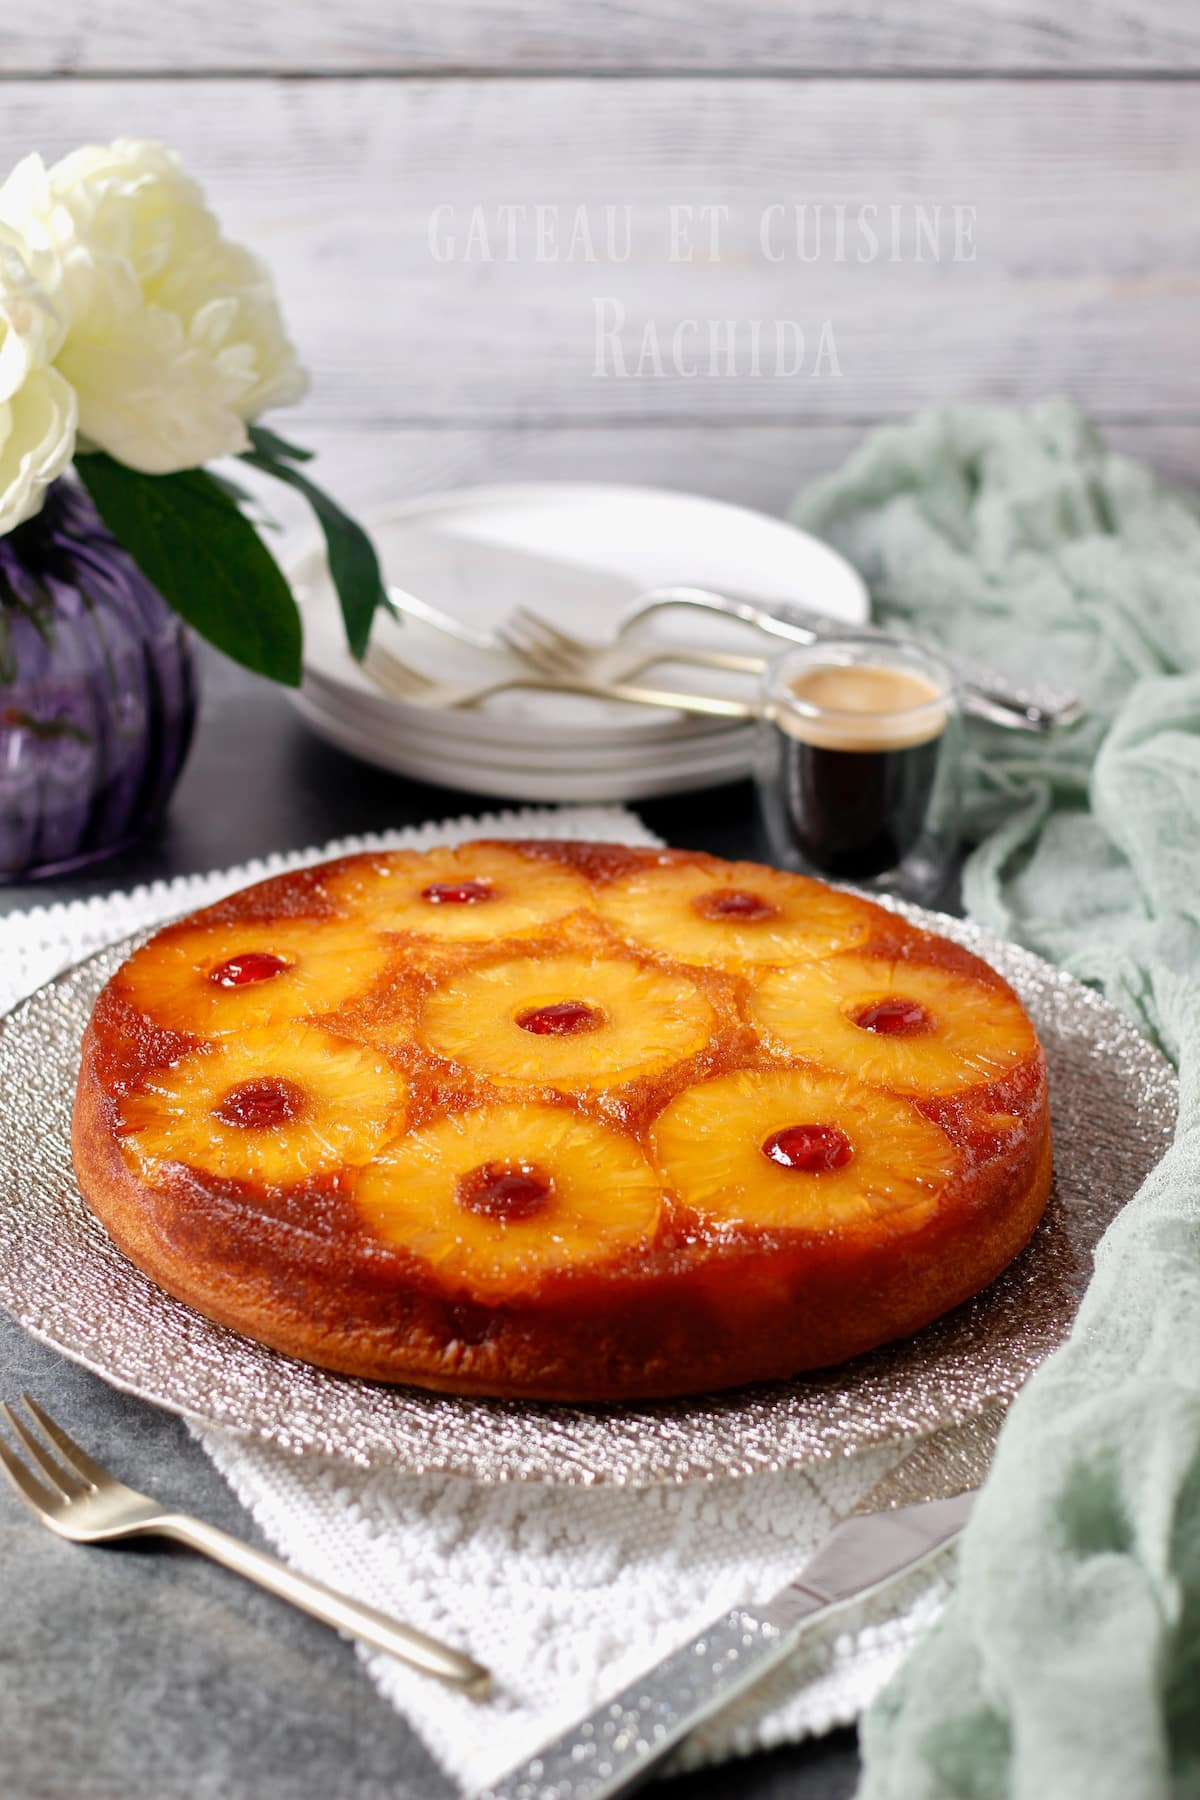
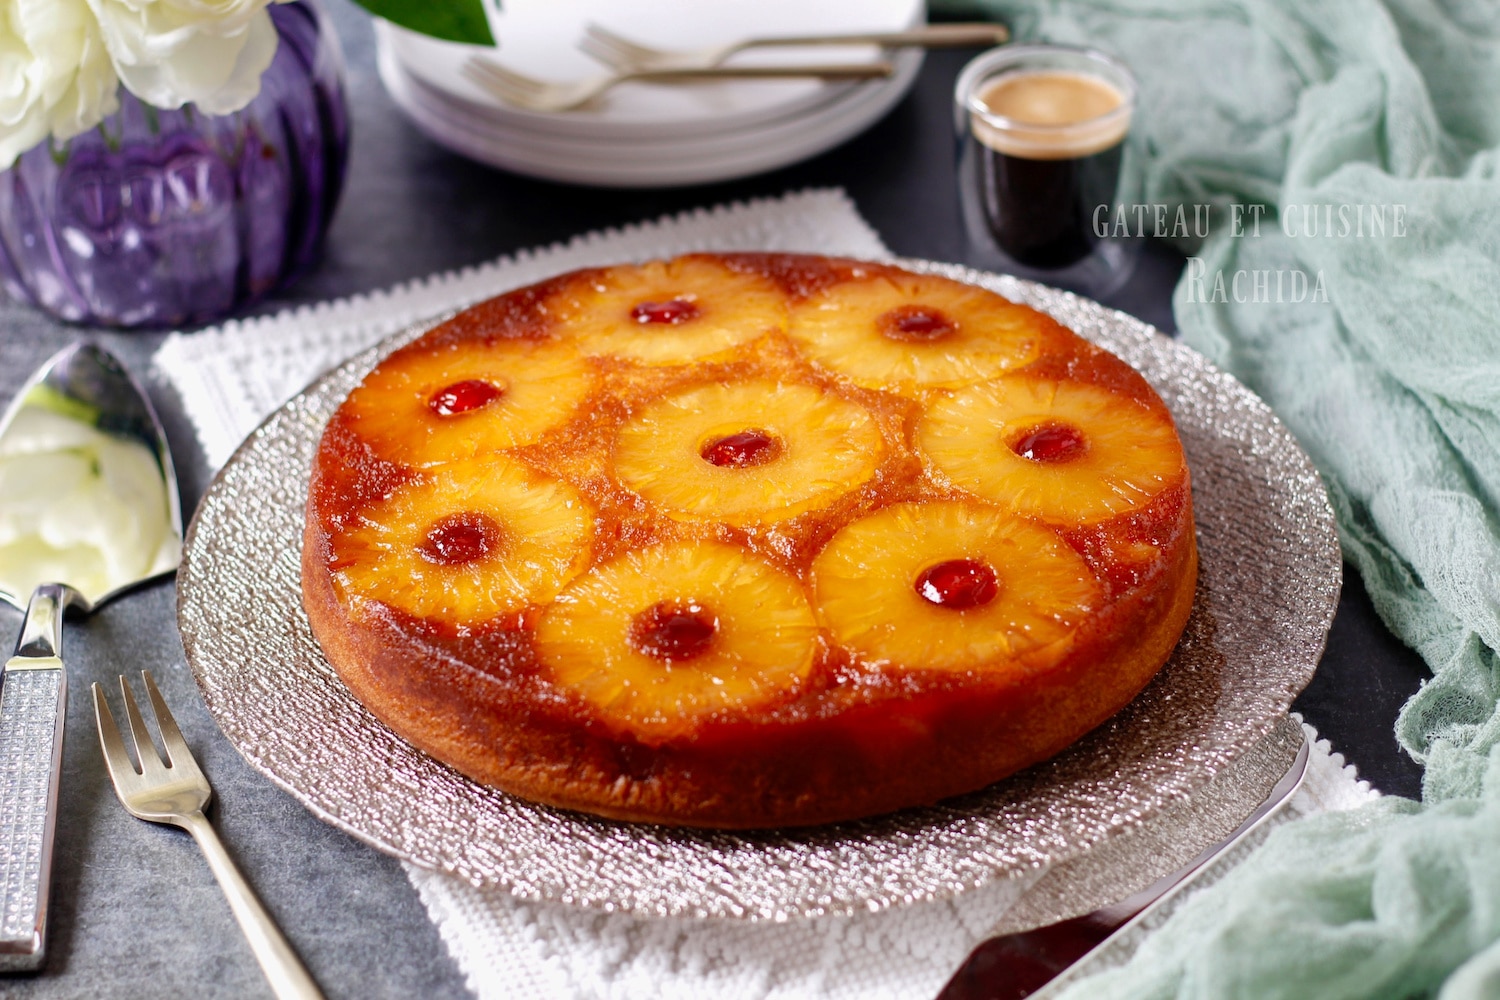
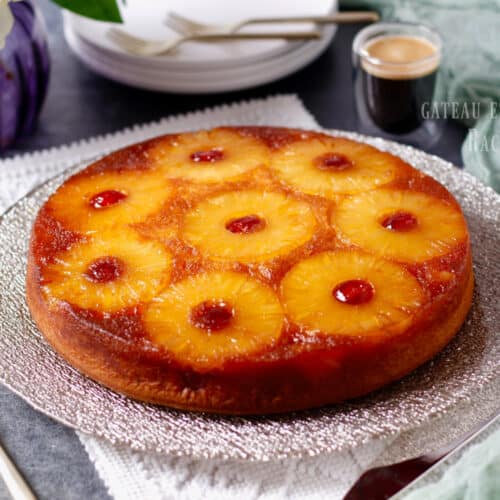
The pineapple upside-down cake, moist and melt-in-your-mouth, will charm you with its caramelized pineapple slices and deliciously fruity taste. It’s a classic, simple, economical, and quick-to-prepare cake that can be made in less than 15 minutes. A real treat for snack time or dessert.
It’s called an upside-down cake because it’s prepared a bit like a Tatin tart: the bottom becomes the top once unmolded. The pineapple rings are arranged on a golden caramel at the bottom of the pan, garnished with candied cherries, then covered with the cake batter.
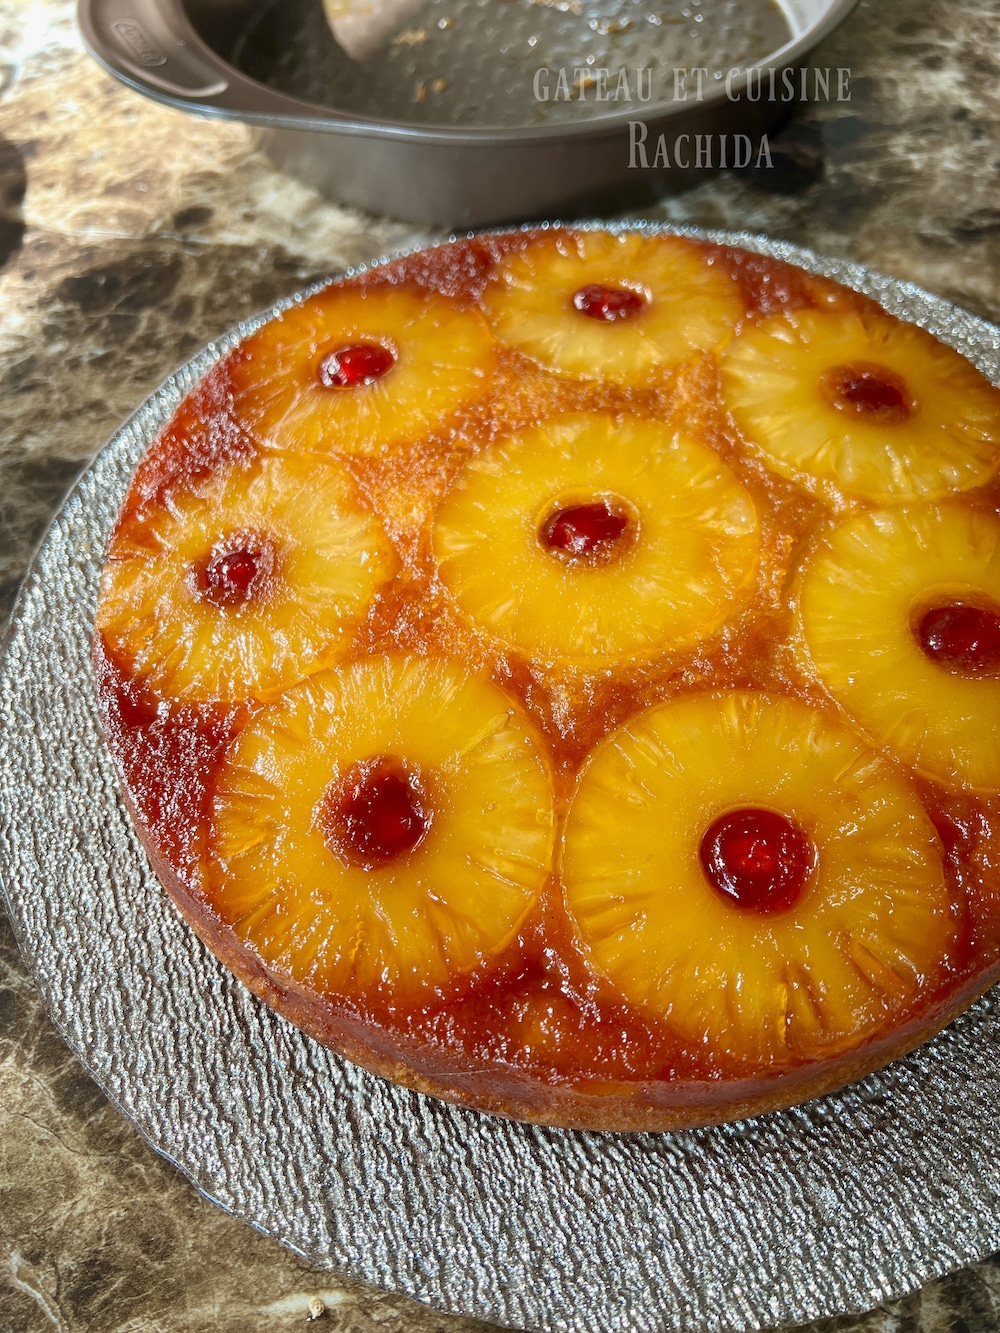
Once out of the oven, the still-warm cake is lightly soaked with pineapple syrup to give it even more flavor and moisture before being unmolded. You then discover a shiny, golden top, with perfectly caramelized pineapple slices.
Originally from the islands, this cake is very popular in the Caribbean, the West Indies, and Latin America, where it is a staple family recipe. Its popularity also exploded after its appearance in the cult American series Desperate Housewives, made famous by Bree Van de Kamp.
And if you love tropical flavors, you can also try the Caribbean Coconut Flan, perfect for an easy-to-prepare dessert.
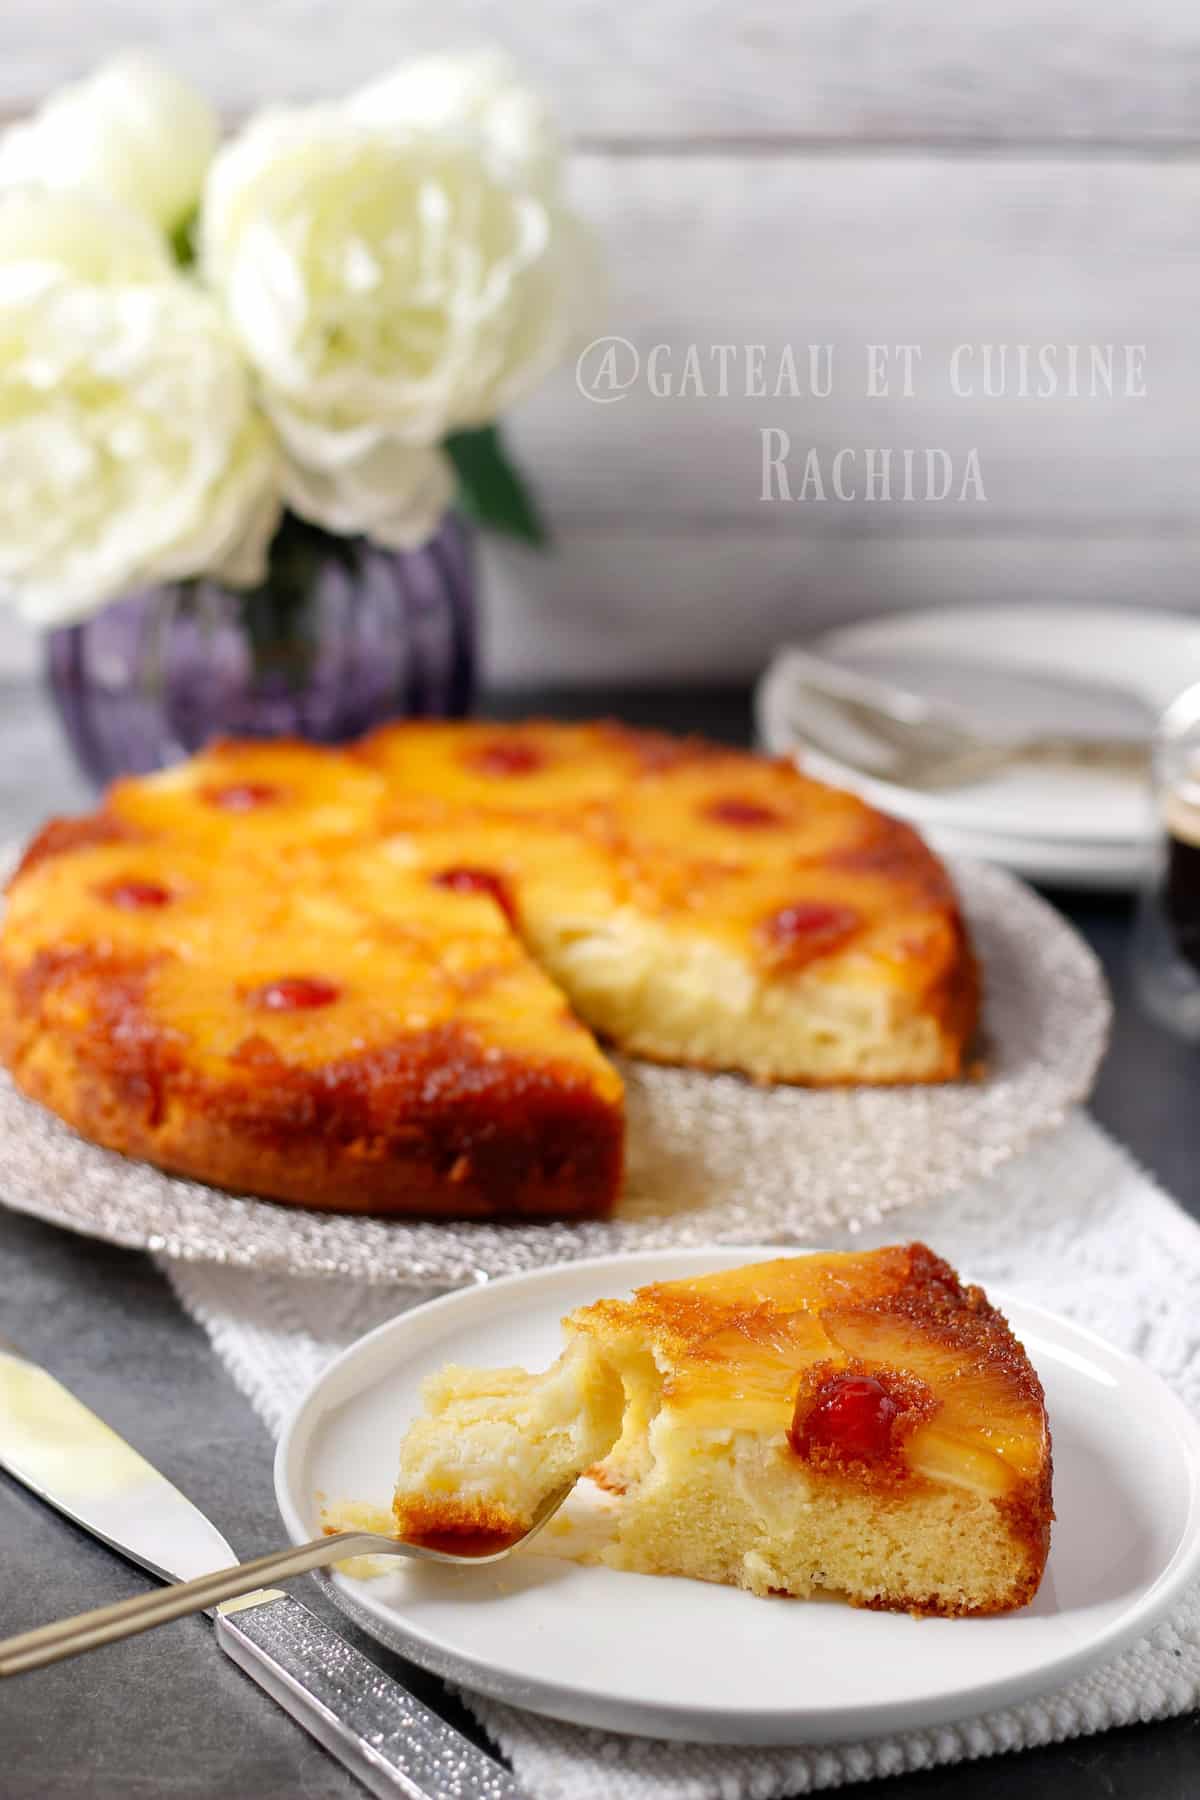
Table of Contents
Tips for Pineapple Upside-Down Cake
It’s a very easy recipe, as simple as a yogurt cake. No need to worry, even if you’re a beginner, you’re sure to succeed with this cake.
For the caramel, simply put the sugar in a saucepan and heat it without stirring until it begins to caramelize. Stir 2 to 3 times off the heat to ensure the caramel turns out perfectly.
For the flour, you can adjust the quantity depending on the texture you want: use between 200 and 250 g. I generally use 200–220 g for a light batter. With 250 g, the texture is slightly denser but still moist and melt-in-your-mouth.
Candied cherries are optional: you can omit them if you like, but they add a beautiful visual touch to the cake. You can also add more or fewer pineapple pieces to the batter according to your taste.
Finally, you can lightly soak the cake if you wish: it’s already very moist, but a little syrup will make it even more melt-in-your-mouth.
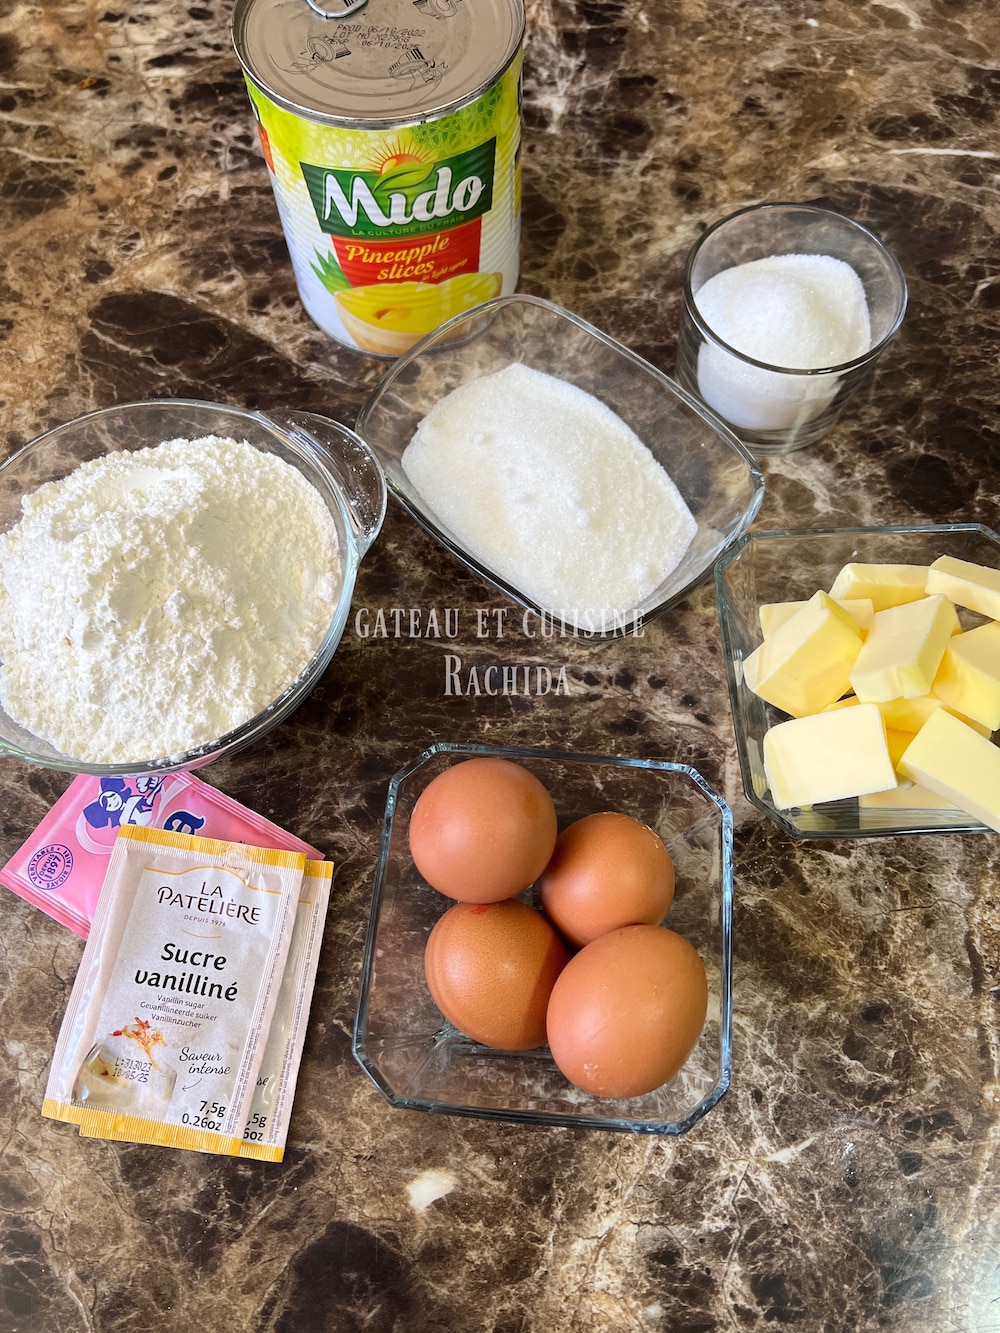
Ingredients:
Note: Find the printable recipe card at the end of the article
For the caramel
120 g (4.2 oz) granulated sugar
For the cake:
- 4 large eggs (250 g / 8.8 oz without shell)
- 150 g (5.3 oz) granulated sugar
- 150 g (5.3 oz) unsalted butter
- 220 g (7.8 oz) all-purpose flour
- 1 packet (11 g / 0.4 oz) baking powder
- 2 packets vanilla sugar
- 60 ml (2 fl oz) pineapple syrup
- 1 large can (820 g / 29 oz) sliced pineapple, if you want to add pineapple pieces to the batter, otherwise use a 400 g (14 oz) can
- A little pineapple syrup for soaking
- 8 candied cherries (optional)
Preparation Steps
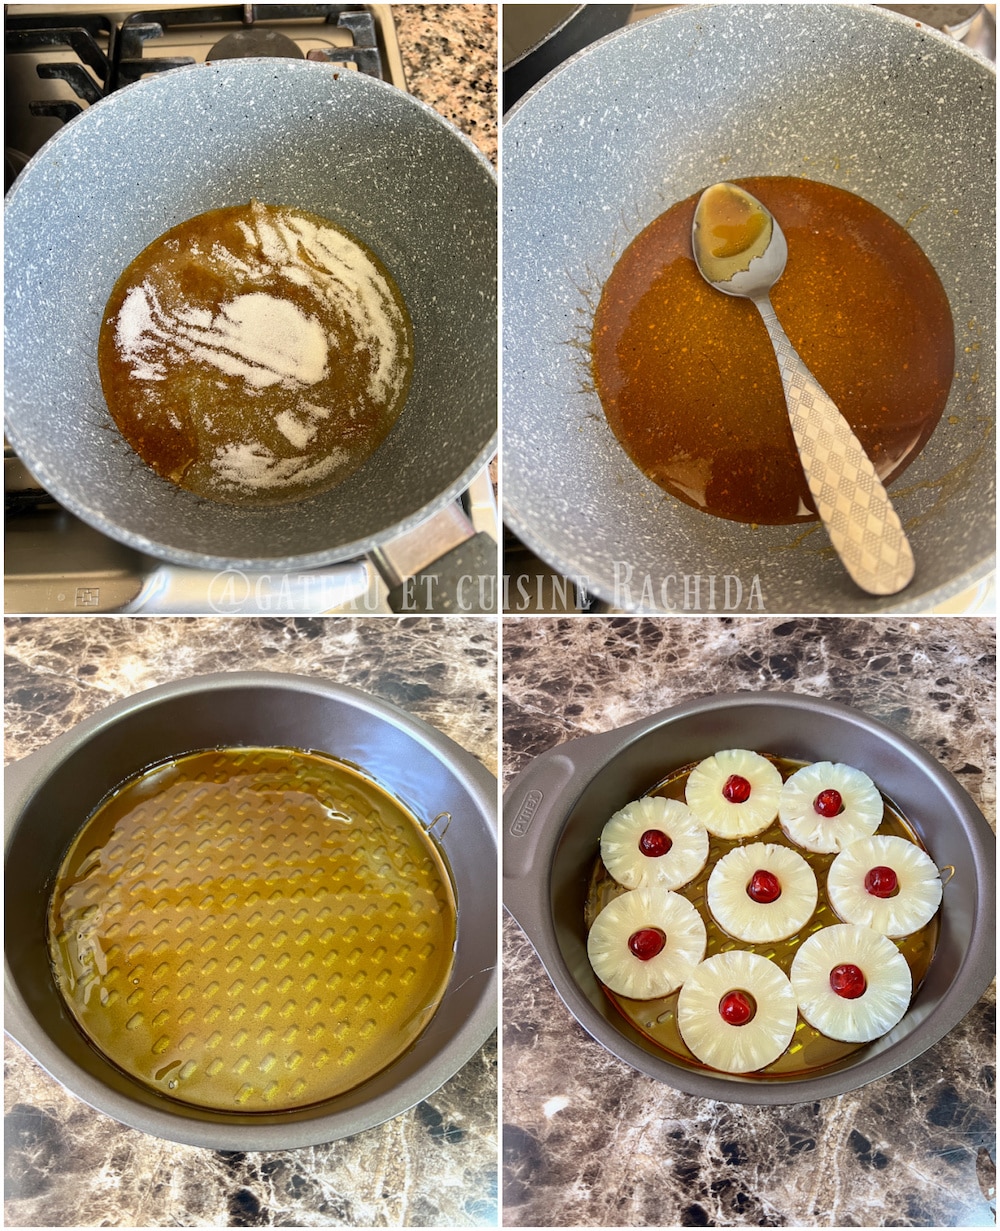
Prepare the Caramel
Place the sugar in a wide enough saucepan to form a thin layer. Heat over low heat to make a dry caramel.
Do not stir until the sugar has almost completely melted and started to turn color. Then remove from the heat, stir to combine, and return to the heat until you obtain a golden caramel, neither too light nor too dark.
Meanwhile, slightly warm the pan in the oven or directly on the stovetop, being careful not to burn yourself. A warm pan will prevent the caramel from hardening too quickly and allow you to spread it evenly.
Pour the caramel into the pan and tilt it to coat the entire bottom.
Tip: If the caramel hardens before the bottom is fully covered, simply reheat the pan on the stove for a few seconds to liquefy it again.
Prepare the Cake Batter
Preheat the oven to 180°C (350°F).
Remove the pineapple slices from the jar and drain them in a colander, then place them on paper towels to dry thoroughly.
Arrange the slices flat on the caramel, side by side in a circle, with one in the center. Place a candied cherry in each hole and set aside.
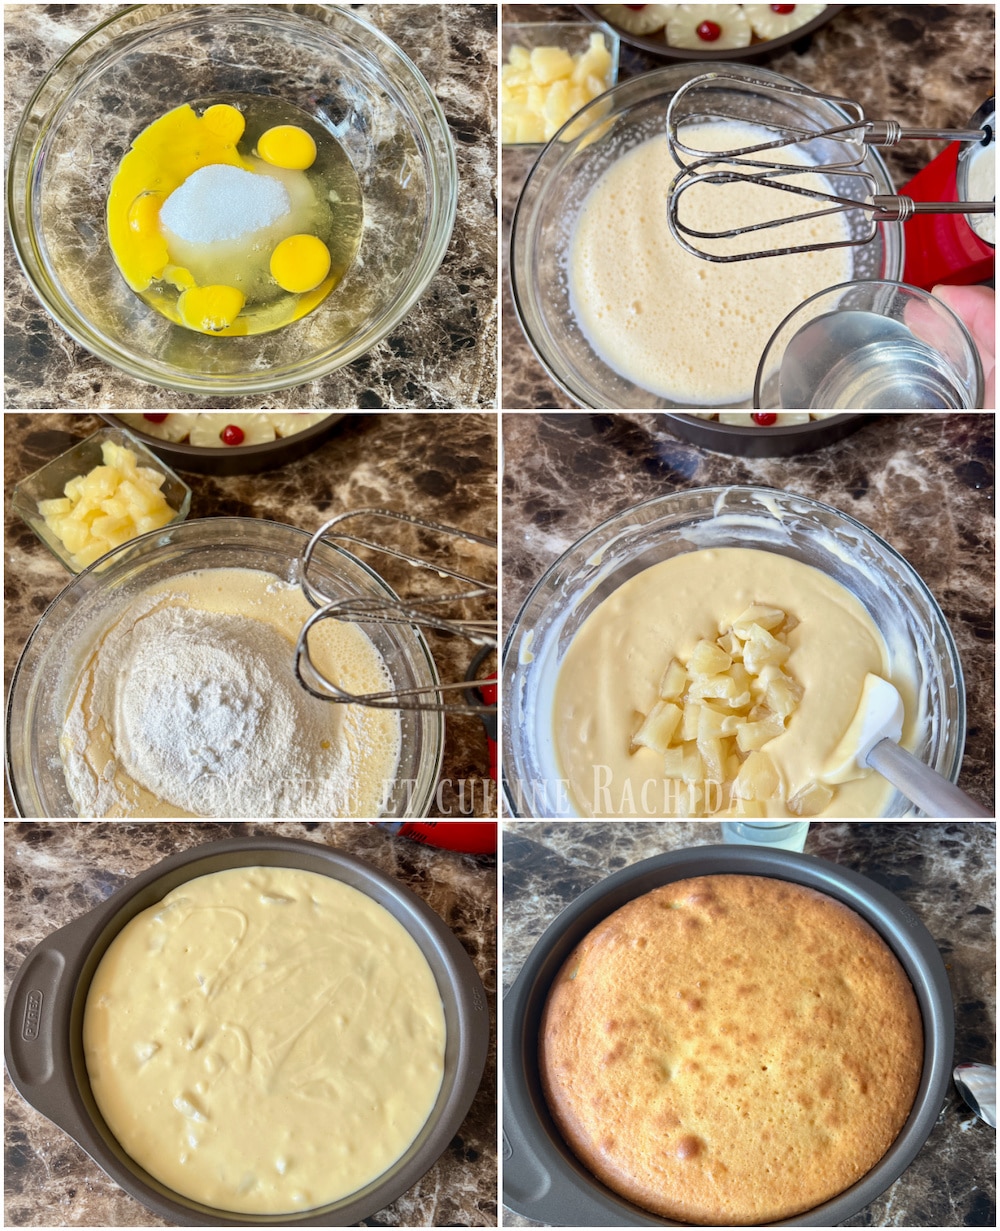
Melt the butter and let it cool slightly.
In a bowl, whisk the eggs with the sugar and vanilla sugar until the mixture becomes frothy. There is no need to bleach them or triple their volume.
Add the lukewarm melted butter while continuing to mix, then add the pineapple syrup.
Incorporate the sifted baking powder, mixing well, then add the flour and mix until smooth.
Optionally, fold a few pineapple rings cut into pieces into the batter.
Pour the batter into the pan and bake for approximately 45 to 55 minutes. Check for doneness after 45 minutes by inserting a wooden skewer into the cake. It should come out clean.
Tip: You can butter the sides of the round cake pan to make unmolding easier. I don’t butter the sides of my cake pan, and the cake comes out perfectly. You can get a thicker cake by using a smaller pan. I find that this gives nice slices that are neither too thin nor too thick.
Optionally, soak the cake with a few spoonfuls of syrup when it comes out of the oven, then return it to the turned-off oven for five minutes.
Unmold the cake onto a serving dish and let it cool or just warm slightly before enjoying.
Storage
Store the cake in the refrigerator for three to four days, well wrapped in an airtight container.
It can also be frozen for longer storage, although this is usually unnecessary for this type of cake due to its simplicity and quick preparation.
Easy Pineapple Upside-Down Cake Recipe
INGRÉDIENTS
For the caramel
- 120 g granulated sugar
For the cake:
- 4 large eggs 250 g / 8.8 oz without shell
- 150 g granulated sugar
- 150 g unsalted butter
- 220 g all-purpose flour
- 1 packet 11 g / 0.4 oz baking powder
- 2 packets vanilla sugar
- 60 ml pineapple syrup
- 1 large can 820 g / 29 oz sliced pineapple, if you want to add pineapple pieces to the batter, otherwise use a 400 g (14 oz) can
- A little pineapple syrup for soaking
- 8 candied cherries optional
PRÉPARATION
Prepare the Caramel
- Place the sugar in a wide enough saucepan to form a thin layer. Heat over low heat to make a dry caramel.
- Do not stir until the sugar has almost completely melted and started to turn color. Then remove from the heat, stir to combine, and return to the heat until you obtain a golden caramel, neither too light nor too dark.
- Meanwhile, slightly warm the pan in the oven or directly on the stovetop, being careful not to burn yourself. A warm pan will prevent the caramel from hardening too quickly and allow you to spread it evenly.
- Pour the caramel into the pan and tilt it to coat the entire bottom.
- Tip: If the caramel hardens before the bottom is fully covered, simply reheat the pan on the stove for a few seconds to liquefy it again.
Prepare the Cake Batter
- Preheat the oven to 180°C (350°F).
- Remove the pineapple slices from the jar and drain them in a colander, then place them on paper towels to dry thoroughly.
- Arrange the slices flat on the caramel, side by side in a circle, with one in the center. Place a candied cherry in each hole and set aside.
- Melt the butter and let it cool slightly.
- In a bowl, whisk the eggs with the sugar and vanilla sugar until the mixture becomes frothy. There is no need to bleach them or triple their volume.
- Add the lukewarm melted butter while continuing to mix, then add the pineapple syrup.
- Incorporate the sifted baking powder, mixing well, then add the flour and mix until smooth.
- Optionally, fold a few pineapple rings cut into pieces into the batter.
- Pour the batter into the pan and bake for approximately 45 to 55 minutes. Check for doneness after 45 minutes by inserting a wooden skewer into the cake. It should come out clean.
- Tip: You can butter the sides of the round cake pan to make unmolding easier. I don't butter the sides of my cake pan, and the cake comes out perfectly. You can get a thicker cake by using a smaller pan. I find that this gives nice slices that are neither too thin nor too thick.
- Optionally, soak the cake with a few spoonfuls of syrup when it comes out of the oven, then return it to the turned-off oven for five minutes.
- Unmold the cake onto a serving dish and let it cool or just warm slightly before enjoying.
Notes
Storage
Store the cake in the refrigerator for 3 to 4 days, well wrapped or in an airtight container. You can freeze the cake to preserve it longer, but since it's very quick and easy to make, I don't think it's necessary.Thank you for your visit and your comments!