
Very high chocolate Molly cake sponge
If you’re looking for a cake that’s moister and less dry than classic sponge cake, this chocolate molly cake is perfect. It’s suitable for all layered cakes thanks to its excellent stability. It can support the weight of layers without collapsing. This feature makes it essential for cake design, layer cakes, and tiered cakes. It will be as useful to you as the vanilla molly cake sponge.
Its particularity? It contains neither butter nor oil. Instead, it is made with whipped cream, which gives it all the necessary softness.
It can be used in the Kinder Bueno layer cake to replace the chocolate sponge cake for example.

If you’re hesitating between chocolate molly cake sponge and chocolate sponge cake, the choice will depend on how you intend to use it.
The chocolate sponge cake is very light, but also less moist. It therefore needs to be soaked to become spongy and moister. However, due to its texture, it’s not suitable for tiered cakes, as it can’t support their weight. It’s perfect for cakes like a Black Forest cake.
Chocolate molly cake, on the other hand, is denser, which gives it great stability. It doesn’t collapse under the weight of layers in layer cakes and tiered cakes for cake design. Moreover, it’s very moist and doesn’t necessarily need to be soaked.

Molly cake sponge
Table of Contents
Tips :
It’s essential to master the baking of molly cake sponge to preserve all its moistness.
For this, opt for long baking at a low temperature. Additionally, using a flower nail is recommended for better heat distribution to the center of the cake, ensuring even baking.
Those who don’t have a flower nail can remedy this by wrapping a damp cloth around the pan before placing it in the oven. Recently, the brand Wilton has released very practical baking strips for this purpose.
The use of a flower nail or damp towel is designed to prevent the chocolate molly cake from having a thick crust on the outside. With good heat distribution, the chocolate molly cake rises and bakes evenly and retains all its moistness.
However, it is entirely possible to make the molly cake successfully without taking these precautions, as long as the recommended baking temperatures are followed.
The recipe on video
Ingredients:
NB: Find the printable recipe card at the end of the article as well as measurements for different cake pan sizes below.
For a 20 cm x 10 cm high cake pan (7.9 x 4 inches )
Baking time: 1 hour and 20 minutes for me, but it may go up to 1 hour and 30 minutes depending on the oven. Check after 1 hour and 10 minutes
- 4 eggs (220 g / 7.8 oz without shells ).
- 333 g granulated sugar ( 11.7 oz)
- 233 g all-purpose flour (8.2 oz)
- 100 g unsweetened cocoa powder (3.5 oz )
- 2 packets vanilla sugar
- 2 packets baking powder ( 14 g / 0.5 oz)
- 333 g heavy cream, 35% fat content ( 11.7 oz)
For an 18 cm x 10 cm high cake pan ( 7.2 inches x 4 inches)
Baking time: 1 hour and 15 minutes for me, but it may go up to 1 hour and 30 minutes depending on the oven. Check after 1 hour.
- 3 large eggs (178 g / 6.3 oz) (1 medium egg weighs about 55 g / 2 oz)
- 270 g granulated sugar (9.5 oz)
- 190 g all-purpose flour ( 6.7 oz)
- 80 g unsweetened cocoa powder (2.8 oz)
- 2 packets of vanilla sugar
- Almost 2 packets baking powder (11 g / 0.4 oz)
- 270 g of heavy cream (35% fat) (9.5 oz)
For a 15 cm x 10 cm high cake pan (6 inches x 4 inches):
Baking time: about 50 minutes to 1 hour and 15 minutes.
- 3 small eggs (1 medium egg weighs approximately 55 g / 2 oz) (123 g / 4.3 oz)
- 186 g granulated sugar (6.6 oz)
- 130 g all-purpose flour (4.6 oz)
- 56 g unsweetened cocoa powder (2 oz)
- 1 packet of vanilla sugar
- 8 g baking powder (0.3 oz)
- 186 g heavy cream (35% fat) (6.6 oz)
For a 25 cm x 8 cm high cake pan (10 inches x 3 inches)
Baking time: 1 hour and 30 minutes to 2 hours depending on the oven. Check after 1 hour and 10 minutes.
- 5 eggs (275 g / 9.7 oz) (1 medium egg weighs about 55 g / 2 oz)
- 416 g granulated sugar (14.7 oz)
- 291 g all-purpose flour (10.3 oz)
- 125 g unsweetened cocoa powder (4.4 oz)
- 2 packets of vanilla sugar
- 2 and a half packets of baking powder (18 g / 0.6 oz)
- 416 g heavy cream (35% fat) (14.7 oz)
For a 25 cm x 10 cm high cake pan (10 inches x 4 inches)
Baking time: 1 hour and 30 minutes to 2 hours depending on the oven. Check after 1 hour and 10 minutes.
6 eggs (343 g / 12.1 oz) (1 medium egg weighs about 55 g / 2 oz)
520 g granulated sugar (18.3 oz)
364 g all-purpose flour (12.8 oz)
156 g unsweetened cocoa powder (5.5 oz)
2 packets of vanilla sugar
3 packets of baking powder (20 g / 0.7 oz)
520 g heavy cream (35% fat) (18.3 oz)
For a 26 cm x 8 cm high cake pan (10.2 inches x 3 inches)
Baking time: 1 hour and 20 minutes to 1 hour and 50 minutes depending on the oven. Check after 1 hour and 10 minutes.
- 5 large eggs (297 g / 10.5 oz) (1 medium egg weighs about 55 g / 2 oz)
- 450 g granulated sugar (15.8 oz)
- 315 g all-purpose flour (11.1 oz)
- 135 g unsweetened cocoa powder (4.8 oz)
- 2 and a half packets of vanilla sugar
- Nearly 3 packets of baking powder (19 g / 0.7 oz)
- 450 g heavy cream (35% fat) (15.8 oz)
Preparation steps :
1. Preheat the oven to 150°C (300°F), either with static or convection oven.
2. Grease and line the bottom and sides of the cake pan with parchment paper, leaving the edges overlapping to make unmolding easier.
3. Whip the cold heavy cream into stiff peaks and set it aside in the refrigerator.
4. Sift together the flour, unsweetened cocoa powder, and baking powder.
5. In the bowl of a stand mixer, beat the eggs with the sugar and vanilla sugar (or vanilla extract or any other flavoring of your choice) for 5 minutes or longer. The mixture should triple in volume, become white, and be smooth and creamy.
6. Gradually fold in the sifted flour, cocoa powder, and baking powder using the paddle attachment of the stand mixer or a rubber spatula. If using a spatula, gently fold by lifting the batter from bottom to top. You will obtain a fairly firm batter.
7. Then, add the whipped cream in several batches, gently folding it in from the bottom up with a spatula to preserve the air incorporated.
8. Place a flower nail at the center of the cake pan, with the point facing upwards, then pour in the batter. The flower nail is not essential, but it helps distribute heat more evenly and ensures a uniform bake.
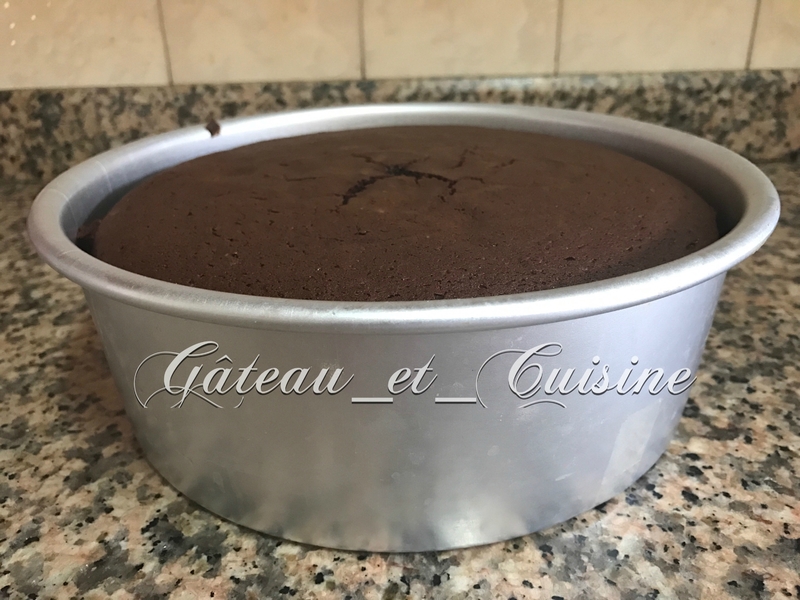
9. Smooth and level the top of the batter in the pan. Then, tap the pan several times on the countertop. This trick not only helps level the surface of the molly cake, but it also brings up and releases air bubbles that could burst during baking. The result: a perfectly flat molly cake sponge on both sides, without any unsightly domes.
The flower decor nail I use

10. Bake for 1 hour and 20 minutes without opening the oven, as this could cause the chocolate molly cake to collapse (like a sponge cake).
11. Monitor the baking from 1 hour onwards. Only open the oven at 1 hour 10 minutes to check if the top is firm. In my oven, 1 hour 20 minutes is perfect, but adjust the time according to your oven.
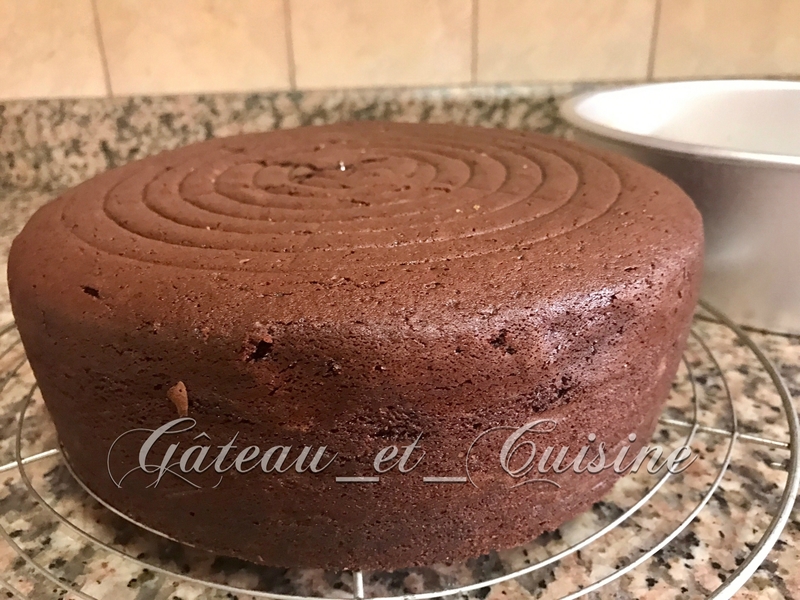
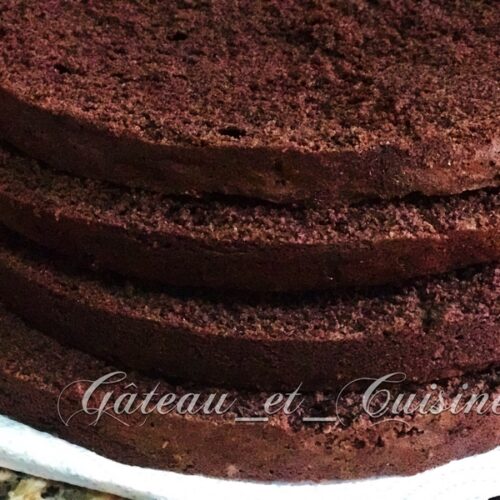
12. Once baked, turn the chocolate molly cake onto a wire rack. Wait until it’s lukewarm or cold before cutting it into layers.
13. Preferably, once the molly cake is lukewarm, wrap it in plastic wrap and store it in the refrigerator until the next day. This will make it firmer and much easier to cut.
Fluffy Chocolate Molly Cake Sponge
EQUIPEMENTS
- Flower nail (optional) optional
- Bake even strip optional
INGREDIENTS
For a 20 cm x 10 cm high cake pan (7.9 x 4 inches )
- 4 eggs (220 g / 7.8 oz without shells.)
- 333 g granulated sugar (11.7 oz)
- 233 g all-purpose flour (8.2 oz)
- 100 g unsweetened cocoa powder (3.5 oz)
- 2 packets vanilla sugar
- 2 packets baking powder (14 g / 0.5 oz)
- 333 g heavy cream 35% fat content ( 11.7 oz)
PREPARATION
- You can read all my tips and find the quantities for other cake pan sizes in the article.
- Preheat the oven to 150°C (300°F), either with static or convection oven.
- Grease and line the bottom and sides of the cake pan with parchment paper, leaving the edges overlapping to make unmolding easier.
- Whip the cold heavy cream into stiff peaks and set it aside in the refrigerator.
- Sift together the flour, unsweetened cocoa powder, and baking powder.
- In the bowl of a stand mixer, beat the eggs with the sugar and vanilla sugar (or vanilla extract or any other flavoring of your choice) for 5 minutes or longer. The mixture should triple in volume, become white, and be smooth and creamy.
- Gradually fold in the sifted flour, cocoa powder, and baking powder using the paddle attachment of the stand mixer or a rubber spatula. If using a spatula, gently fold by lifting the batter from bottom to top. You will obtain a fairly firm batter.
- Then, add the whipped cream in several batches, gently folding it in from the bottom up with a spatula to preserve the air incorporated.
- Place a flower nail at the center of the cake pan, with the point facing upwards, then pour in the batter. The flower nail is not essential, but it helps distribute heat more evenly and ensures a uniform bake.
- Smooth and level the top of the batter in the pan. Then, tap the pan several times on the countertop. Note : This trick not only helps level the surface of the molly cake, but it also brings up and releases air bubbles that could burst during baking. The result: a perfectly flat molly cake sponge on both sides, without any unsightly domes.
- Bake for 1 hour and 20 minutes without opening the oven, as this could cause the chocolate molly cake to collapse (like a sponge cake).
- Monitor the baking from 1 hour onwards. Only open the oven at 1 hour 10 minutes to check if the top is firm. In my oven, 1 hour 20 minutes is perfect, but adjust the time according to your oven.
- Once baked, turn the chocolate molly cake onto a wire rack. Wait until it's lukewarm or cold before cutting it into layers.
- Preferably, once the molly cake is lukewarm, wrap it in plastic wrap and store it in the refrigerator until the next day. This will make it firmer and much easier to cut.
Thank you for visiting my blog and for your comments.
You can also follow me on my youtube channel