Chocolate decoration
Among the various methods available, tempering chocolate with Mycryo is undoubtedly the easiest and fastest way to achieve chocolate that is glossy, snappy, and releases easily from molds. It’s perfect for making Christmas chocolates, decorating entremets, or elevating a birthday cake.
This technique is perfect for enhancing a simple dessert, like a classic chocolate mousse cake. No need for the tedious tabling step anymore, that process of cooling chocolate on a work surface or over an ice bath, only to reheat it again to reach the ideal working temperature.
Table of Contents
What exactly is chocolate tempering?
As explained in the previous article on classic tempering, the goal of tempering (also known as pre-crystallization) is rooted in the molecular structure of cocoa butter. Cocoa butter is made up of a blend of fatty acids, each forming a different type of crystal.
Among these, only one crystal type has the ability to contract properly as it cools, the beta crystal. It’s also the only one that crystallizes at 27°C (80.6°F), the temperature at which it hardens. The other types crystallize below 25°C (77°F) and don’t provide the same shine or snap.
Tempering (or pre-crystallization) involves heating chocolate to melt all types of crystals (up to 50–55 °C for dark chocolate and 45 °C for milk or white chocolate), then cooling it down to the pre-crystallization temperature, but never below, to allow only the desirable Beta crystals to form.
Dropping the temperature too low could lead to the formation of less stable, non-contracting crystals. The chocolate is then gently reheated to make it more fluid again without disrupting its structure.
These Beta crystals can form naturally by following the proper tempering curve for each type of chocolate, or they can be introduced by seeding with already stable crystals, either finely chopped unmelted chocolate or Mycryo cocoa butter.
When done properly, this process ensures glossy, snappy chocolate that unmolds easily, no matter the type of mold used (plastic, metal, glass, or polycarbonate).
What is seed tempering?
Seed tempering means adding the right Beta crystals (see above) directly to melted chocolate, without following the full cooling curve.
There are two main methods:
With unmelted chocolate: Melt 2/3 of the chocolate, then add the remaining 1/3 finely chopped (or in pistoles) to lower the temperature and seed with stable crystals.
With Mycryo cocoa butter: Melt the chocolate, let it cool to 34-35 °C (93-95 °F), then add 1% Mycryo. Stir well and use immediately.
Both techniques help achieve even crystallization and keep the chocolate fluid for longer.
Video recipe
Tools needed for tempering and making decorations

- High-quality couverture chocolate (such as Valrhona or Cacao Barry)
- Thermometer (probe thermometer or infrared laser thermometer)
- One bowl and a saucepan
- Offset spatula
- Chocolate decorating comb
- Dough scraper
- Ruler
- Acetate sheet
- Guitar sheet (plastic transfer sheet)
- Parchment paper
- Tape or rubber band
Ingredients:
- High-quality couverture chocolate (such as Valrhona or Cacao Barry)
- Mycryo cocoa butter (1 g for every 100 g of chocolate)
Preparation steps :
Using unmelted (never previously used) chocolate
Melt 2/3 of the chocolate in a double boiler, following the melting curve for each type: 50-55°C (122-131°F) for dark chocolate, 45°C (113°F) for milk and white chocolate.
Add the remaining 1/3 of finely chopped chocolate or chocolate pistoles and stir until fully melted.
Use immediately. Maintain the working temperature: do not let it drop below 31°C (88°F) for dark chocolate, or 28-29°C (82-84°F) for milk and white chocolate.
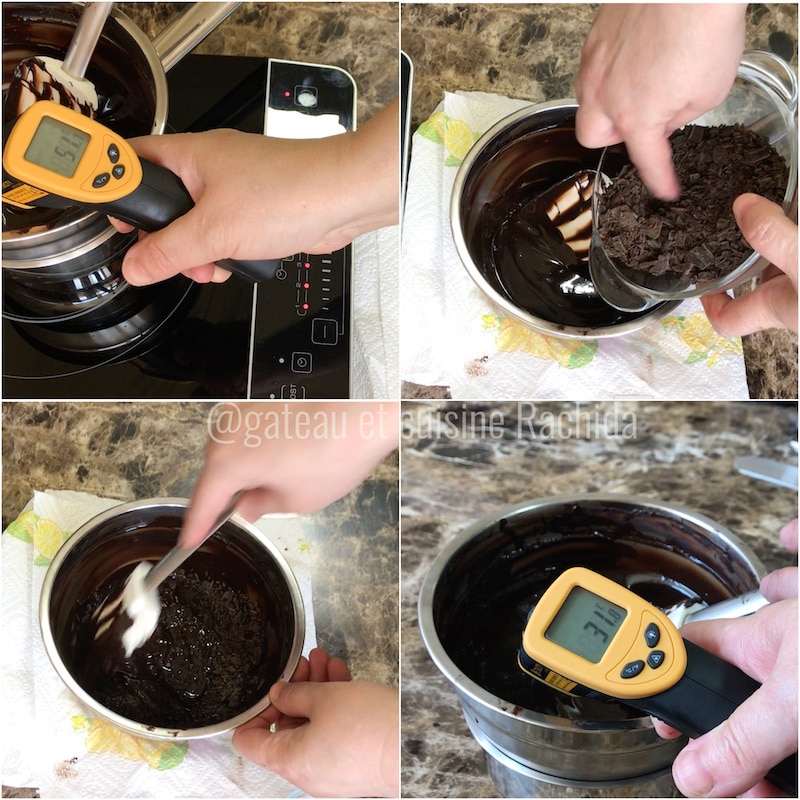
Using Mycryo Cocoa Butter
Melt the chocolate in a double boiler or microwave, without exceeding 50°C (122°F) for dark chocolate and 45°C (113°F) for milk, white, or colored chocolate.
Once melted, let the chocolate cool to 34-35°C (93-95°F) for dark chocolate and 33-34°C (91-93°F) for milk and white chocolate (refer to the temperature curve), stirring constantly by lifting and letting it fall back into the bowl.
When the chocolate reaches 34-35°C (93-95°F), add 3 g of Mycryo cocoa butter (1% for every 100 g of chocolate).
Stir well and use immediately to create your chocolate decorations. Keep the chocolate at its working temperature: do not let it drop below 31°C (88°F) for dark chocolate, or 28-29°C (82-84°F) for milk and white chocolate.
This method gives you a wider working range, making it easier to shape and work with your chocolate decorations.
Making chocolate decorations
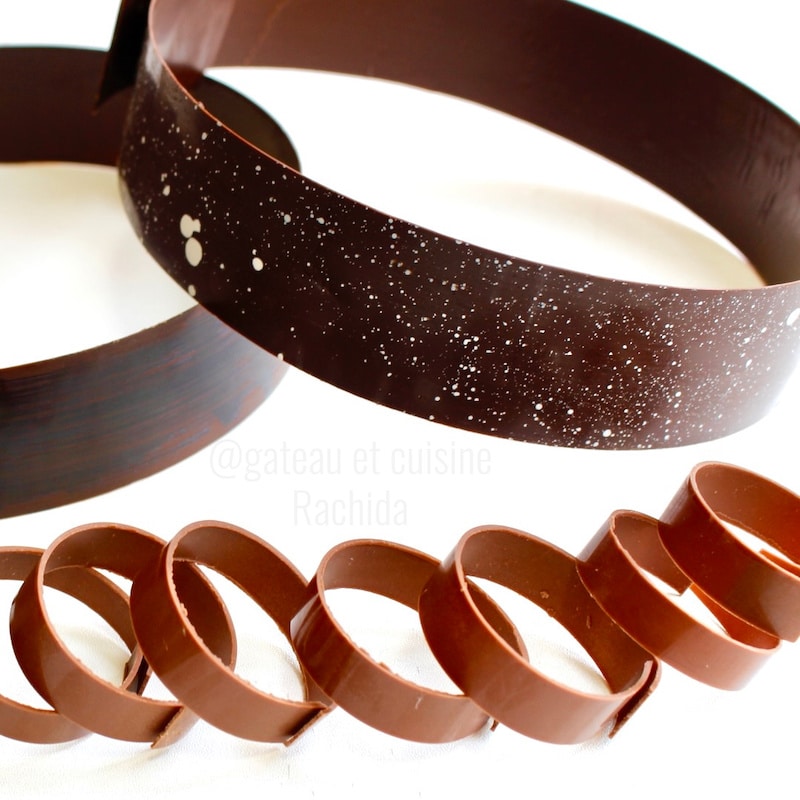
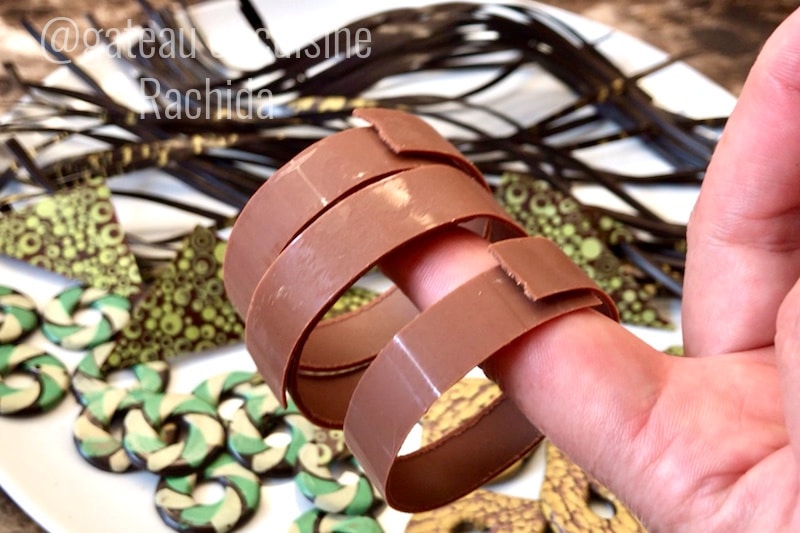
Chocolate Rings
Spread the tempered chocolate in a thin layer over an acetate sheet.
Use an offset spatula to smooth it out with back-and-forth motions. Remove any excess chocolate.
Lift the strip gently using the tip of a knife. Wipe the edges clean and set it aside.
Wait a moment, then move it again to a clean spot so the sides stay neat. Slide a knife underneath to prevent it from sticking to the work surface.
Scrape the table to recover any still-liquid chocolate. Keep the chocolate warm over a double boiler to maintain the working temperature.

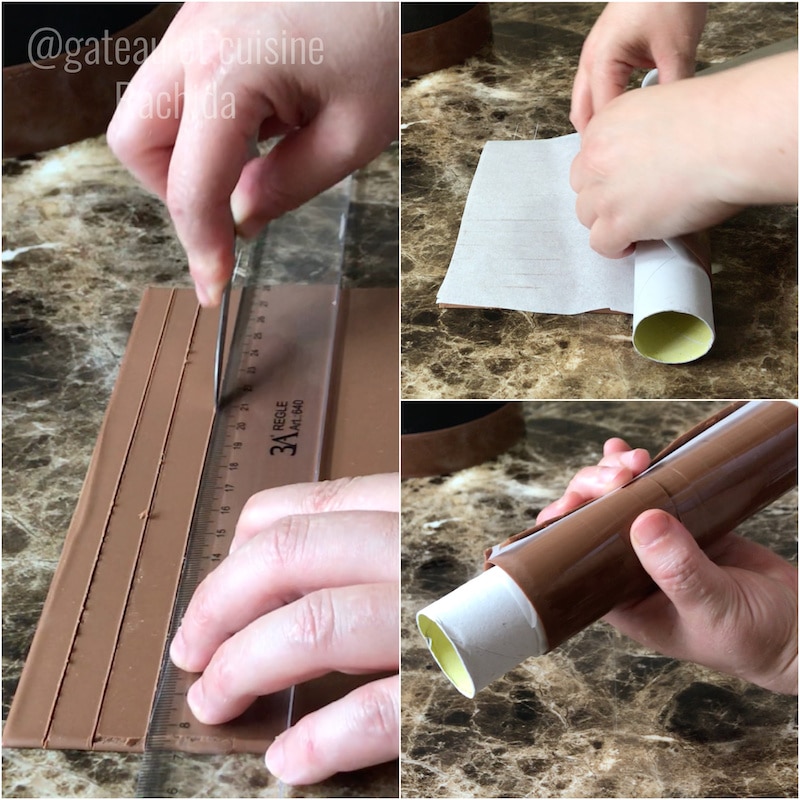
As soon as the chocolate becomes matte and doesn’t leave a mark when touched, cut bands of the desired width into the chocolate. Be careful not to cut through the acetate sheet.
Place a sheet of parchment paper on top and wrap it around a paper tube or rolling pin. Make sure the tube has the same diameter as the chocolate rings you want.
Secure the ends of the sheet with tape or use a rubber band.
Let set for a few hours or overnight.
Once the chocolate has set, remove the tape or rubber band, then gently remove the tube.
Carefully peel off the parchment paper to release the chocolate rings onto your work surface. (see video)

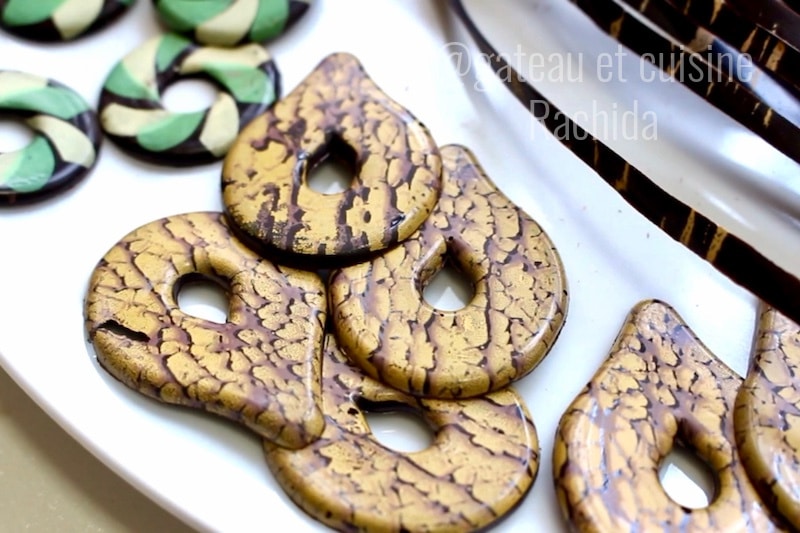
Small graphic decorations with transfer sheets
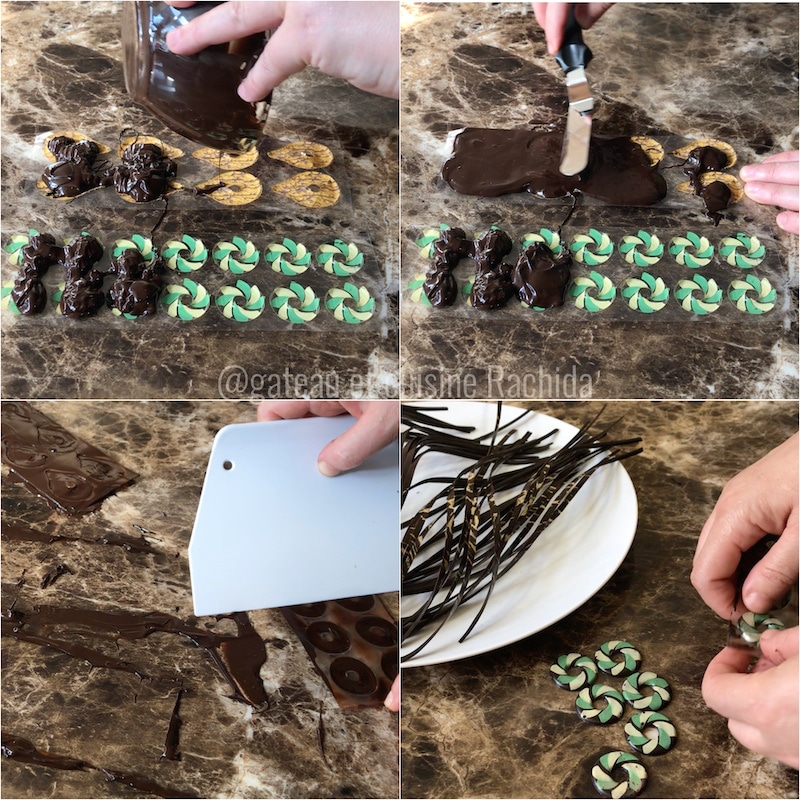
Pour a small amount of chocolate, just enough to fill the molds and spread it evenly.
Scrape off the excess chocolate. Let set before unmolding.
Speckled chocolate bands for entremets
You will need:
- Cocoa butter
- Fat-soluble food coloring for chocolate
- 2 identical acetate strips, each 2 cm longer than the circumference of the entremets ring
Melt the cocoa butter and mix in the coloring. Stir well. You can strain it through a fine sieve.
Dip a (new) toothbrush into the colored cocoa butter, then use a knife to flick the bristles, creating small droplets (speckles) of cocoa butter on the acetate strip.
Allow the cocoa butter to set before pouring tempered chocolate over the strip.
Spread the chocolate evenly across the strip using a back-and-forth motion. Lift the strip with the tip of a knife and set it aside.
Once the chocolate turns matte and no longer sticks to your fingers, place a second acetate strip on top.
Wrap the double strip around a ring of the same diameter. Tape the ends together. Let it set before unmolding and wrapping it around the entremets.
You can also use a brush to paint the strip with several colors. When doing so, pour white chocolate over the painted acetate.
 I hope you find this tutorial on tempering chocolate by seeding and these few chocolate decorations useful.
I’ll be doing another article soon on how to make chocolate spirals and pastilles.


Easy Chocolate Tempering Using Mycryo Seeding
INGREDIENTS
- High-quality couverture chocolate such as Valrhona or Cacao Barry
- Mycryo cocoa butter 1 g for every 100 g of chocolate
PREPARATION
Using unmelted (never previously used) chocolate
- Melt 2/3 of the chocolate in a double boiler, following the melting curve for each type: 50-55°C (122-131°F) for dark chocolate, 45°C (113°F) for milk and white chocolate.
- Add the remaining 1/3 of finely chopped chocolate or chocolate pistoles and stir until fully melted.
- Use immediately. Maintain the working temperature: do not let it drop below 31°C (88°F) for dark chocolate, or 28-29°C (82-84°F) for milk and white chocolate.
Using Mycryo Cocoa Butter
- Melt the chocolate in a double boiler or microwave, without exceeding 50°C (122°F) for dark chocolate and 45°C (113°F) for milk, white, or colored chocolate.
- Once melted, let the chocolate cool to 34-35°C (93-95°F) for dark chocolate and 33-34°C (91-93°F) for milk and white chocolate (refer to the temperature curve), stirring constantly by lifting and letting it fall back into the bowl.
- When the chocolate reaches 34-35°C (93-95°F), add 3 g of Mycryo cocoa butter (1% for every 100 g of chocolate).
- Stir well and use immediately to create your chocolate decorations. Keep the chocolate at its working temperature: do not let it drop below 31°C (88°F) for dark chocolate, or 28-29°C (82-84°F) for milk and white chocolate.
- This method gives you a wider working range, making it easier to shape and work with your chocolate decorations.
Making chocolate decorations
- Chocolate Rings
- Spread the tempered chocolate in a thin layer over an acetate sheet.
- Use an offset spatula to smooth it out with back-and-forth motions. Remove any excess chocolate.
- Lift the strip gently using the tip of a knife. Wipe the edges clean and set it aside.
- Wait a moment, then move it again to a clean spot so the sides stay neat. Slide a knife underneath to prevent it from sticking to the work surface.
- Scrape the table to recover any still-liquid chocolate. Keep the chocolate warm over a double boiler to maintain the working temperature.
- As soon as the chocolate becomes matte and doesn’t leave a mark when touched, cut bands of the desired width into the chocolate. Be careful not to cut through the acetate sheet.
- Place a sheet of parchment paper on top and wrap it around a paper tube or rolling pin. Make sure the tube has the same diameter as the chocolate rings you want.
- Secure the ends of the sheet with tape or use a rubber band. Let set for a few hours or overnight.
- Once the chocolate has set, remove the tape or rubber band, then gently remove the tube.
- Carefully peel off the parchment paper to release the chocolate rings onto your work surface. (see video)
- Small graphic decorations with transfer sheets
- Pour a small amount of chocolate, just enough to fill the molds and spread it evenly.
- Scrape off the excess chocolate. Let set before unmolding.
- Speckled chocolate bands for entremet
- You will need:Cocoa butterFat-soluble food coloring for chocolate2 identical acetate strips, each 2 cm longer than the circumference of the entremets ring
- Melt the cocoa butter and mix in the coloring. Stir well. You can strain it through a fine sieve.
- Dip a (new) toothbrush into the colored cocoa butter, then use a knife to flick the bristles, creating small droplets (speckles) of cocoa butter on the acetate strip.
- Allow the cocoa butter to set before pouring tempered chocolate over the strip.
- Spread the chocolate evenly across the strip using a back-and-forth motion. Lift the strip with the tip of a knife and set it aside.
- Once the chocolate turns matte and no longer sticks to your fingers, place a second acetate strip on top.
- Wrap the double strip around a ring of the same diameter. Tape the ends together. Let it set before unmolding and wrapping it around the entremets.
- You can also use a brush to paint the strip with several colors. When doing so, pour white chocolate over the painted acetate.
- I hope you find this tutorial on tempering chocolate by seeding and these few chocolate decorations useful.
- I'll be doing another article soon on how to make chocolate spirals and pastilles.