Homemade pie crust that’s buttery, crispy, and slightly flaky, a little richer than a classic shortcrust pastry. Very simple and quick to make, it’s ready in less than 10 minutes for a perfect pie base. Made with a few basic ingredients, it offers an incomparable taste and a much better texture than store-bought crusts. Ideal for sweet or savory pies.
Making a pie still intimidates many beginner bakers, mainly because of the fear of messing up the base: the pie crust. There are many recipes, each with its own characteristics, which is why I’ve dedicated articles to the fundamentals like pâte sucree, pâte brisée, and pâte sablee, all accompanied by videos.
Added to this list is this pie crust, which contains more butter and is made using the rubbing-in method. It produces a dough that is very easy to roll out, doesn’t stick, and is simple to handle. How you work the dough will determine whether the crust is slightly flaky.
I’ll show you how to prepare it, line your pan, and create a beautiful edge or crimping, like you might see on pumpkin or apple pies. I’ll also show you how to blind bake it for a fully cooked, golden, and very crispy crust.
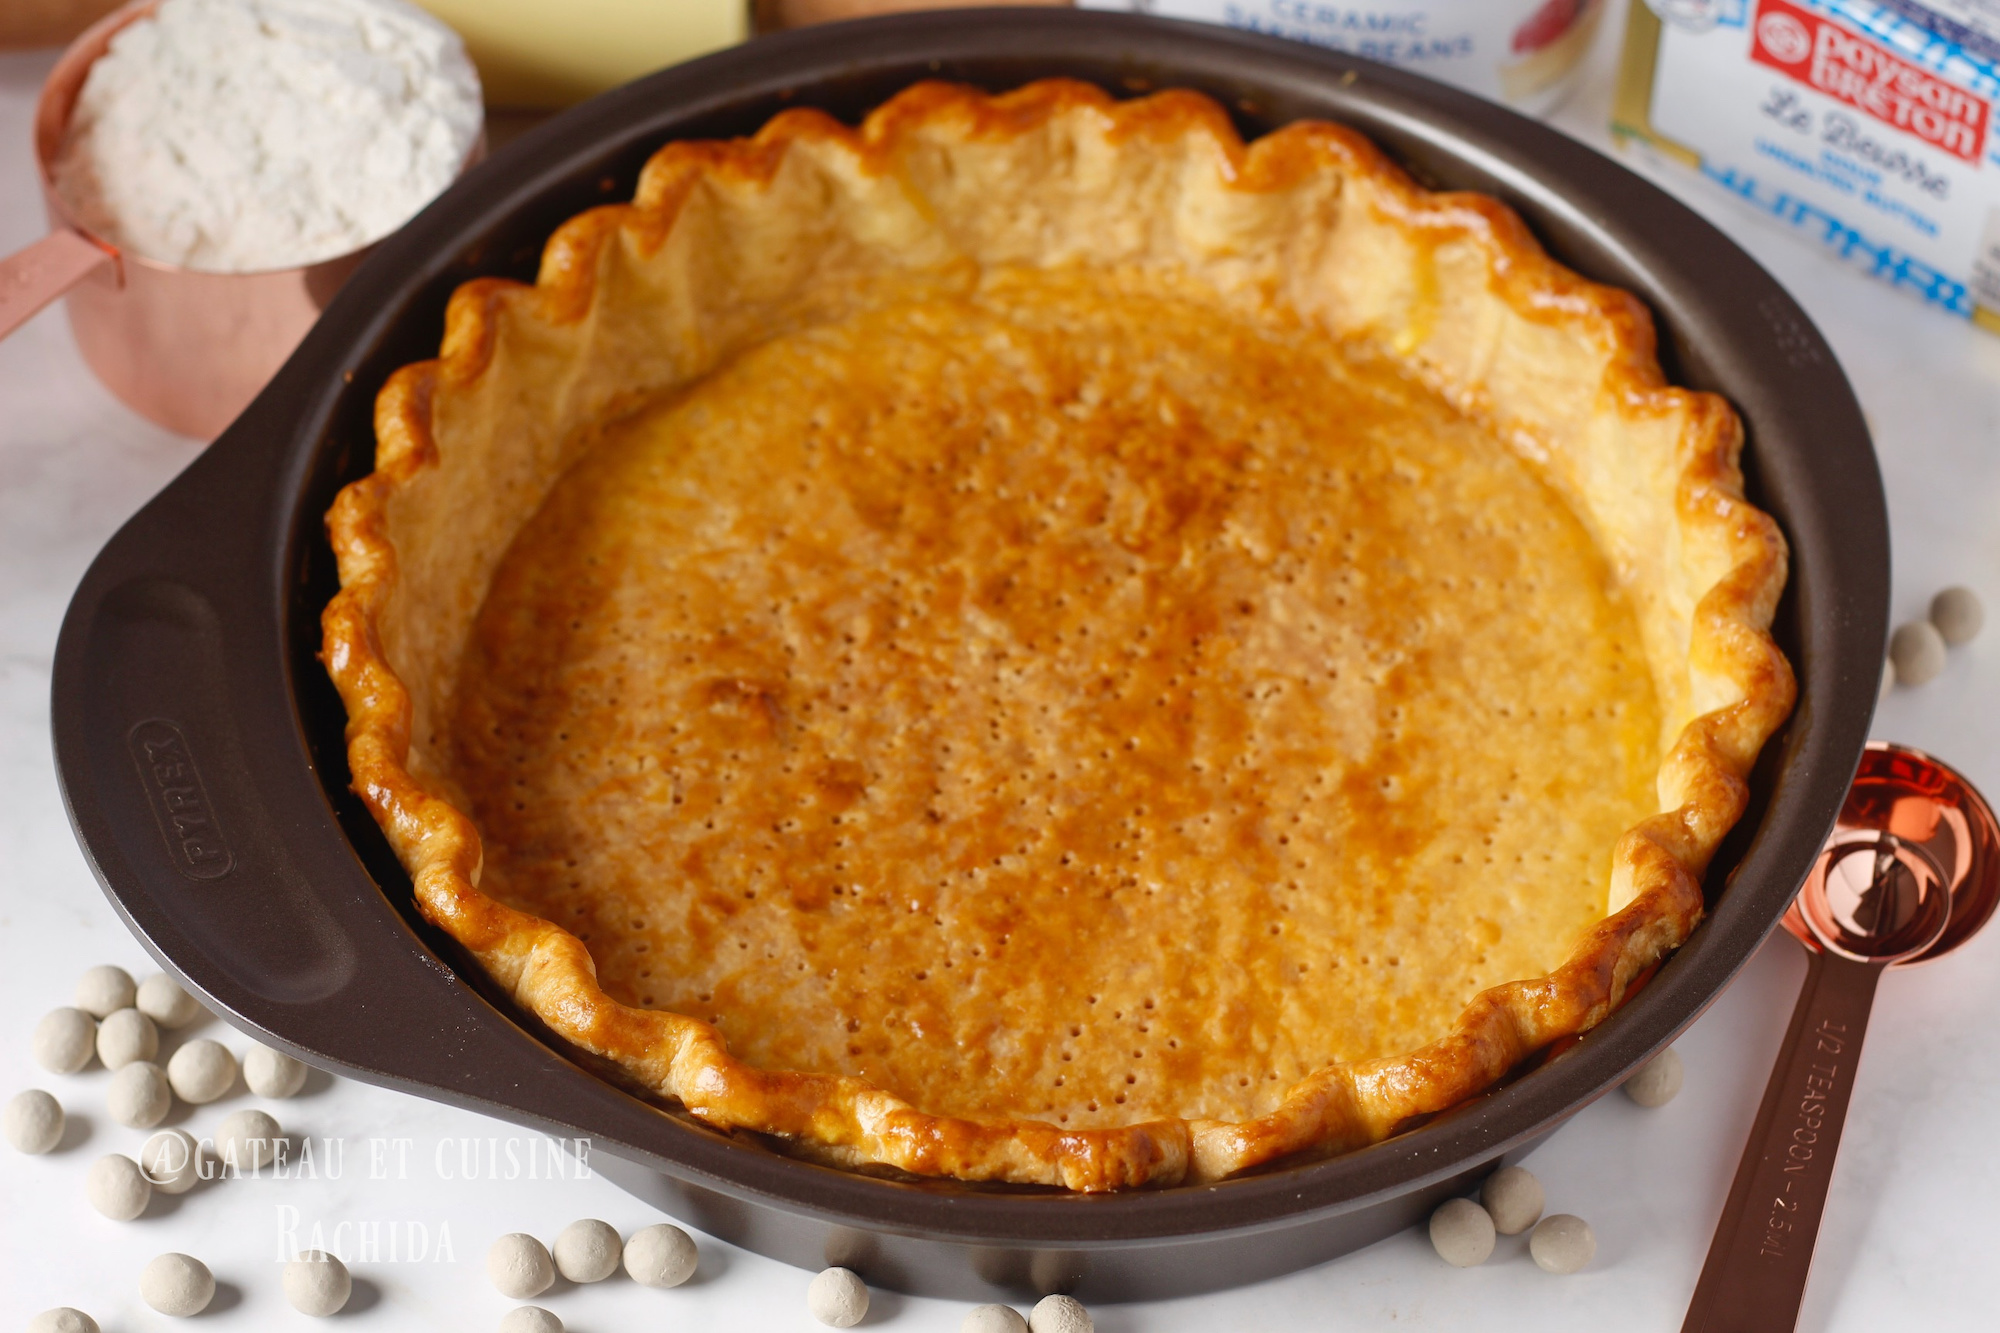
Table of Contents
Tips for Making a Perfect Pie Crust
Getting a perfect pie crust starts with a few simple steps. Letting the dough rest allows the gluten to relax and the butter to firm up, making it easier to handle and preventing the crust from shrinking during baking.
1. Use cold butter for a tender, flaky dough that’s easy to work with.
2. Pulse the butter and flour quickly in a food processor for under 30 seconds, or rub the butter into the flour by hand until you get very small crumbs. Larger crumbs will give the dough a slightly flaky texture.
3. Add the cold water in two parts: pour in two-thirds first and mix just enough for the dough to start coming together, then add the remaining water as needed (about 50-70 ml depending on the flour).
4. Turn the dough out onto a work surface. Press it forward gently with the palm of your hand, fold it over itself, and repeat once or twice to bring it together without kneading. Form it into a ball, flatten slightly into a disk, wrap in plastic, and refrigerate for at least 2 hours.
5. Roll the dough out on a lightly floured surface. There’s no need to use parchment paper—the dough is perfect, non-sticky, and easy to work with.
6. Line the pan with the dough, pressing it gently against the sides. Chill in the refrigerator or freezer for a few minutes before baking to prevent the edges from collapsing.
7. Trim the edges. Once the dough is in the pan, you can either cut off the excess for a classic crust or leave about 2 cm (¾ inch) overhang. Fold the overhang over itself to create a slightly thicker edge, which you can decorate with your fingers or a fork. For a cleaner finish, you can also level the edges by running a knife horizontally along the rim for a perfectly even border.
To shape the edge, place your thumb and index finger over the dough, about 2 cm (¾ inch) apart, and use the thumb of your other hand to press the dough from the inside out between your fingers.
Ingredients for a 26 Cm (10-Inch) Pie Crust
Note: Find the printable recipe card at the end of the article.
You will have some leftover dough that you can use to make cookies.
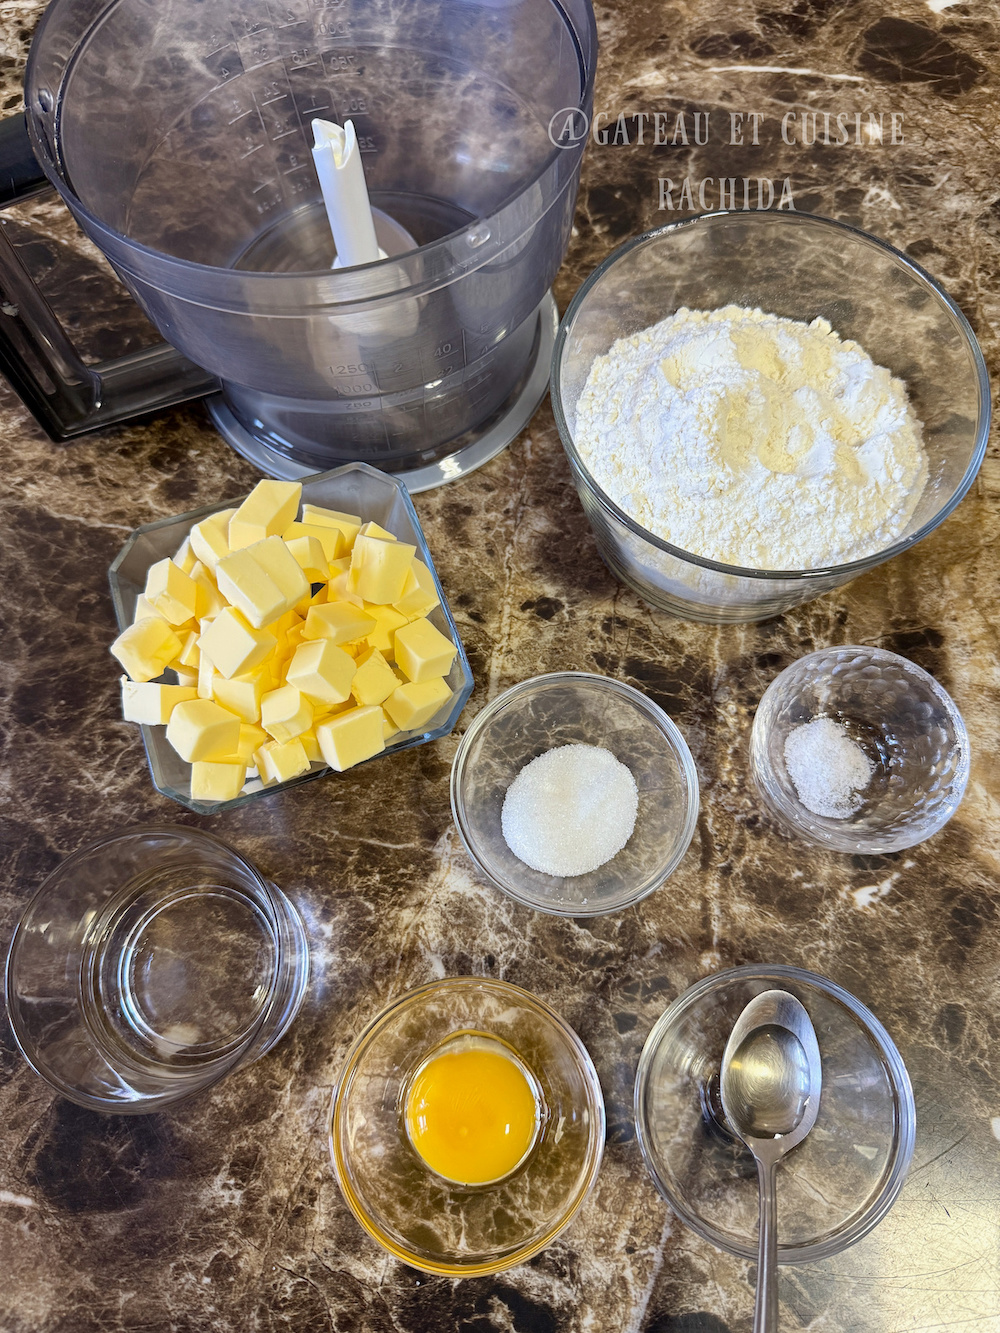
- 300 g flour (10.5 oz)
- 180 g cold butter, cut into small cubes (6.3 oz)
- 1 level tablespoon sugar (optional, the dough is more flavorful; do not add for a savory pie)
- 1/2 teaspoon salt
- 1 egg yolk (optional, for a more crumbly and flavorful dough)
- 1/2 teaspoon vinegar (optional, helps with preservation)
- 60 ml cold water (more or less depending on flour absorption and butter quality) (2 fl oz)
For the Egg Wash (Optional)
- 1 egg yolk
- 1/2 teaspoon milk
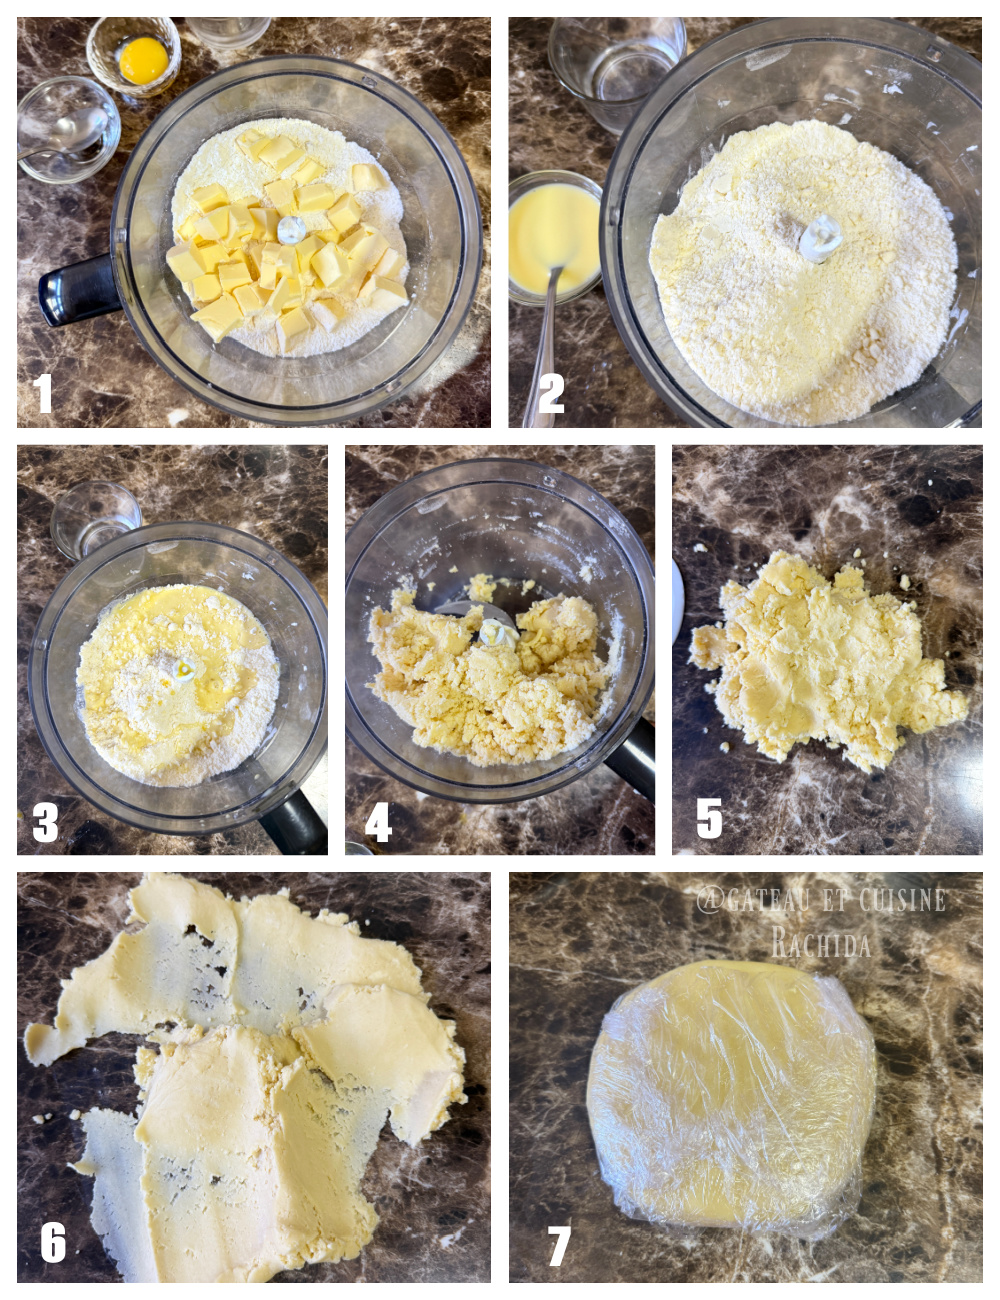
How to Prepare a Foolproof Pie Crust
This takes one to two minutes in a food processor, or about five minutes by hand.
Prepare the dough
1. Place the flour, cold diced butter, sugar, and salt in the food processor bowl and pulse until the mixture resembles coarse sand.
2. Whisk the egg with two-thirds of the water and the vinegar. Pour into the food processor and pulse until the dough just starts to come together. Do not worry about forming a ball.
3. Turn the dough out onto a work surface. Using the palm of your hand, press it down and push it forward, fold it back, and repeat once or twice. Gather the dough into a ball, flatten it slightly into a disc, and wrap it in plastic wrap.
Note: To keep the dough slightly flaky, skip the pressing and folding step.
4. Let it rest in the refrigerator for at least two hours to let the gluten relax and to prevent the dough from shrinking when rolled out or collapsing during baking.
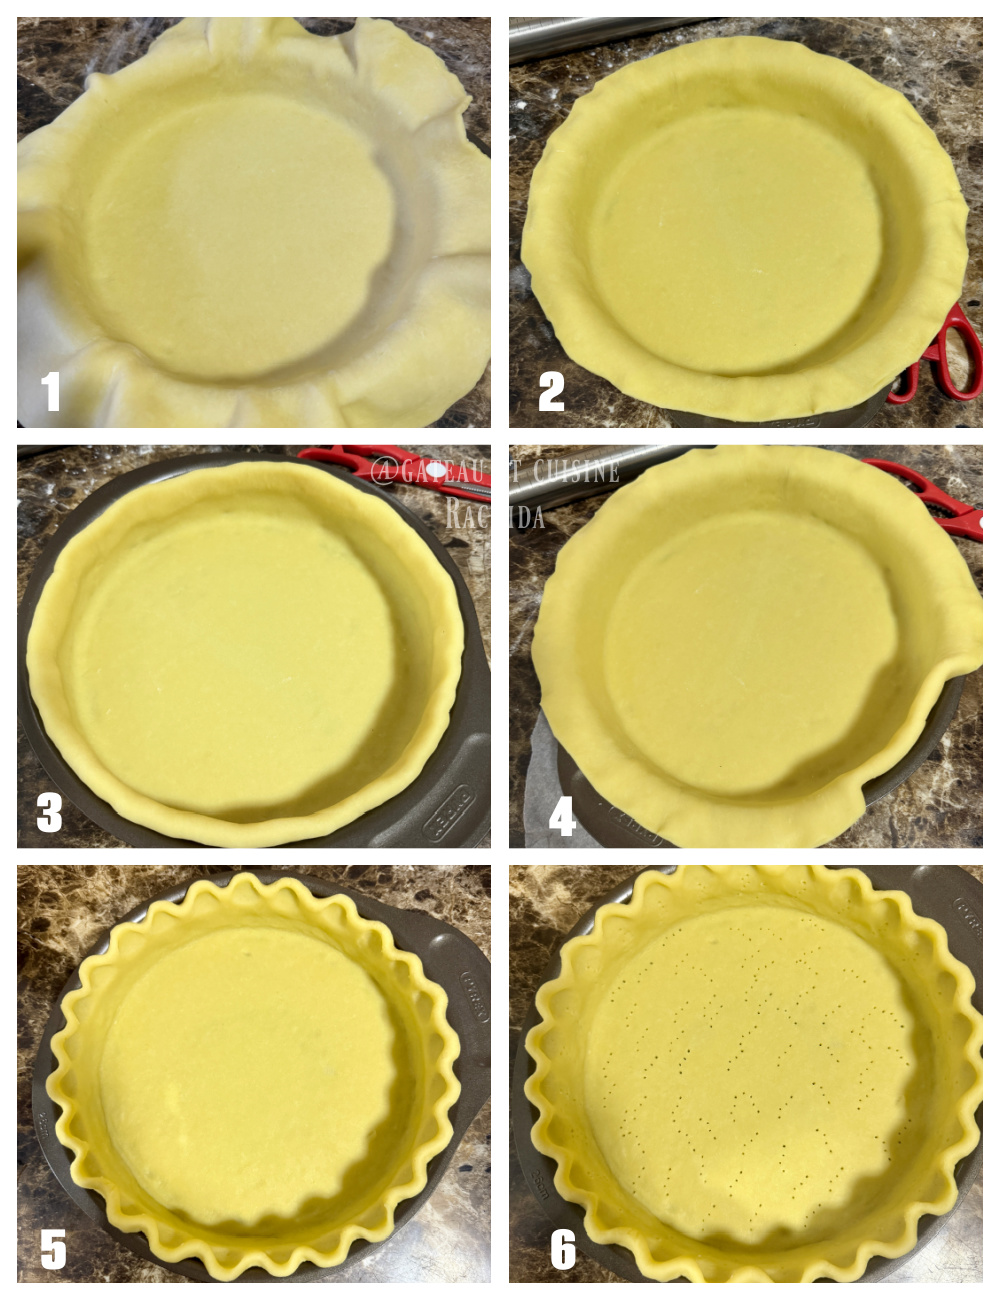
Roll out the Dough and Line the Pan
1. Remove the dough from the refrigerator and roll it out on a lightly floured work surface. Lightly flour the top as well if it starts to stick to the rolling pin.
2. Roll the dough to about 3 mm (1/8 inch) thick, giving it a quarter turn regularly to keep it even and round.
3.Form a disc larger than the diameter of the pan, keeping in mind the height of the sides and leaving extra dough if you want to create a thicker crimped edge.
Note: If the dough becomes too soft as you roll it, transfer it to a baking sheet lined with parchment paper and chill it in the refrigerator for about 15 minutes.
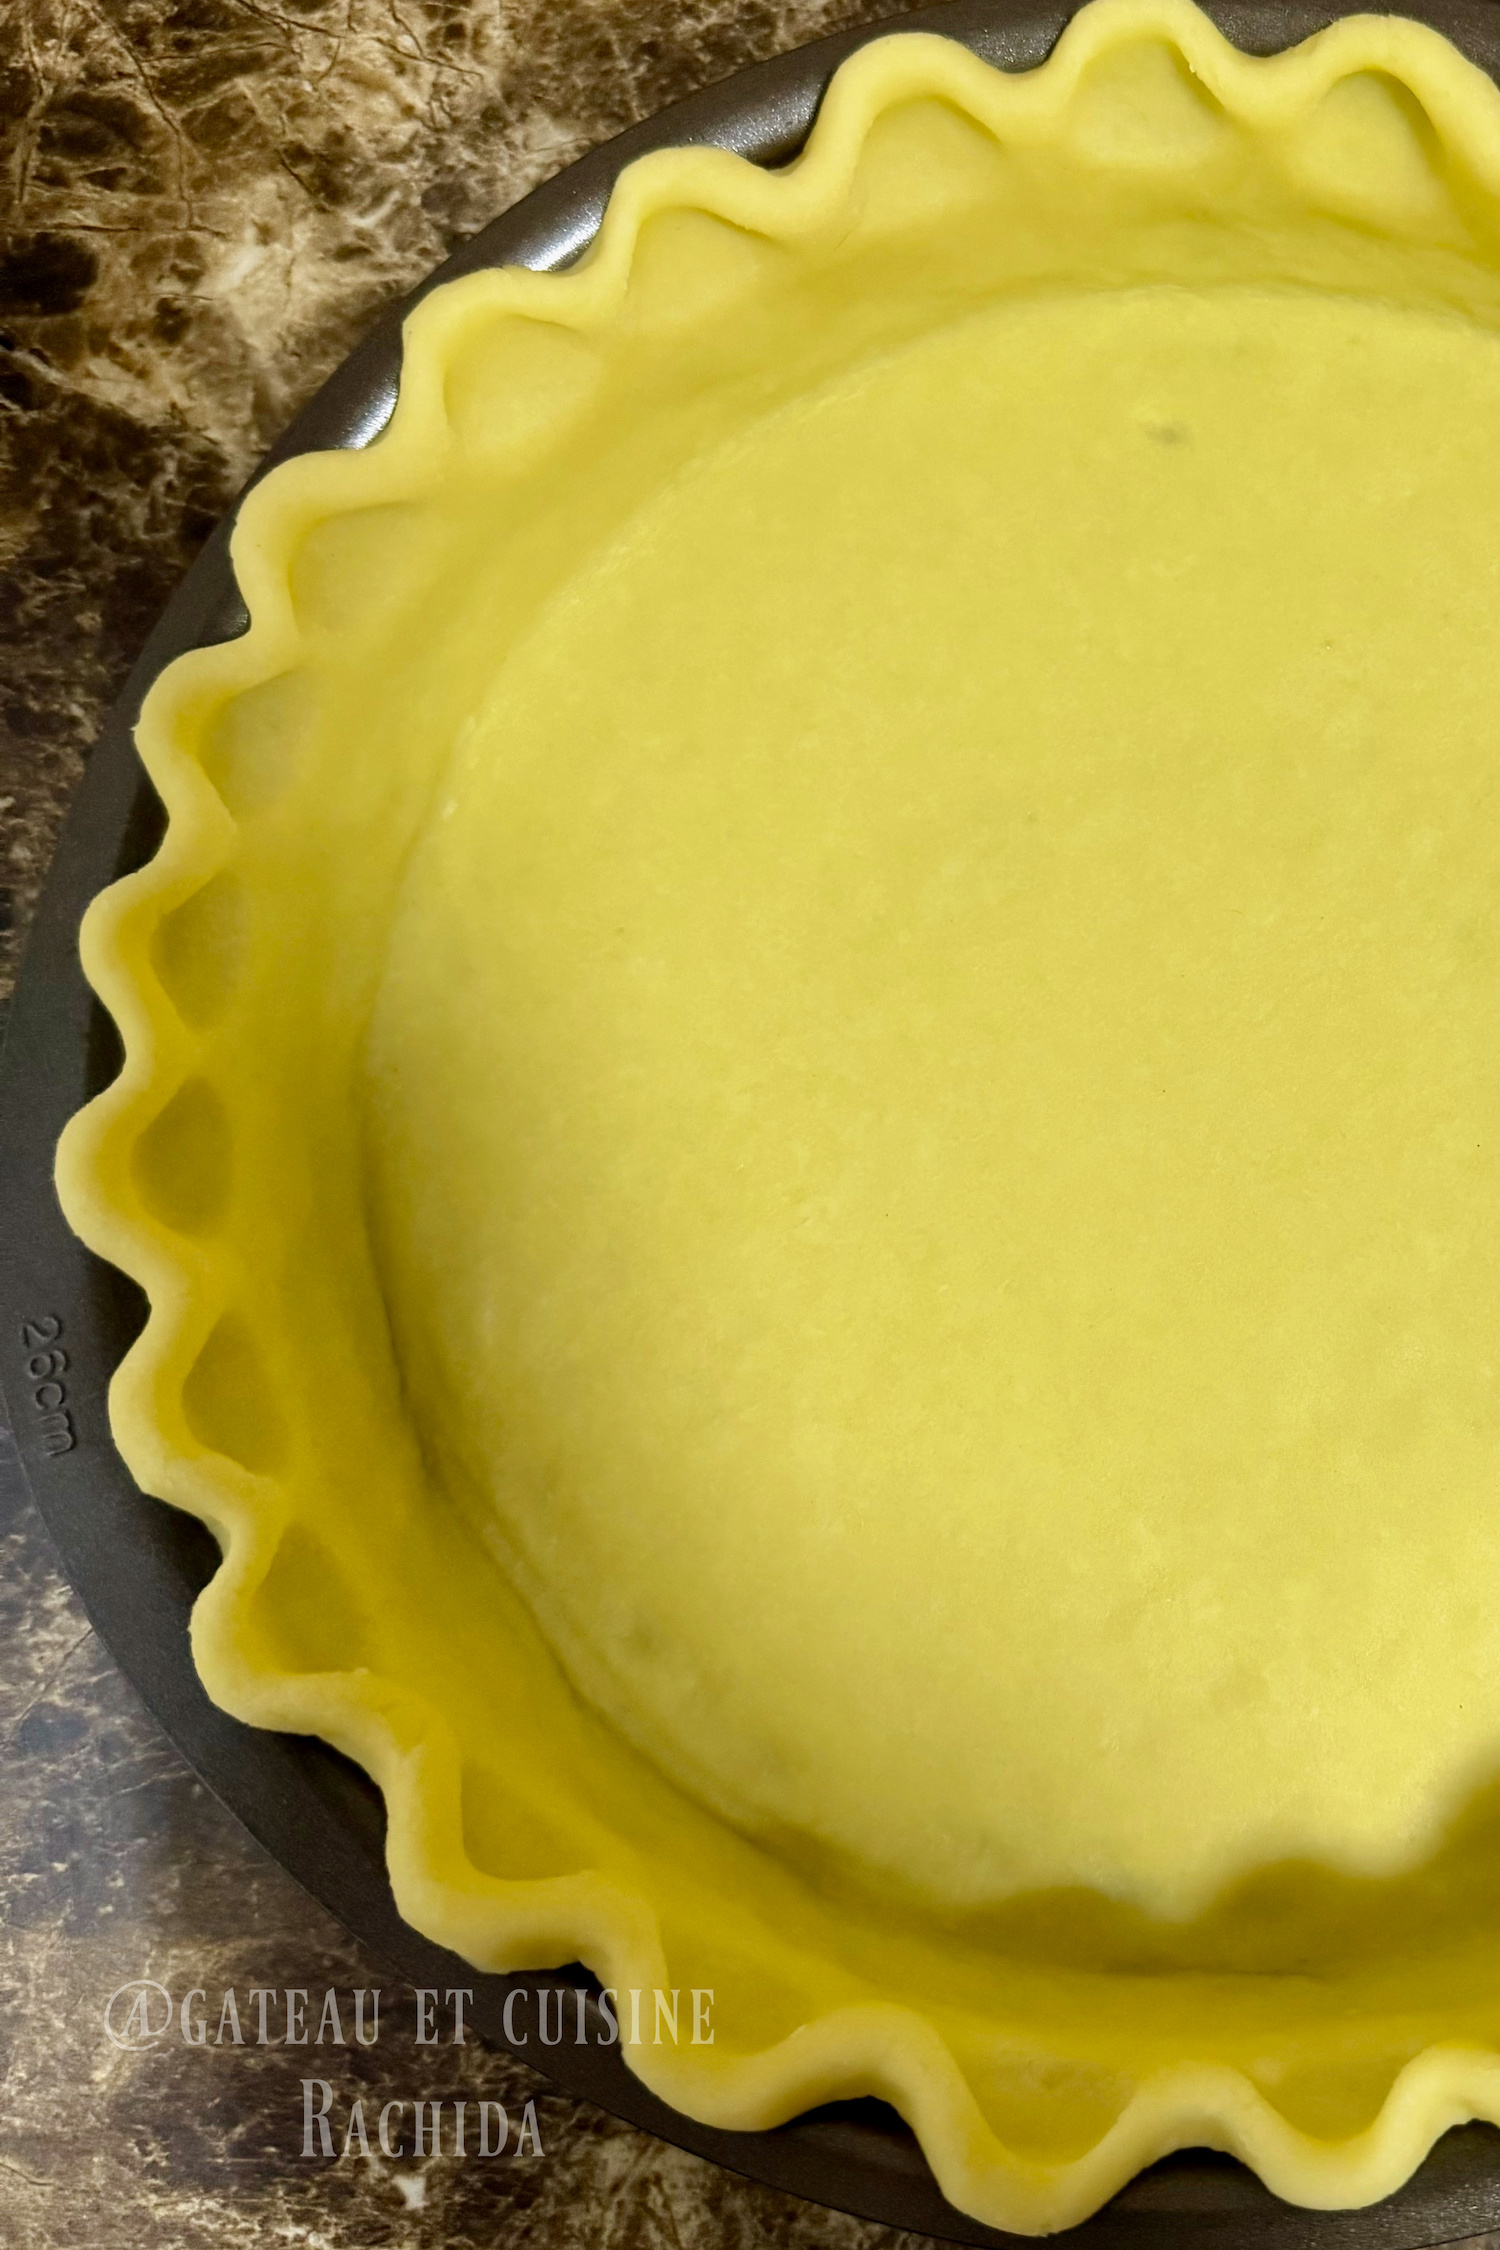
4.Fold the dough in half and place it in the center of the pan, then gently unfold it and ease it into the bottom and sides without stretching or tearing it.

5. Press the dough against the sides and bottom of the pan, making sure to remove any air bubbles or creases.
6. Trim the excess dough flush with the pan for a classic crust, or leave about 2 cm (3/4 inch) overhanging. Fold this excess back onto itself toward the inside of the pan to form a slightly thicker edge.
7. Decorate the edge with your fingers, a crimper, or a fork, depending on the style you want. For the hand crimping technique, place your index finger and thumb on the outside of the crust and press from the inside with the thumb of your other hand.
8. Prick the bottom and sides of the dough with a fork, then place the pan in the refrigerator or freezer for a few minutes to firm up the dough before baking.
Note: You can fill and bake the pie at this stage, but I recommend giving the crust at least a partial bake until it turns lightly golden. It really makes a difference in flavor.
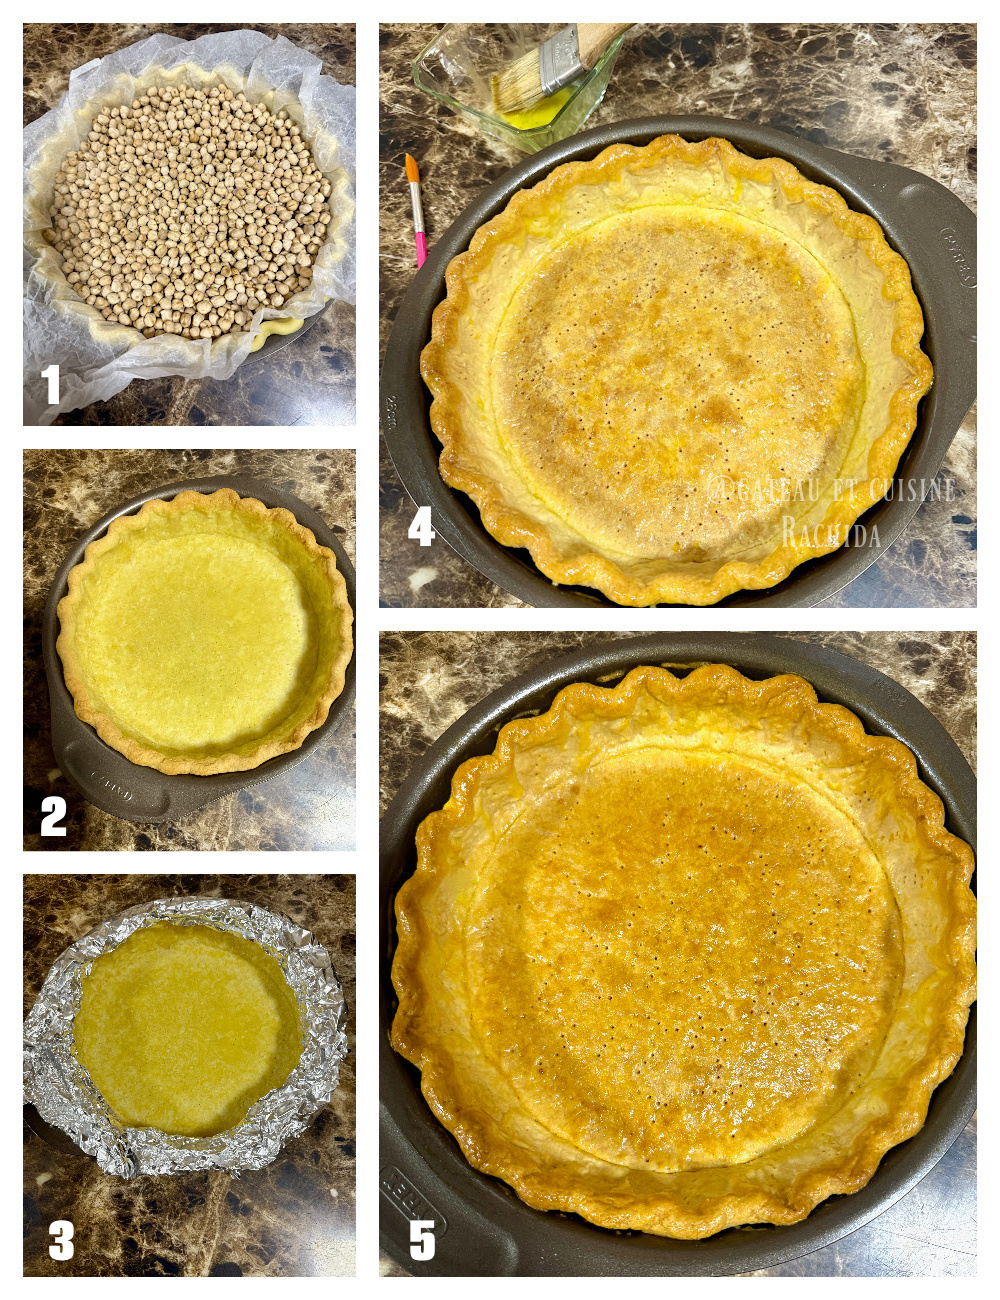
Blind Baking
1. Preheat the oven to 190°C (375°F) on conventional heat.
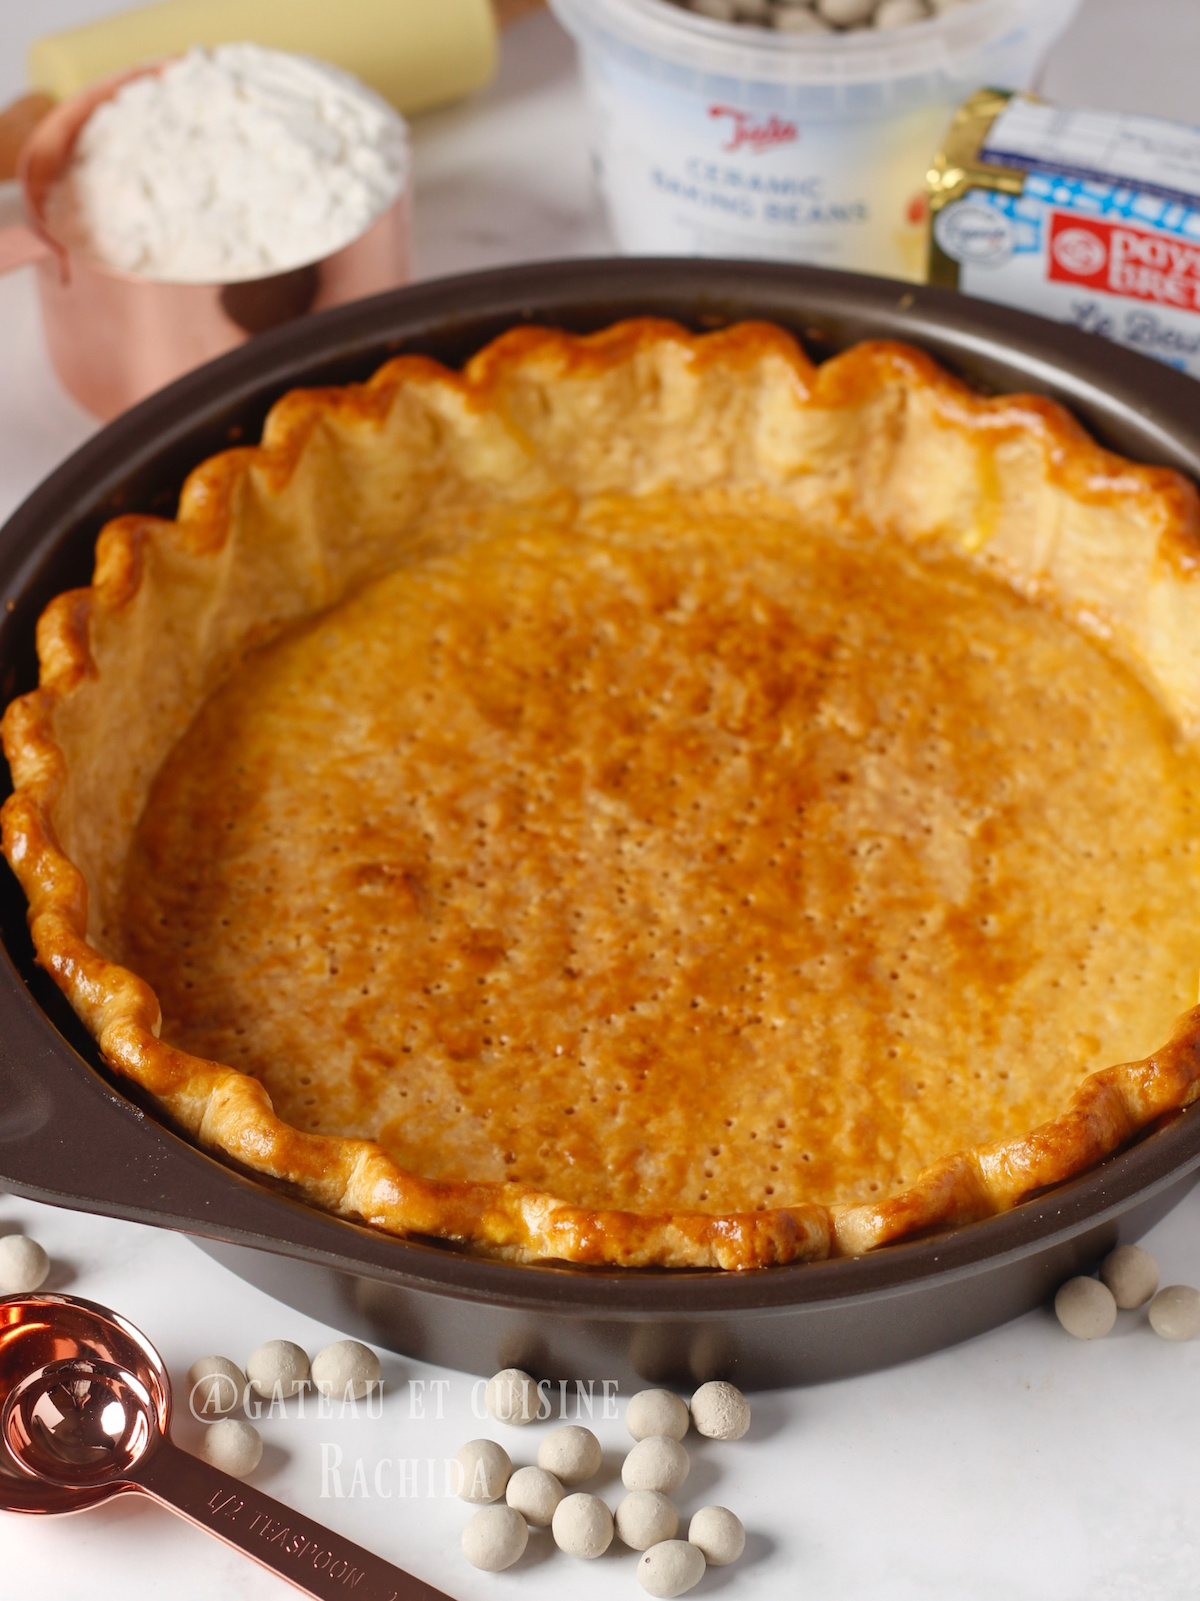
2. Place a crumpled piece of parchment paper on the dough. This helps it fit snugly into the shape of the pan. Add pie weights, chickpeas, rice, or any other legume on top.
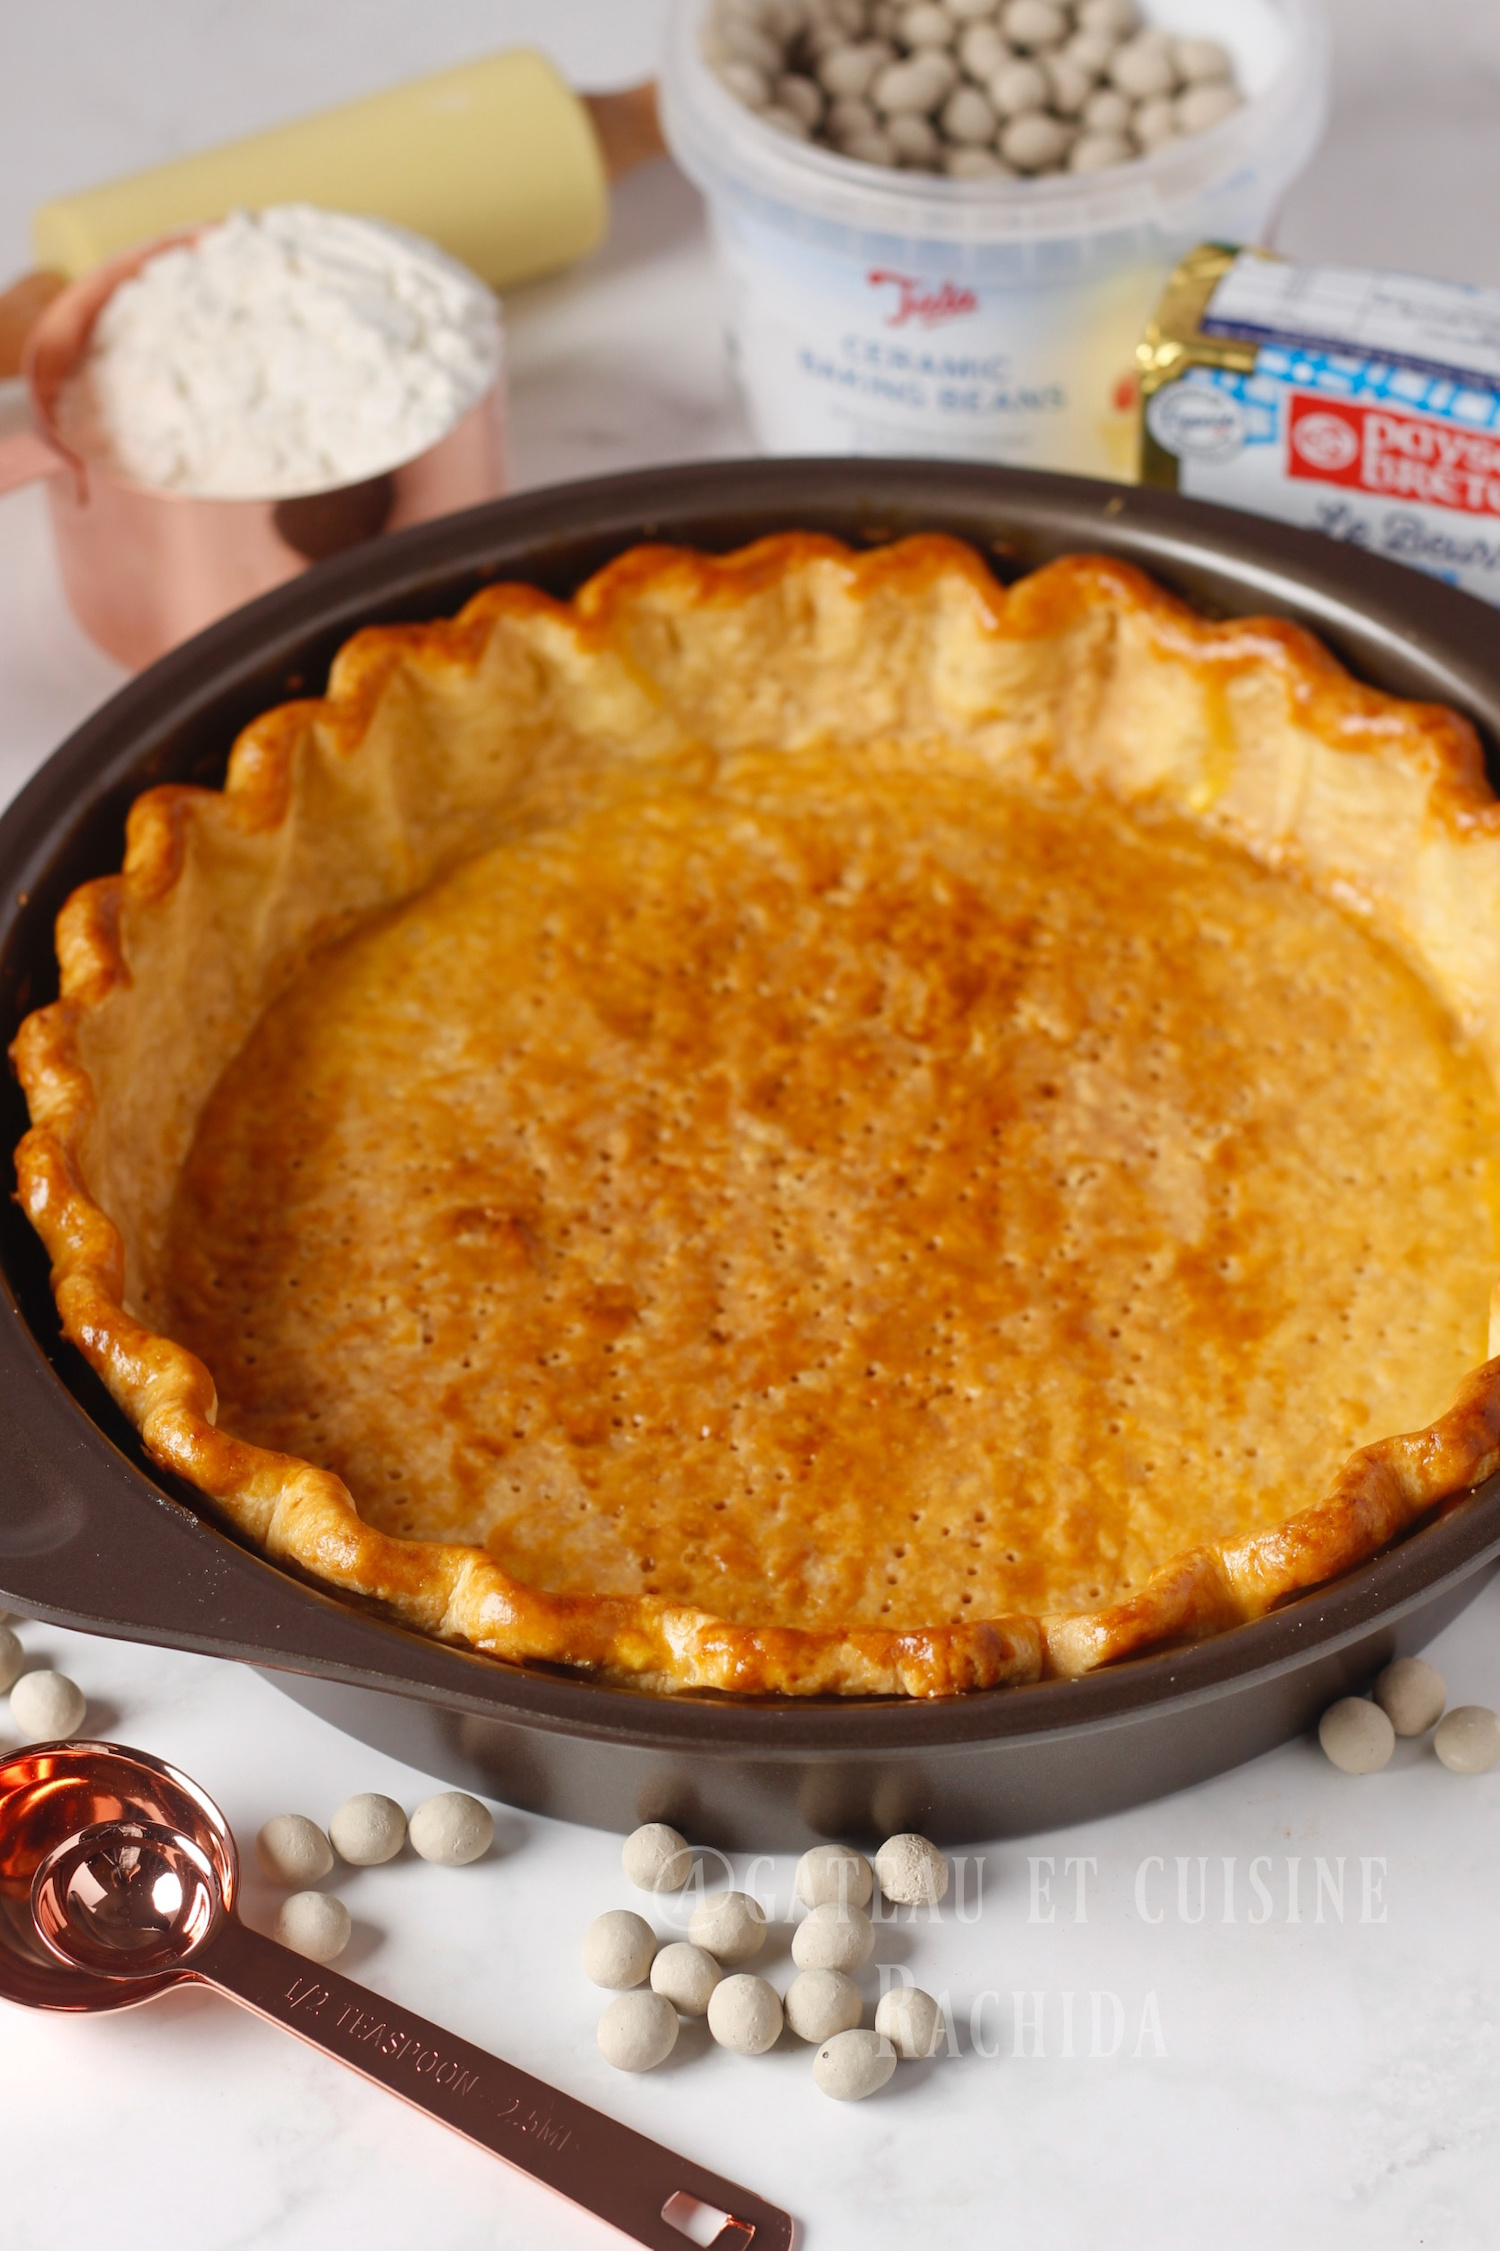
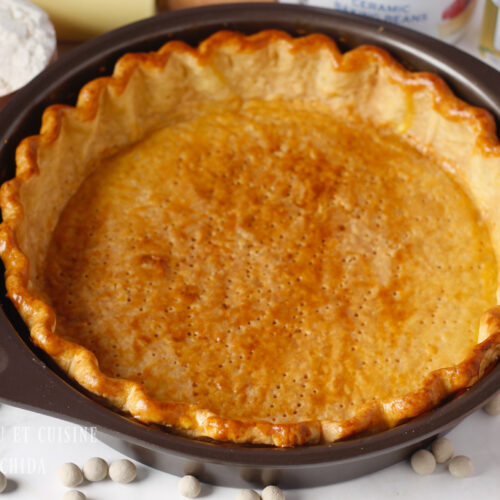
3. Bake for about 20 minutes, until the edges begin to turn lightly golden. Carefully remove the weights along with the parchment paper. Return the crust to the oven and finish baking until it is lightly golden, or fully baked depending on the filling, for a thoroughly cooked and very crispy crust.
Full baking takes about 50 minutes.
4. Lightly brown the bottom and edges about 10 minutes before the end of baking. Brush with an egg yolk mixed with a few drops of milk. This helps protect the crust from the moisture of the filling and gives a nice shine to the edges, if you’ve created one.
Note: If the edges start to brown before the bottom, cover them with a strip of aluminum foil to prevent burning.
How to Store Pie Dough and Pie Crust
Raw Dough: Wrap the dough in plastic wrap and store in the refrigerator for up to 2–3 days. For longer storage, freeze the dough as a disc or ball, wrapped in plastic and placed in a freezer bag, for up to 2 months. Thaw in the refrigerator before using.
Pre-baked Pie Crust: Let the crust cool completely, then wrap in plastic wrap or store in an airtight container. It will keep for 2–3 days in the refrigerator or up to 1 month in the freezer.
Easy Homemade Pie Crust and Blind Baking
INGREDIENTS
- You will have some leftover dough that you can use to make cookies.
- 300 g flour
- 180 g cold butter cut into small cubes
- 1 level tablespoon sugar optional, the dough is more flavorful; do not add for a savory pie
- 1/2 teaspoon salt
- 1 egg yolk optional, for a more crumbly and flavorful dough
- 1/2 teaspoon vinegar optional, helps with preservation
- 60 ml cold water more or less depending on flour absorption and butter quality
- For the Egg Wash Optional
- 1 egg yolk
- 1/2 teaspoon milk
PREPARATION
Prepare the dough
- Place the flour, cold diced butter, sugar, and salt in the food processor bowl and pulse until the mixture resembles coarse sand.
- Whisk the egg with two-thirds of the water and the vinegar. Pour into the food processor and pulse until the dough just starts to come together. Do not worry about forming a ball.
- Turn the dough out onto a work surface. Using the palm of your hand, press it down and push it forward, fold it back, and repeat once or twice. Gather the dough into a ball, flatten it slightly into a disc, and wrap it in plastic wrap.
- Note: To keep the dough slightly flaky, skip the pressing and folding step.
- Let it rest in the refrigerator for at least two hours to let the gluten relax and to prevent the dough from shrinking when rolled out or collapsing during baking.
Roll out the Dough and Line the Pan
- Remove the dough from the refrigerator and roll it out on a lightly floured work surface. Lightly flour the top as well if it starts to stick to the rolling pin.
- Roll the dough to about 3 mm (1/8 inch) thick, giving it a quarter turn regularly to keep it even and round.
- Form a disc larger than the diameter of the pan, keeping in mind the height of the sides and leaving extra dough if you want to create a thicker crimped edge.
- Note: If the dough becomes too soft as you roll it, transfer it to a baking sheet lined with parchment paper and chill it in the refrigerator for about 15 minutes.
- Fold the dough in half and place it in the center of the pan, then gently unfold it and ease it into the bottom and sides without stretching or tearing it.
- Press the dough against the sides and bottom of the pan, making sure to remove any air bubbles or creases.
- Trim the excess dough flush with the pan for a classic crust, or leave about 2 cm (3/4 inch) overhanging. Fold this excess back onto itself toward the inside of the pan to form a slightly thicker edge.
- Decorate the edge with your fingers, a crimper, or a fork, depending on the style you want. For the hand crimping technique, place your index finger and thumb on the outside of the crust and press from the inside with the thumb of your other hand.
- Prick the bottom and sides of the dough with a fork, then place the pan in the refrigerator or freezer for a few minutes to firm up the dough before baking.
- Note: You can fill and bake the pie at this stage, but I recommend giving the crust at least a partial bake until it turns lightly golden. It really makes a difference in flavor.
Blind Baking
- Preheat the oven to 190°C (375°F) on conventional heat.
- Place a crumpled piece of parchment paper on the dough. This helps it fit snugly into the shape of the pan. Add pie weights, chickpeas, rice, or any other legume on top.
- Bake for about 20 minutes, until the edges begin to turn lightly golden. Carefully remove the weights along with the parchment paper. Return the crust to the oven and finish baking until it is lightly golden, or fully baked depending on the filling, for a thoroughly cooked and very crispy crust.
- Full baking takes about 50 minutes.
- Lightly brown the bottom and edges about 10 minutes before the end of baking. Brush with an egg yolk mixed with a few drops of milk. This helps protect the crust from the moisture of the filling and gives a nice shine to the edges, if you’ve created one.
- Note: If the edges start to brown before the bottom, cover them with a strip of aluminum foil to prevent burning.
Thank you for your visit and your comments