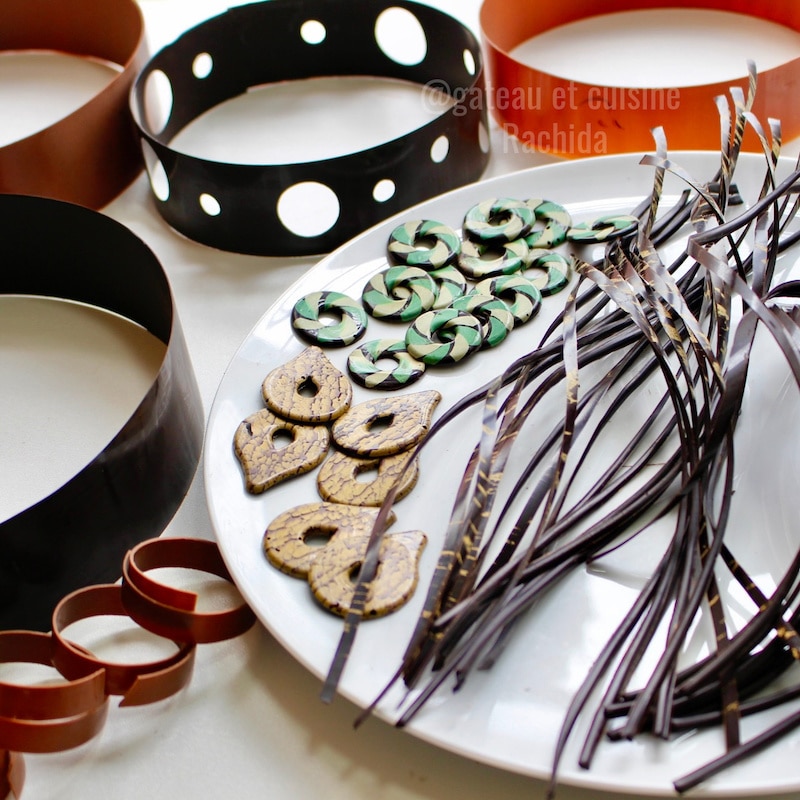
Chocolate decorations made with tempered chocolate
Tempering chocolate is a crucial technique that gives it a smooth, glossy finish, a satisfying snap, and easy unmolding. Knowing how to temper chocolate properly involves carefully melting and cooling it to control cocoa butter crystals. Whether you’re making molded chocolates or decorative elements like those in the praline mousse cake, it ensures the perfect texture and a professional look.
Poorly tempered chocolate will look dull, feel sticky to the touch, melt too quickly, and be difficult to unmold. In contrast, well-tempered chocolate creates thin, glossy shells that release easily from silicone or polycarbonate molds. It also allows you to make beautiful chocolate rings and other decorative elements for your mousse cakes or desserts.
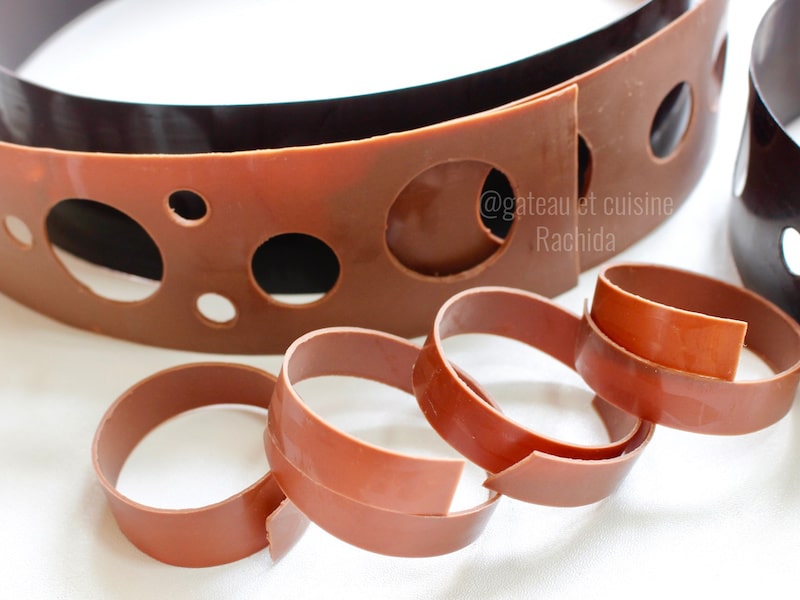
Table of Contents
How to Temper Chocolate ?
Tempering chocolate is a key step to achieving a glossy, snappy, and stable finish that unmolds perfectly. It also allows you to create a wide range of chocolate decorations: rings, tiles, twists, bands, shells, and more.
Essential Rules to Follow :
- No water contact: Even a drop of water can cause the chocolate to seize, making it thick and unusable for tempering.
- Use a thermometer: It’s essential for accurately monitoring each temperature stage.
- Choose high-quality couverture chocolate: Preferably in callets (chips), or finely chopped if using a bar.
- Don’t temper less than 300 g of chocolate: Smaller quantities are difficult to keep at the right temperature unless you plan to use it all at once.
How to Melt Chocolate :
- Double Boiler Method: Place the chocolate in a heatproof bowl set over a saucepan of simmering (not boiling) water. The bottom of the bowl should not touch the water. Melt the chocolate slowly, removing the bowl if needed to avoid exceeding the melting temperature.
Be careful not to overheat the chocolate, as it can seize, becoming grainy, thick, and unusable.
- Microwave Method: Place chocolate pistoles or finely chopped chocolate in a microwave-safe bowl. Heat in short bursts of 10-20 seconds, stirring well between each interval to ensure even melting and to prevent burning.
Steps of Tempering :
- Melting: The chocolate is completely melted and smooth.
- Pre-crystallization: It is cooled down to a specific temperature, depending on the type of chocolate.
- Working: It is gently reheated to its working temperature.
- Crystallization: The chocolate is left to set at room temperature in a cool, dry place.
Tempering Techniques :
- Double boiler method: The traditional and precise approach.
- Seeding method: Add unmelted chocolate to the melted chocolate to bring the temperature down more quickly and encourage proper crystal formation.
- Using Mycryo: Mycryo is powdered cocoa butter. It helps stabilize melted chocolate and encourages the formation of the right cocoa butter crystals without the need for traditional cooling methods. Just add about 1% of Mycryo (1 g per 100 g of chocolate) once the chocolate has cooled to the pre-crystallization temperature. This method is quick, reliable, and perfect for small batches or home use.

Video method
Equipment:
- A mixing bowl or heatproof bowl
- A saucepan
- A regular or offset spatula
- A probe or infrared (laser) thermometer
Ingredients:
NB: See the temperature curves for the different chocolates and the printable recipe card at the end of the article. You can save them.
- A minimum of 300 g of couverture chocolate (Valrhona milk chocolate here)
Preparation steps :
Melt the chocolate gently over a double boiler (here, milk chocolate).
Place the chocolate in a heatproof bowl set over a saucepan of hot water. The bottom of the bowl should not touch the water, which must stay at a simmer, not a boil.
Stir occasionally with a spatula.
Heat the milk chocolate to 44-45°C (111-113°F) Remove the bowl from the heat once the chocolate reaches around 41°C (106°F) , as the temperature will continue to rise slightly off the heat.
If needed, briefly return it to the double boiler to bring it up to 44-45°C.
⚠️ Do not exceed 45°C (113°F) for milk, white, or colored chocolate, and 55°C (131°F) for dark chocolate.
Refer to the tempering curves shown above for more precision.

Cool the chocolate down to 27-28°C (80-82°F).
Transfer the bowl to a cold water bath to speed up the cooling process. Once it reaches around 33°C (91°F), begin stirring regularly (this is called “stirring to promote crystallization”) until it drops to 27–28°C.
Reheat to the working temperature: 29-30°C (84-86°F).
Place the bowl back over a lukewarm water bath, or use a hair dryer to gently warm it to the ideal working temperature.
⚠️ Do not exceed 30°C (86°F), or you’ll have to restart the tempering process from scratch.

To test whether the chocolate is properly tempered, dip a teaspoon into it and place it on your work surface. The chocolate should begin to set within 3 minutes, becoming firm and matte without any whitish streaks.
The chocolate is now ready to use. Maintain the working temperature 29 – 30 °C (84-86°F) by regularly placing the bowl over a warm double boiler
Make sure the water doesn’t exceed 34 °C (93 °F), or you risk overheating and breaking the temper.

Chocolate Decorations

Chocolate cake collar or ribbon
Pour a little tempered chocolate onto a strip of acetate (collar), cut to match the circumference of your cake ring (add about 2 cm to help close the strip easily).
Spread the chocolate evenly using an offset spatula. Aim for a thin but not too thin layer, if it’s too thin, the ribbon may break when handled. Use a back-and-forth motion and remove any excess chocolate.
If the layer seems too thin after spreading, simply add a bit more chocolate and gently smooth it out again.
Lift the strip using the tip of a knife, then carefully run it between your thumb and index finger to wipe the edges and remove any excess chocolate.
Place the strip on a clean surface, then slide it slightly to ensure the sides are clean and to prevent smudging. Gently slip the blade of a knife underneath to keep it from sticking to the surface.
Scrape the table to collect any remaining liquid chocolate and keep it in a warm double boiler to maintain its working temperature.
As soon as the chocolate starts to turn matte and no longer leaves marks when touched, place a second strip of acetate of the same size on top. Wrap everything around your cake ring, slightly overlapping the ends of the strips, and secure them with a piece of tape.

Place the cake ring with the chocolate collar (strip of acetate) on a tray and let it set for several hours, ideally overnight. You can also prepare it several days in advance if needed.
The next day, gently remove the acetate strip, then take off the cake ring and the inner acetate collar. Carefully wrap the chocolate band around your dessert, slightly expanding it if needed.
If needed, you can trim the ends using a heated knife.
For a more creative design, you can punch holes into the chocolate collar. To do this, heat a frying pan, place piping tips of your chosen size in it, then gently press them into the chocolate to make clean cut-outs.
Make sure to wipe the piping tip clean between each use.

Chocolate Tempering Curves:
Dark Chocolate Tempering Curve
|
Milk Chocolate Tempering Curve
|
White Chocolate Tempering Curve
|

How to temper chocolate?
INGREDIENTS
Note: See the temperature curves for the different types of chocolate above. You can save them.
- A minimum of 300 g of couverture chocolate Valrhona milk chocolate here
PREPARATION
- Melt the chocolate gently over a double boiler (here, milk chocolate).
- Place the chocolate in a heatproof bowl set over a saucepan of hot water. The bottom of the bowl should not touch the water, which must stay at a simmer, not a boil.
- Stir occasionally with a spatula.
- Heat the milk chocolate to 44-45°C (111-113°F) Remove the bowl from the heat once the chocolate reaches around 41°C (106°F) , as the temperature will continue to rise slightly off the heat.
- If needed, briefly return it to the double boiler to bring it up to 44-45°C.
- ⚠️ Do not exceed 45°C (113°F) for milk, white, or colored chocolate, and 55°C (131°F) for dark chocolate.
- Refer to the tempering curves shown above for more precision.
- Cool the chocolate down to 27-28°C (80-82°F).
- Transfer the bowl to a cold water bath to speed up the cooling process. Once it reaches around 33°C (91°F), begin stirring regularly (this is called "stirring to promote crystallization") until it drops to 27–28°C.
- Reheat to the working temperature: 29-30°C (84-86°F).
- Place the bowl back over a lukewarm water bath, or use a hair dryer to gently warm it to the ideal working temperature.
- ⚠️ Do not exceed 30°C (86°F), or you’ll have to restart the tempering process from scratch.
- To test whether the chocolate is properly tempered, dip a teaspoon into it and place it on your work surface. The chocolate should begin to set within 3 minutes, becoming firm and matte without any whitish streaks.
- The chocolate is now ready to use. Maintain the working temperature 29 - 30 °C (84-86°F) by regularly placing the bowl over a warm double boiler
- Make sure the water doesn’t exceed 34 °C (93 °F), or you risk overheating and breaking the temper.
Chocolate Decorations
- Chocolate cake collar or ribbon
- Pour a little tempered chocolate onto a strip of acetate (collar), cut to match the circumference of your cake ring (add about 2 cm to help close the strip easily).
- Spread the chocolate evenly using an offset spatula. Aim for a thin but not too thin layer, if it’s too thin, the ribbon may break when handled. Use a back-and-forth motion and remove any excess chocolate.
- If the layer seems too thin after spreading, simply add a bit more chocolate and gently smooth it out again.
- Lift the strip using the tip of a knife, then carefully run it between your thumb and index finger to wipe the edges and remove any excess chocolate.
- Place the strip on a clean surface, then slide it slightly to ensure the sides are clean and to prevent smudging. Gently slip the blade of a knife underneath to keep it from sticking to the surface.
- Scrape the table to collect any remaining liquid chocolate and keep it in a warm double boiler to maintain its working temperature.
- As soon as the chocolate starts to turn matte and no longer leaves marks when touched, place a second strip of acetate of the same size on top. Wrap everything around your cake ring, slightly overlapping the ends of the strips, and secure them with a piece of tape.
- Place the cake ring with the chocolate collar (strip of acetate) on a tray and let it set for several hours, ideally overnight. You can also prepare it several days in advance if needed.
- The next day, gently remove the acetate strip, then take off the cake ring and the inner acetate collar. Carefully wrap the chocolate band around your dessert, slightly expanding it if needed.
- If needed, you can trim the ends using a heated knife.
- For a more creative design, you can punch holes into the chocolate collar. To do this, heat a frying pan, place piping tips of your chosen size in it, then gently press them into the chocolate to make clean cut-outs.
- Make sure to wipe the piping tip clean between each use.
Thank you for your visit and your comments!