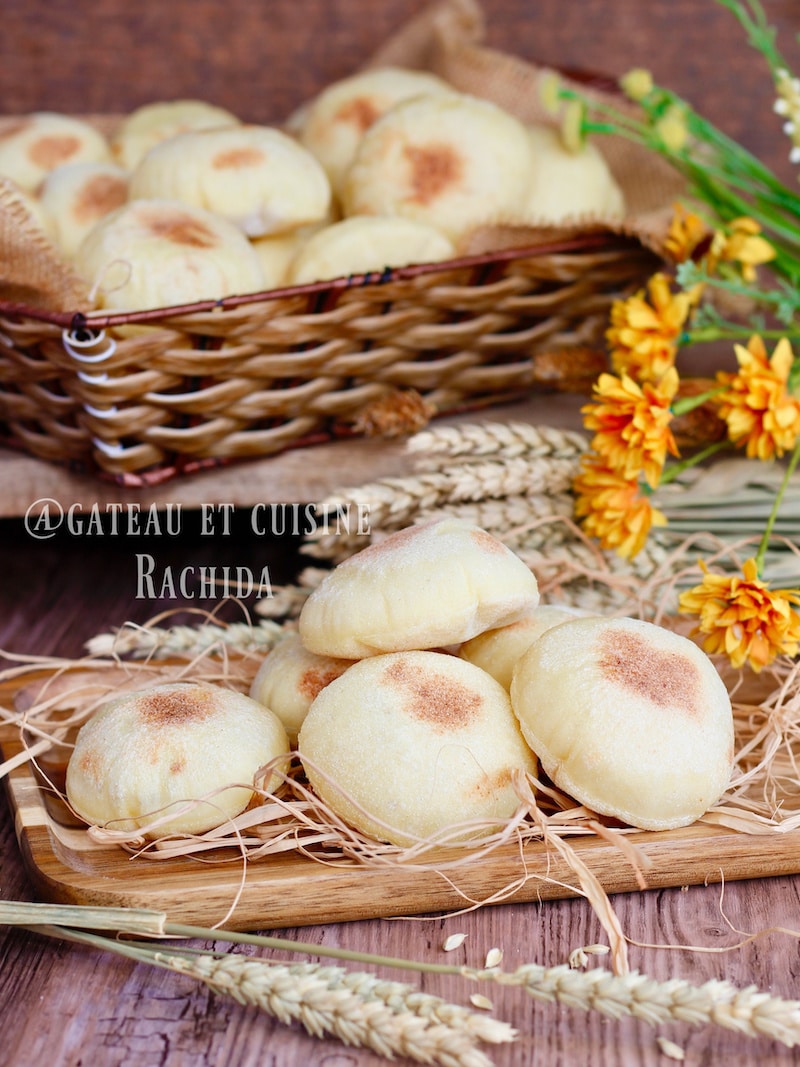
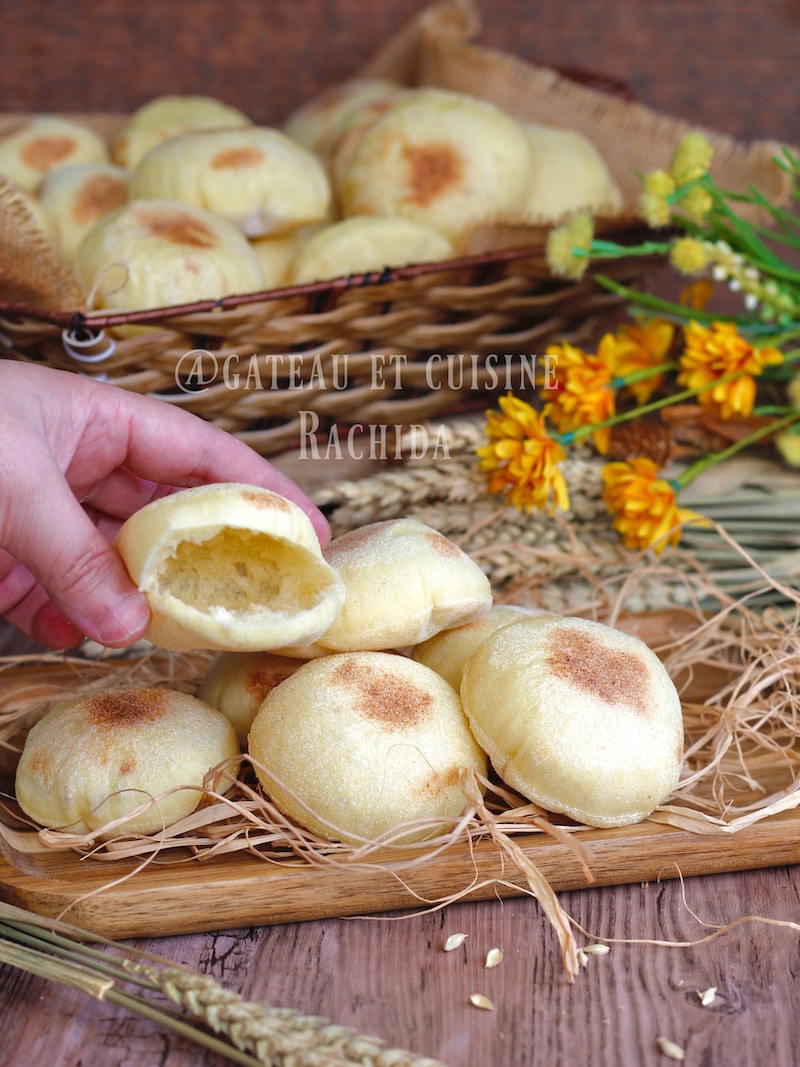
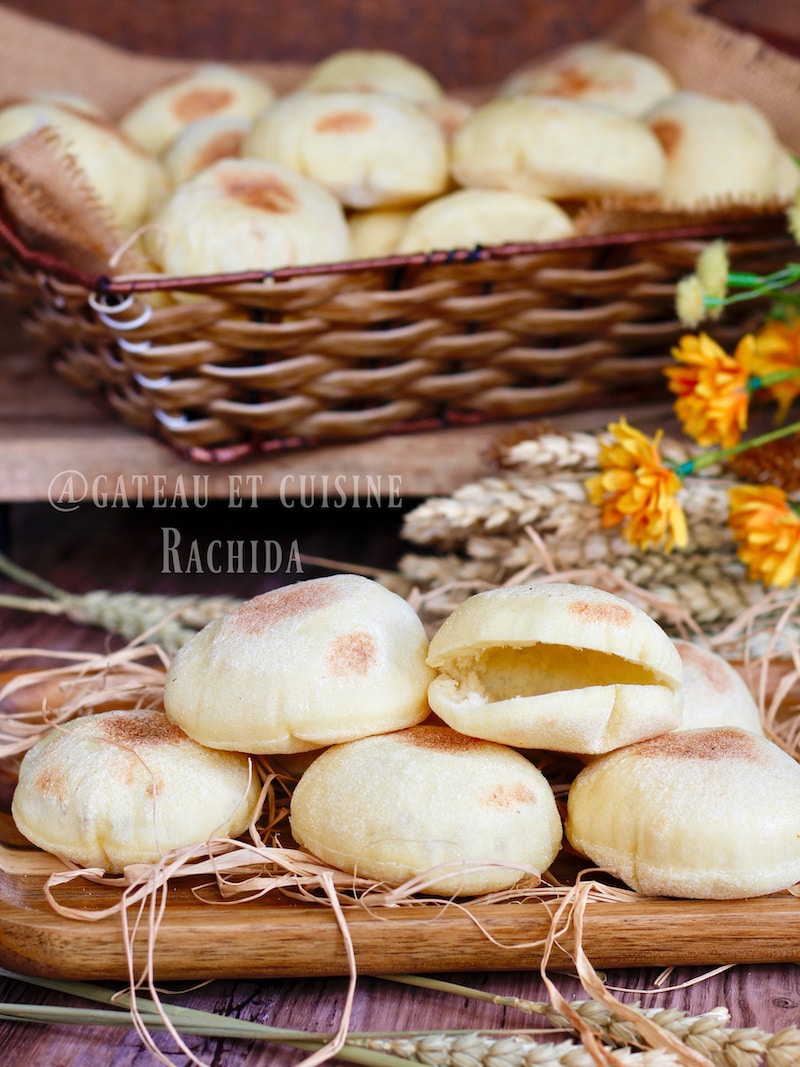
Batbout is a Moroccan round pita bread cooked on the stovetop in a skillet that puffs up into a small pocket. Its unique feature is that it has very little crumb inside, making it perfect for stuffing with a variety of fillings and vegetables. It closely resembles Lebanese pita bread.
Stuffed batbouts are especially popular during Ramadan, often served on the Iftar table.
They make a perfect starter, picnic snack, or dinner appetizer.
Batbout – Moroccan pita bread
Table of Contents
Batbout – Moroccan Pita Bread
If you’re a fan of Moroccan cuisine, you’re probably familiar with these fluffy, pita-like breads stuffed with a variety of fillings.
The recipe for moroccan pita bread is very simple and, like bread, the dough can be kneaded by hand or with a stand mixer. In Morocco, batbouts are often found in bakeries, sold in bags and ready to be stuffed.
The recipe is so easy and affordable that it would be a shame not to make these batbouts at home.
They’re perfect for a party spread, a picnic, or a birthday table, especially served with cheeseburger sliders.
Even if you’re a beginner in the kitchen, following the recipe step by step will help you get them just right.
Batbouts are very practical because you can make a large batch in a short time and freeze portions for later use.
When you want a quick and easy dinner or a relaxed Sunday brunch, simply take out the amount you need and let them come to room temperature while you prepare your favorite fillings.
You can adapt the fillings to suit your tastes, dietary preferences, or just use whatever ingredients you have on hand.
For example, a can of tuna, a few salad leaves, a little mayonnaise, and some corn makes delicious tuna batbouts. They pair well with almost anything. You can even fill them with leftover roast chicken.
Tips for Perfect Moroccan Pita Batbout
The Dough: It’s important to knead it for 12 minutes to develop the gluten and achieve a smooth, supple, and elastic texture. The dough should not be sticky. Because water absorption can vary between flours, start with half of the water and gradually add the rest as you knead. Stop adding water once the dough pulls away from the sides of the mixer while remaining soft and non-sticky.
| Batbouts can be made with all-purpose flour alone, or by substituting up to half of it with fine semolina, extra-fine semolina, or durum wheat flour. You can adjust the ratio to your liking, as long as it doesn’t exceed 50%. A 50/50 mix yields excellent results. |
Rising Time: Cover the dough and let it rise in a warm, draft-free place for 1 to 1.5 hours, depending on the room temperature, until it doubles in size.
Rolling Out: Punch down the dough and knead it briefly to form a smooth ball. If you’ve made a large batch, divide the dough in half and shape each portion into a ball.
Coat the ball you’re going to use with extra-fine semolina or durum wheat flour. Keep the other ball covered to prevent it from drying out.
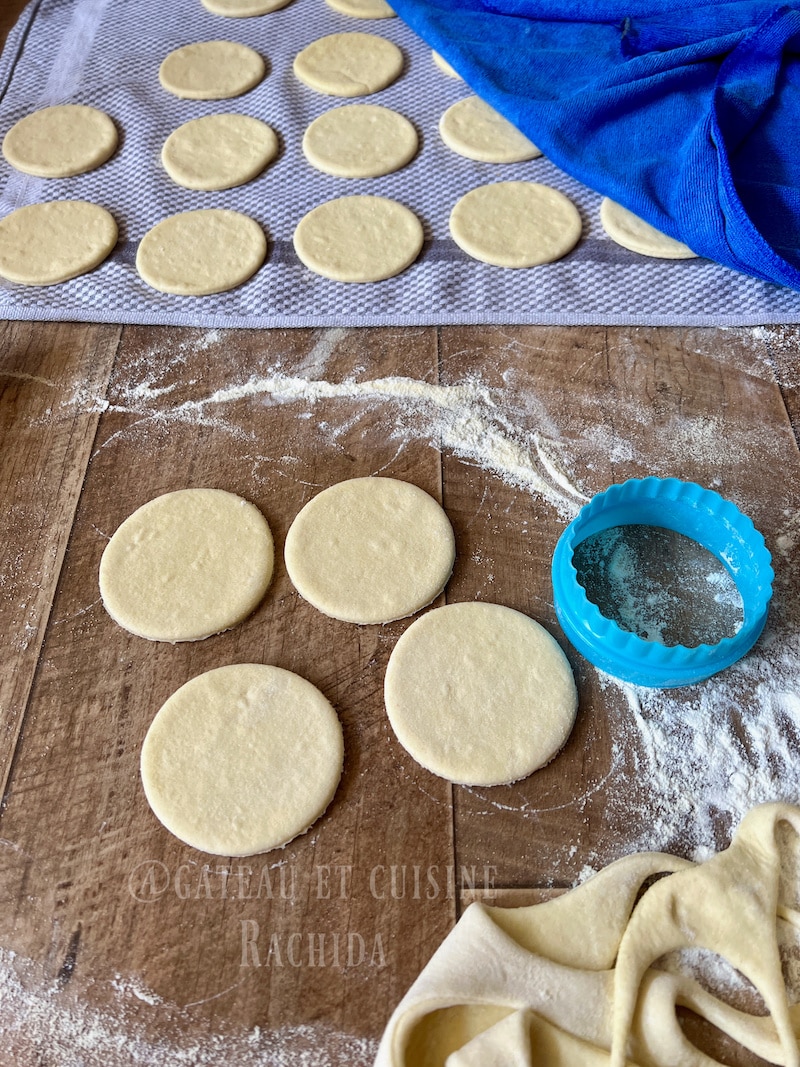
Roll out the dough thinly to a thickness of 5 mm (about 3/16 inch), dusting the work surface with flour to prevent sticking. Rolling the dough thinly will give you batbouts with a light crumb that puff up like little balloons. This is exactly what we want in batbouts so they can be easily stuffed.
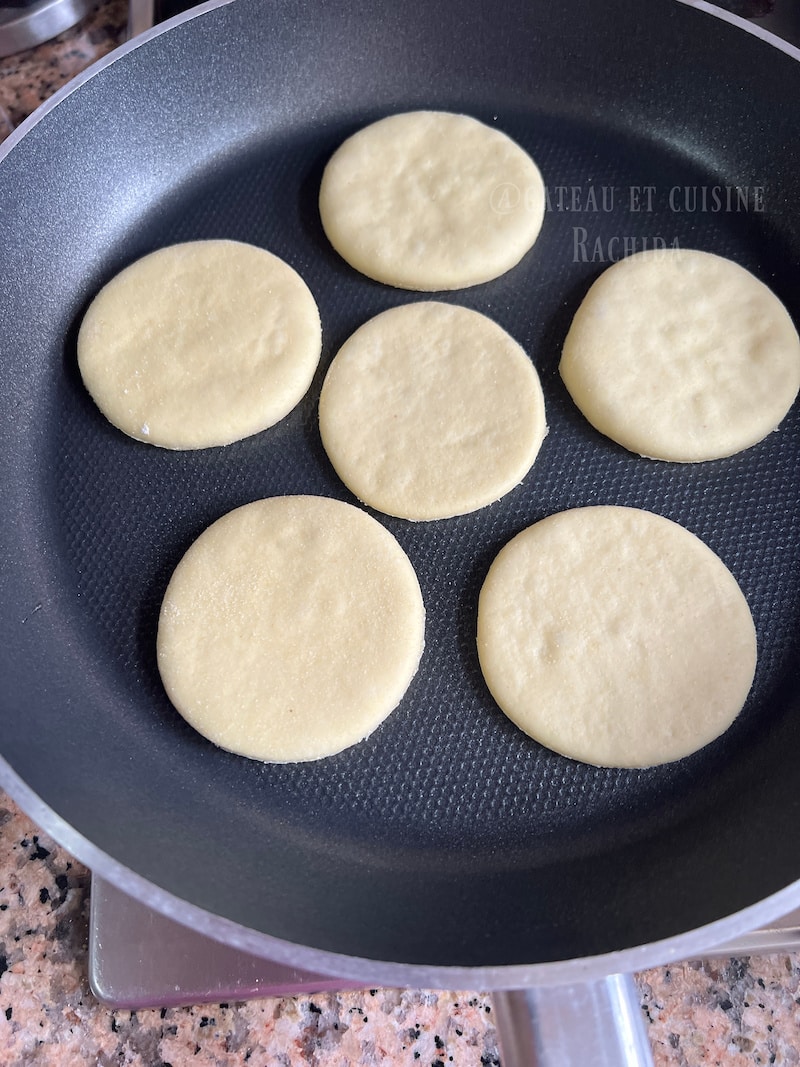
Cut the dough into discs using a cookie cutter or a glass, depending on the size you want. I use a 7.5 cm (3-inch) cookie cutter for mini batbouts like in the photos. This is the perfect size for bite-sized pieces that are easy to hold, not too small and not too big.
Place the discs carefully on a clean towel so they don’t lose their shape, cover them, and let them rise for 30 minutes.
Cooking: Heat a skillet over medium heat and gently place the dough discs in it.
To get batbouts that puff up like little balloons, you need to flip them several times. Once a disc holds its shape, turn it over. In the photo below, the two batbouts at the top (where my signature is) need to be flipped. Turn them from one side to the other about every 10 seconds.
 Don’t wait until one side is golden, or the bread won’t puff up. It will take about 6 minutes to cook.
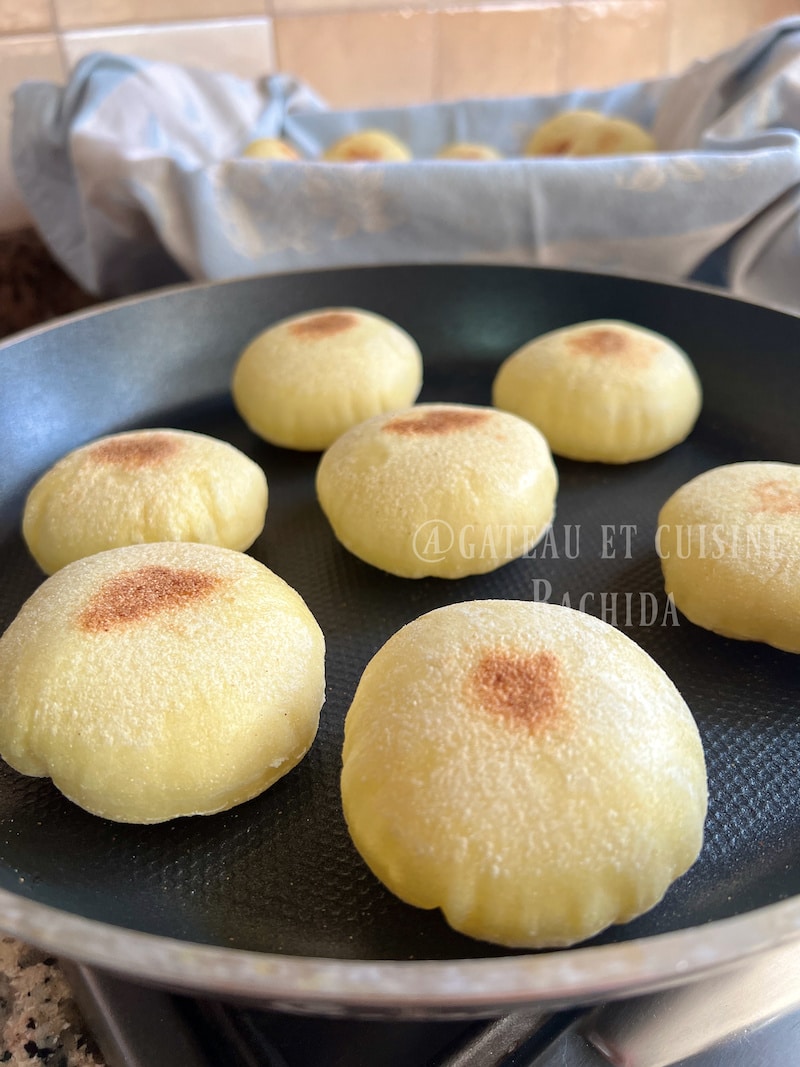
Ingredients:
NB: You can print the recipe card at the end of the article.
- 300 g (10.5 oz) all-purpose flour
- 300 g (10.5 oz) fine semolina, extra-fine semolina, or durum wheat flour
- 1 tablespoon vegetable oil
- 1 teaspoon granulated sugar 5 g
- 1 teaspoon salt 5 g
- 2 teaspoons dry yeast 5 g or 15 g (0.5 oz) fresh yeast
- 280 to 300 g (10 oz to 10.5 oz) water, depending on flour absorption.
How to make Moroccan Pita Bread
Kneading the dough
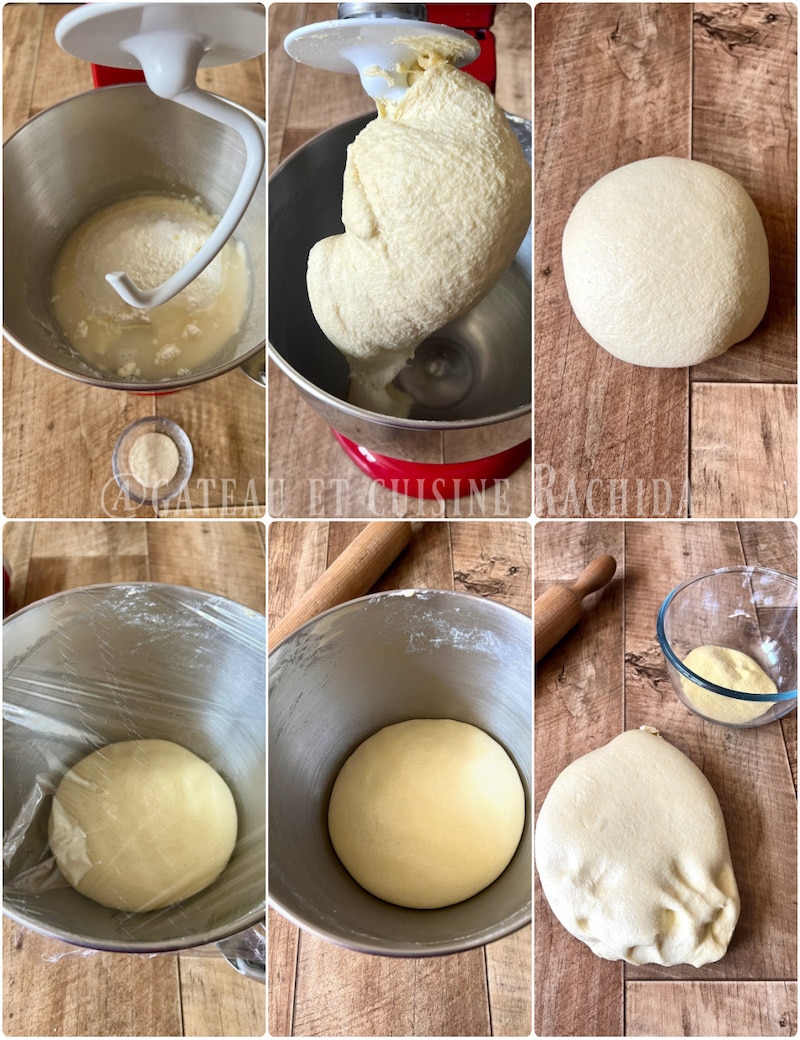
In a stand mixer bowl or a large mixing bowl (for hand kneading), combine the flour, semolina, salt, sugar, and oil.
Add half of the water and start kneading on low speed (or by hand).
Gradually add the yeast and remaining water until a soft ball forms.
Knead for 12 minutes total.
Turn the dough onto a lightly floured surface, knead briefly to smooth it, and shape into a ball. Place it back in the bowl.
Drizzle a little oil over the dough to prevent drying. Cover with plastic wrap and a kitchen towel.
Let the dough rise for 1 to 1.5 hours, until doubled in size.
Transfer to a work surface, gently punch down the dough, and knead lightly to release the air.
Shaping the batbouts
Divide the dough into two balls, keeping the one you’re not using covered with a tea towel.
Lightly coat the dough ball with extra-fine semolina and roll it out on a floured work surface using a rolling pin.
Roll the dough to about 5 mm (3/16 inch) thick. Make sure it isn’t sticking to the surface. Lightly flour as needed.
Use a cookie cutter or a glass to cut out discs in your preferred size. I use a 7.5 cm (3-inch) cutter for mini batbouts like in the photos.
Carefully transfer the discs onto a clean cloth, taking care not to deform them. Cover with a large kitchen towel while you work.
Gather the leftover dough, knead it into a smooth ball, wrap it in plastic wrap, and let it rest.
Repeat the same steps with the second dough ball, then do the same with the rested dough scraps.
Let all the discs rise for 30 minutes before cooking.
Cooking
Heat a frying pan over medium heat and place the dough discs in the pan, starting with the ones prepared first.
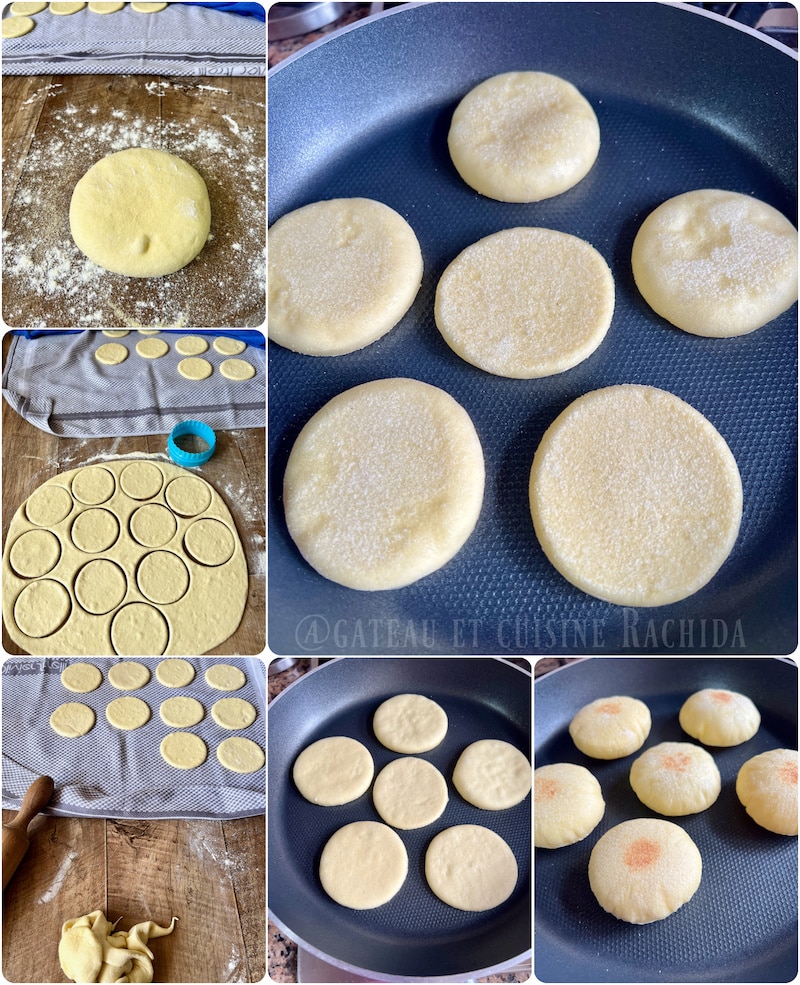
Once the discs hold their shape, flip them. Turn them every 10 seconds so they puff up and develop a light golden color.
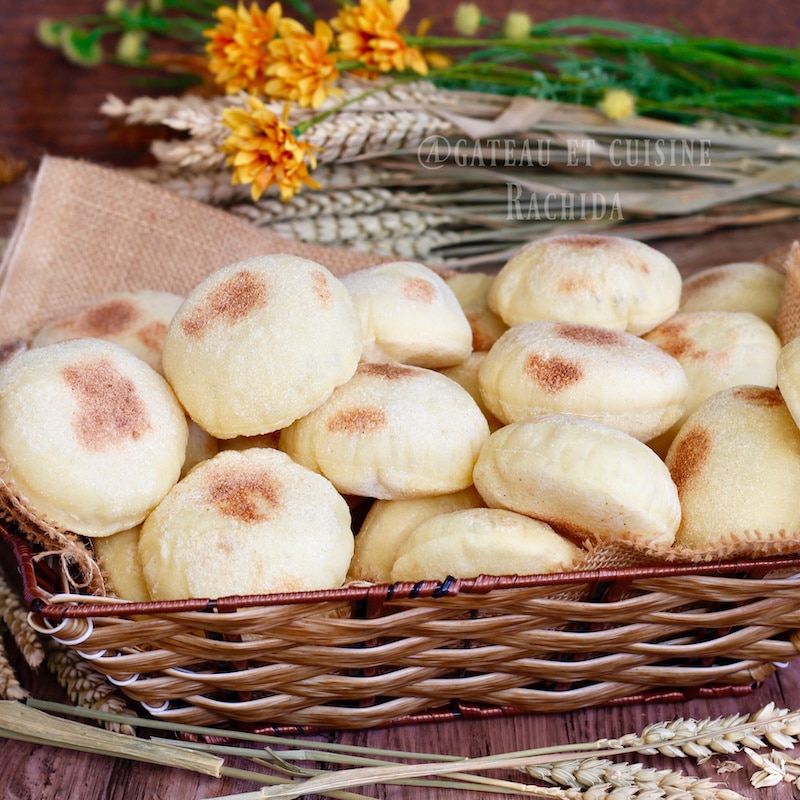
Place the cooked batbouts in a basket lined with a clean cloth and cover them. Continue cooking the remaining discs in the same way.
How to store batbouts?
Once the batbouts have cooled, place the desired amount in zip-top freezer bags or airtight containers and store them in the freezer.
They can be kept for up to 3 months in the freezer or 1 to 2 days in the refrigerator.
Remove them from the freezer about 2 hours before stuffing.

Batbout Moroccan Pita Bread
EQUIPEMENTS
INGREDIENTS
- 300 g all-purpose flour
- 300 g fine semolina, extra-fine semolina, or durum wheat flour
- 1 tablespoon vegetable oil
- 1 teaspoon granulated sugar 5 g
- 1 teaspoon salt 5 g
- 2 teaspoons dry yeast or 15 g / 0.5 oz fresh yeast
- 280 to 300 g water 10 oz to 10.5 oz depending on flour absorption.
PREPARATION
Kneading the dough
- In a stand mixer bowl or a large mixing bowl (for hand kneading), combine the flour, semolina, salt, sugar, and oil.
- Add half of the water and start kneading on low speed (or by hand).
- Gradually add the yeast and remaining water until a soft ball forms.
- Knead for 12 minutes total.
- Turn the dough onto a lightly floured surface, knead briefly to smooth it, and shape into a ball. Place it back in the bowl.
- Drizzle a little oil over the dough to prevent drying. Cover with plastic wrap and a kitchen towel.
- Let the dough rise for 1 to 1.5 hours, until doubled in size.
- Transfer to a work surface, gently punch down the dough, and knead lightly to release the air.
Shaping the batbouts
- Divide the dough into two balls, keeping the one you’re not using covered with a tea towel.
- Lightly coat the dough ball with extra-fine semolina and roll it out on a floured work surface using a rolling pin.
- Roll the dough to about 5 mm (3/16 inch) thick. Make sure it isn’t sticking to the surface. Lightly flour as needed.
- Use a cookie cutter or a glass to cut out discs in your preferred size. I use a 7.5 cm (3-inch) cutter for mini batbouts like in the photos.
- Carefully transfer the discs onto a clean cloth, taking care not to deform them. Cover with a large kitchen towel while you work.
- Gather the leftover dough, knead it into a smooth ball, wrap it in plastic wrap, and let it rest.
- Repeat the same steps with the second dough ball, then do the same with the rested dough scraps.
- Let all the discs rise for 30 minutes before cooking.
Cooking
- Heat a frying pan over medium heat and place the dough discs in the pan, starting with the ones prepared first.
- Once the discs hold their shape, flip them. Turn them every 10 seconds so they puff up and develop a light golden color.
- Place the cooked batbouts in a basket lined with a clean cloth and cover them. Continue cooking the remaining discs in the same way.
Notes
How to store batbouts?
Once the rolls have cooled, place as many as you like in zip-top freezer bags or airtight containers and store them in the freezer. They will keep for up to 3 months in the freezer and 1 to 2 days in the fridge. Take them out of the freezer about 2 hours before filling them.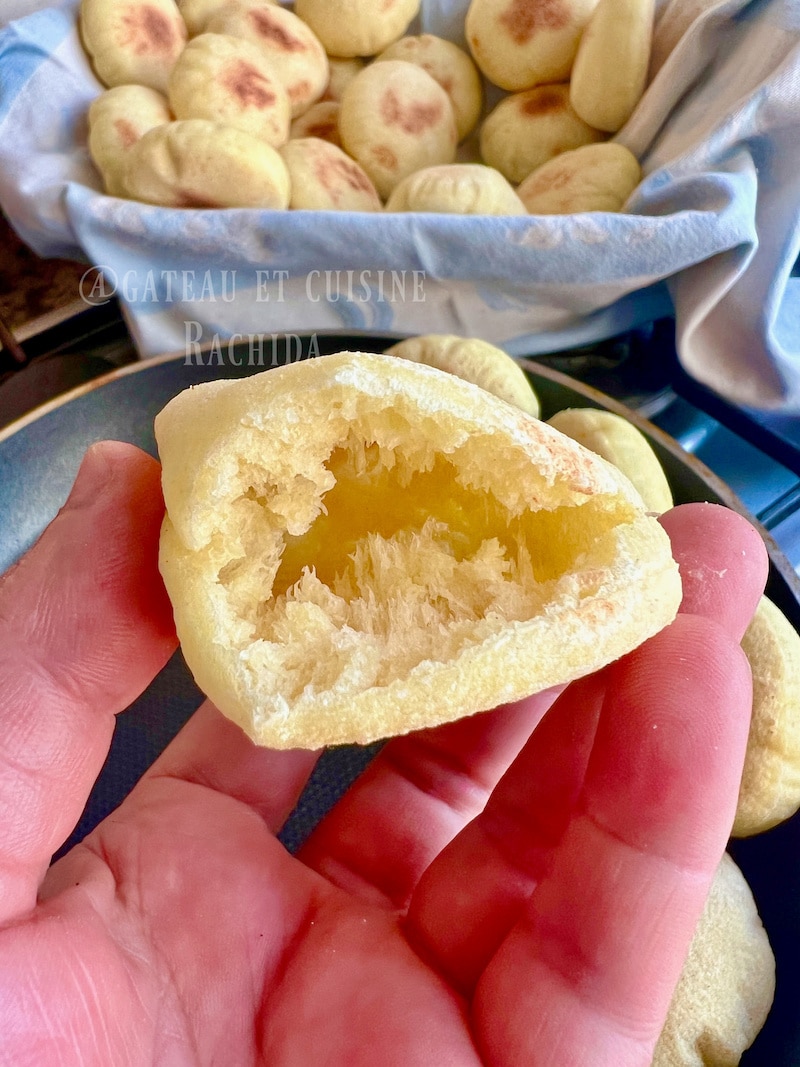
Thank you for your visit to my pastry blog and your comments.