
Sweet shortcrust pastry (french pâte sablée)
It’s the ultimate tart dough for incredibly crisp, sandy, crumbly, and delicious tarts. This tart dough is magnificent; even when blind baked, it yields excellent results. You’ll get impeccable tart shells that rival those found in top pastry shops. It’s up to you to make a magnificent strawberry tart, and so many others!
Like a beautiful pecan pie or a cherry pie.
It’s a fundamental and essential base recipe in pastry that you need to master in order to make all kinds of tarts. Making sweet shortcrust pastry isn’t difficult in itself, but you do need to know a few rules to make sure you don’t run into any problems when making your tarts.
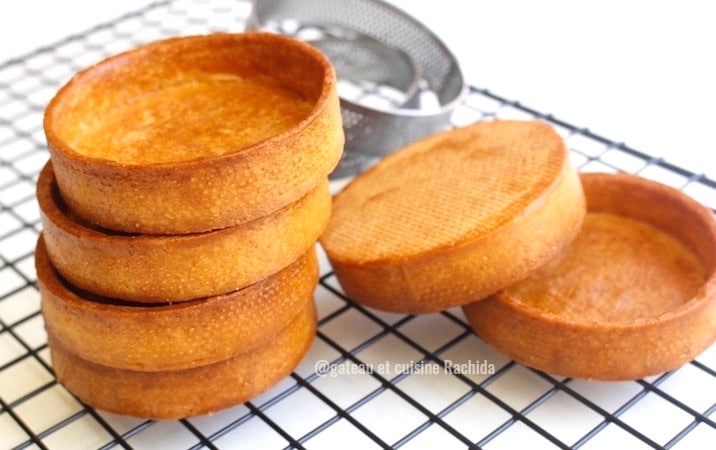
homemade sweet pastry – tart base
Table of Contents
A fundamental of pastry
Learning to line a tart ring properly is essential ! It’s mastering the lining of a tart ring that will give you perfect tart shells. It is essential, when you love making tarts, to follow the tips for preparing sweet pastry, apply yourself to lining the tart ring, and respect the resting time for the dough and the lined tart shell in the refrigerator.
The article is a little long, but I think it’s necessary to go through everything that will help you get the result you want. The article is illustrated with step-by-step pictures to help you.
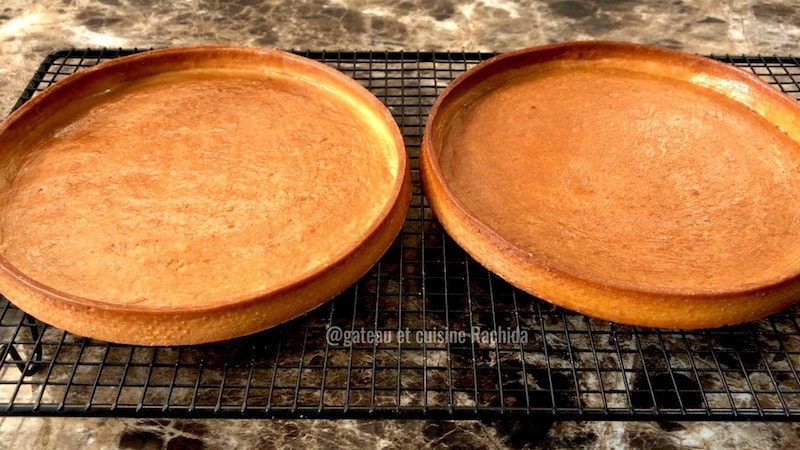
sweet pastry – tart shell
What’s the difference between sweet pastry dough (pâte sucrée) and sweet shortcrust (pâte sablée)?
You have probably wondered what the difference is between these two types of tart doughs.
It’s important to note that both doughs are made from the same ingredients.
In the recipe for sweet shortcrust pastry, the quantity of ingredients is different from that of the sweet pastry (pâte sucrée).
Generally, sweet pastry dough contains more icing/powdered sugar, while shortcrust pastry dough contains more butter. The latter has a more crumbly and richer texture.
Sweet pastry or sweet shortcrust, both doughs can be prepared either with a mixer or by hand. The result is the same.
The difference between sweet pastry and pâte sablée
- The order of incorporating the ingredients
- How to work the dough
- The texture is not the same
↪️ In sweet pastry, the dough is worked by creaming or by rubbing :
Cream the softened butter with the powdered sugar, add the almond powder, then beaten egg, and finally the flour.
Result obtained : a tighter and crispier dough
↪️️ In sweet shortcrust, the dough is worked by rubbing :
Work the flour, almond powder, and icing sugar with cold butter until the mixture resembles fine breadcrumbs to obtain a sandy dough, then incorporate the beaten egg.
Result obtained : crumbly dough with a richer taste
Some chefs have evolved the recipe of sweet pastry by adding almond powder to it, like the recipe by Pierre Hermé that I’m presenting here.
In this article, we will explore two techniques for preparing sweet pastry dough :
➡️ by creaming and by rubbing. Here, it’s the recipe for sweet pastry dough that is worked by creaming or by rubbing, the quantity of ingredients is the same.
You can make sweet pastry dough either by hand, which is very easy, or with a food processor, whichever you prefer. To succeed, whether by hand or using a food processor, it must be worked as little as possible.
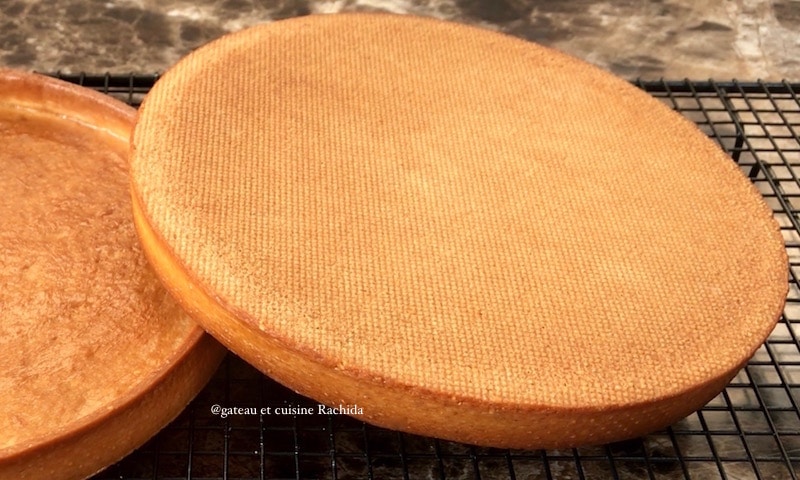
Tips for successful sweet pastry dough
For a successful sweet pastry 👉 do not knead the dough.
This will activate the gluten network and give the dough strength and elasticity.
➡️ A dough with too much strength will shrink when rolled out, and the edges will collapse during baking.
➡️ Remember that the less activated or limited the gluten network, the more crumbly the pastry.
➡️ Overworking shortcrust pastry will make it brittle, and you’ll struggle to line the tart rings with it.
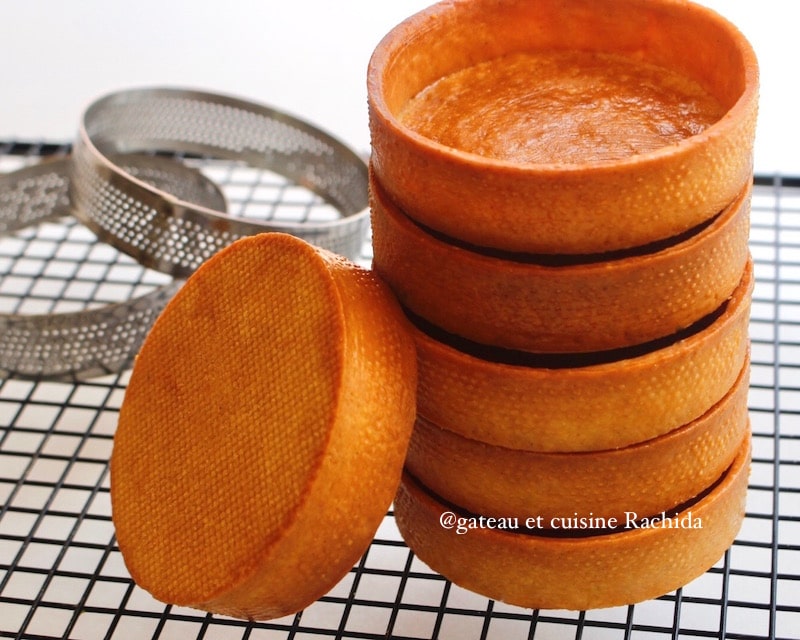
I hope you’re still there :-) I warned you that the article would be quite long, but I wanted to make it as precise as possible for you. The lining technique I’m proposing here might seem long and tedious, but I assure you that once you get the hang of it, it goes very quickly.
Of course, you can also line the tart shell using the traditional method: traditional tart ring lining.
Why do I prefer the new generation lining method over the traditional one
↪️ Simply for its ease. It might surprise you, but I assure you it’s true. You’re sure to get tart shells with right angles, straight sides, and it’s very convenient for lining small tart rings.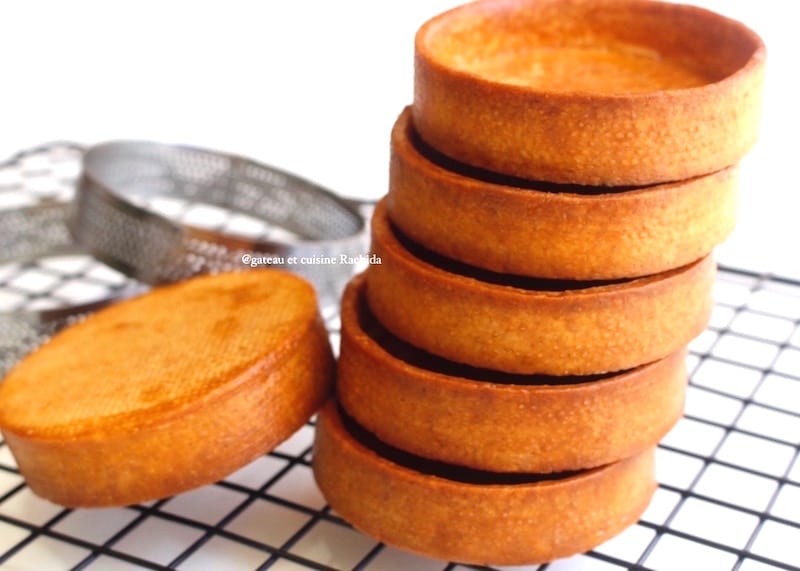
What’s the difference between these two methods of lining
Lining with the Gianluca Fusto, Cédric Grolet “new generation” method involves lining the tart ring in two steps. We use strips of pastry dough to line the edges, then a disk for the bottom.
️ In traditional method, We line the tart ring in one step. We use a single rolled-out dough that will fit the tart ring The method is more technical. You need to be precise to achieve a right angle between the edges and the bottom of the ring.
Just like in the video, I wanted to offer you a fairly comprehensive tutorial that could help you or provide you with ideas and tips to enhance your tarts. For those who like to read and don’t like video tutorials, I’ve put the steps in pictures.
You’re not obligated to brown the tart case, but it’s better. It gives shine, makes the tart case more beautiful, and waterproofs it.

Sweet pastry video with the lining method
➡️ 1st method: Sweet pastry by creaming
➡️ 2nd method: Sweet pastry by rubbing
➡️ The Gianluca Fusto lining method
- No need for weights when blind baking
- No need to prick the dough anymore
- No more dough deformation.
- Egg wash for a pie crust with a glossy, golden, and waterproof finish
Materials required
- A stand mixer with a flat beater (K) or your hands will suffice
- Rolling pin
- Tart ring (preferably micro-perforated)
- SILPAIN baking mat
- Perforated baking tray preferably
- A pair of rulers with 3 mm and 2 mm ( 0.11 and 0.08 in ) thickness preferred.
- Knife
- Ruler
- Parchment paper
- Microplane or fine mesh strainer
How to prepare the sweet pastry (pâte sucrée)
NB: For full details of ingredients, see the recipe-card below, which you can also print out.
Sweet pastry (pâte sucrée) by creaming
1. Cream the butter and sifted icing/powdered sugar in the mixing bowl of the stand mixer fitted with the paddle attachment (K),
2. Add salt, vanilla beans and almond powder. Mix and scrape the bottom of the bowl.
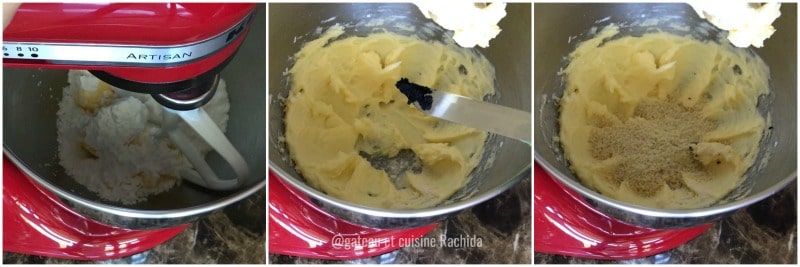
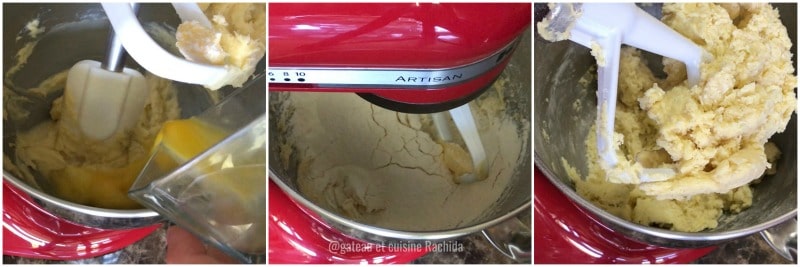
3. Add the egg, mix a little with the spatula and then blend in the stand mixer.
4. Add the sifted flour and mix briefly without kneading or gathering into a ball. The mixture is just clumping together. Don’t overwork the pastry sweet.
Stop as soon as the flour is incorporated.
5. Turn the dough onto the work surface and smear it with the palm of your hand in a back-and-forth motion 2 or 3 times to combine everything.
⚠️ Warning : Do not overwork the dough to avoid activating the gluten network.
The pastry will take on too much strength and become elastic.That’s what causes the edges to collapse during baking.
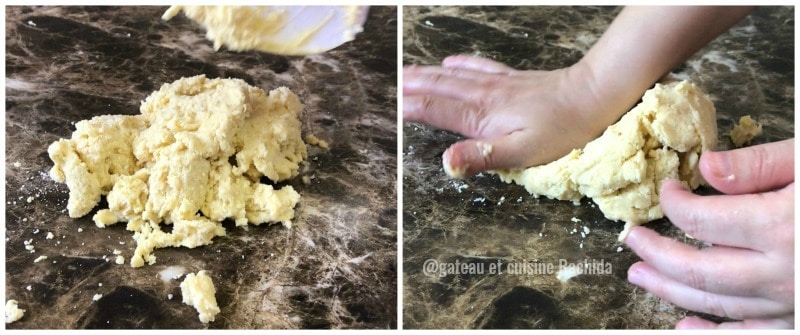
| FRASER OR FRAISER : are two terms in French pastry making that refer to a technique used in the preparation of certain doughs, such as shortcrust or sandy dough. This involves mixing the dough ingredients to achieve a homogeneous texture while avoiding gluten development. The goal is to bind the ingredients without making the dough elastic, ensuring a crumbly and sandy texture once baked. You need to push the dough in front of you by pressing it with the palm of your hand, bring it back, and push it again. |
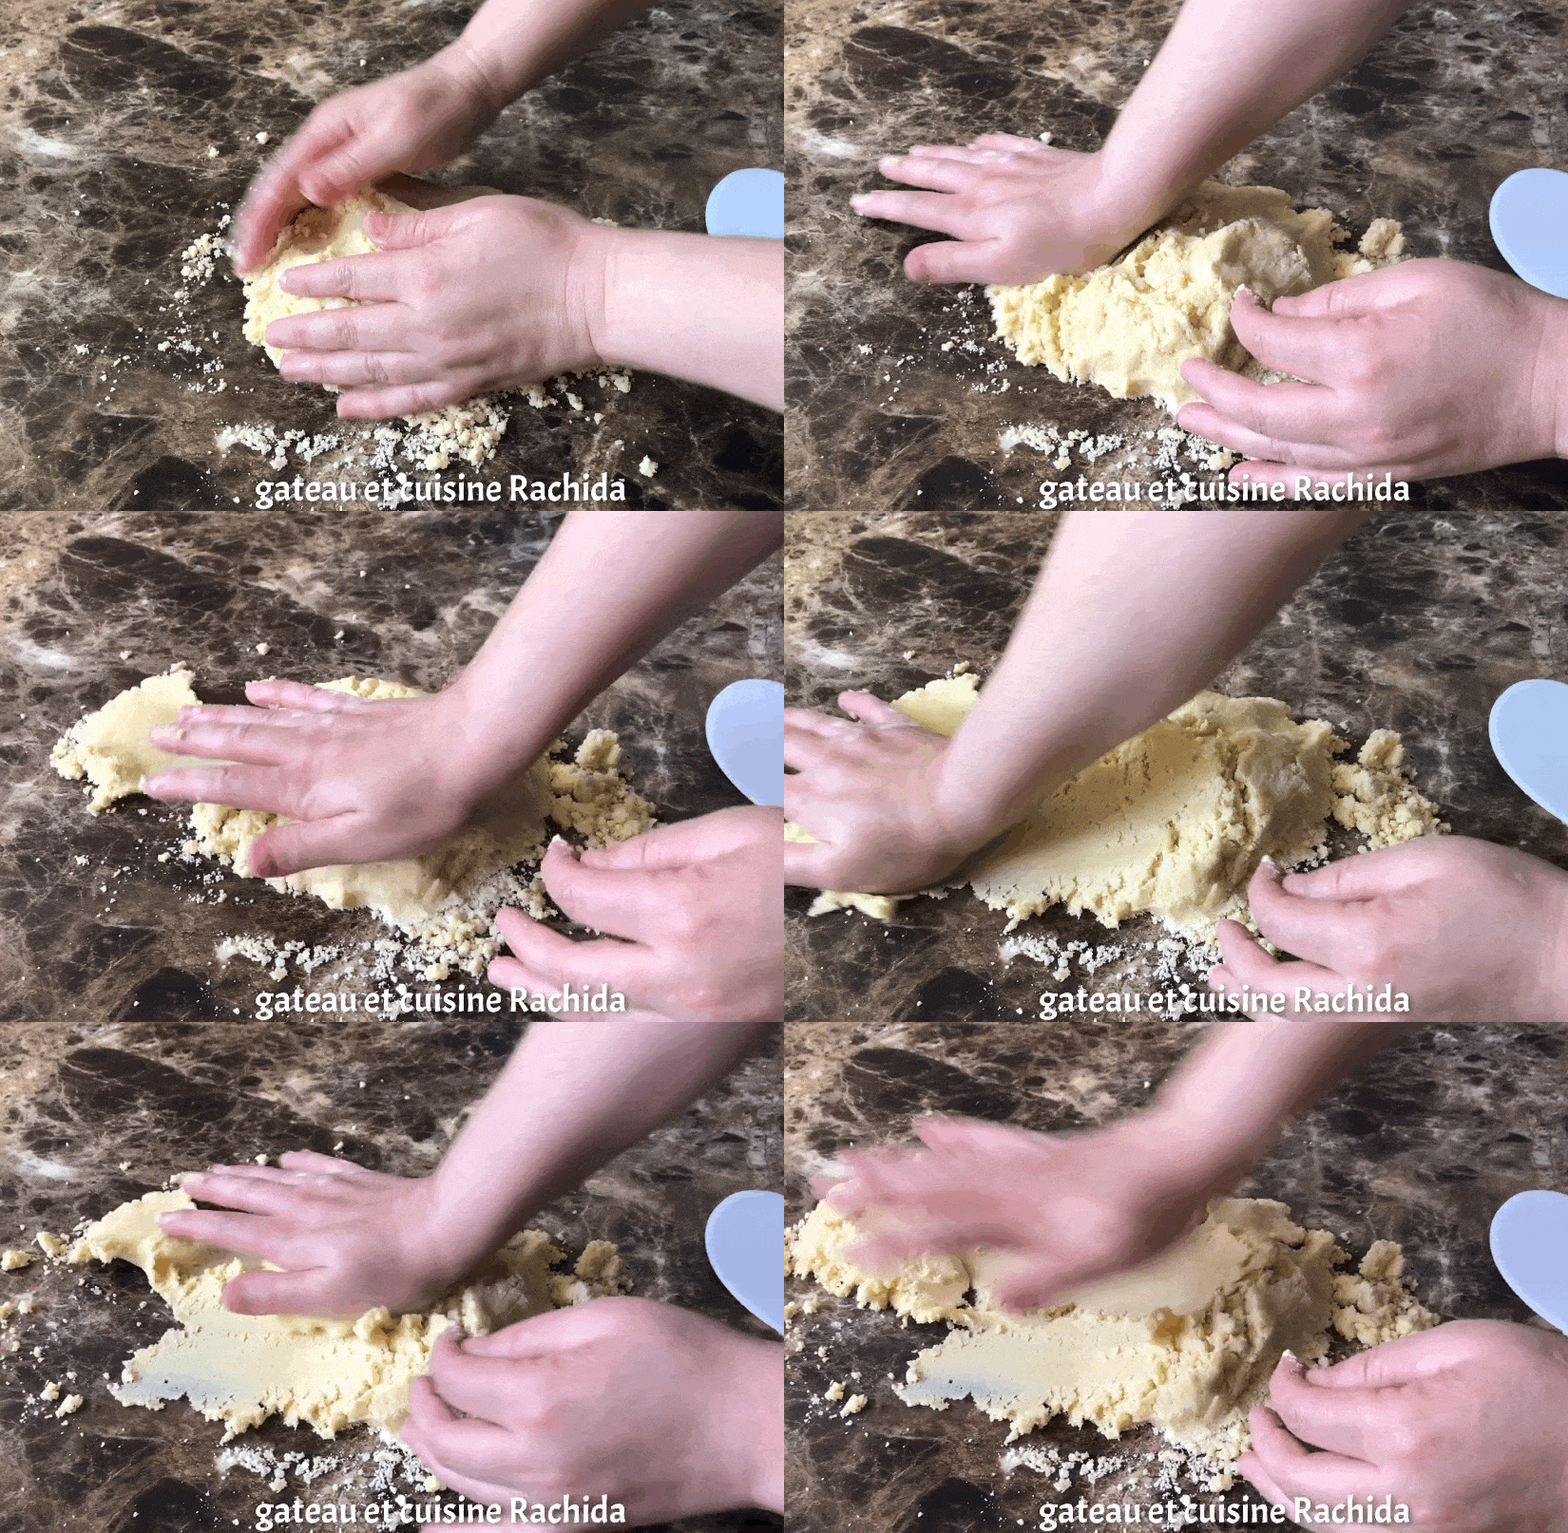
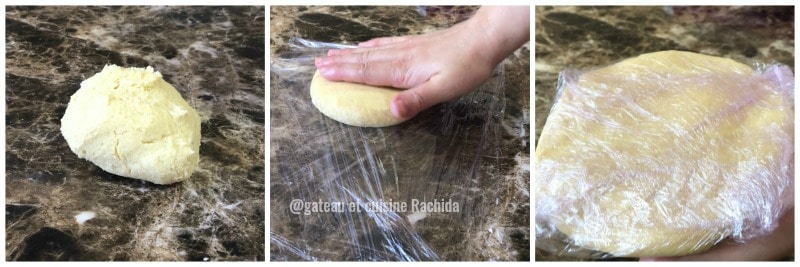
6.Gather the dough into a ball and divide it in half.
7. Flatten each ball; this will cool the dough faster and make it easier to roll out.
8. Wrap each dough ball in plastic wrap and refrigerate for at least 2 hours. It’s best to make it the day before for the next day.
Update : You can continue to follow the resting times that I explain below and in the video if you have time. However, since then, I have tested the following methods when I am in a hurry :
1. Once the dough is prepared and wrapped, leave it in the refrigerator for 2 hours, then roll it out, using the cold if it starts to stick.
Line the tart ring and let it harden in the freezer for 1 to 2 hours before baking.
2. Just after preparation, roll it out to a thickness of 2 to 3 mm approximately ( 0.08 to 0.12 in) between 2 sheets of parchment paper or guitar sheet, and let it firm up for about 20 to 30 minutes, or until it can be easily handled when lining the tart ring.
Line your tart ring following the steps below, then leave the ring in the freezer for 2 hours or overnight in the refrigerator before baking.
Sweet pastry (pâte sucrée) by rubbing
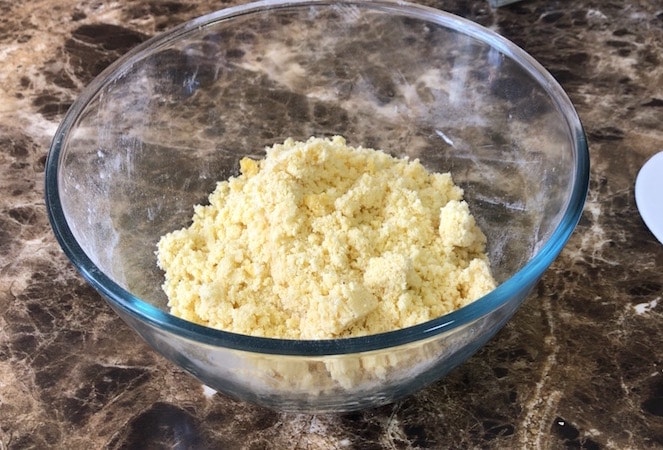
1. In a food processor (fitted with a blade), crumble all the ingredients except the egg. The butter should be cold but not hard.
2. Pulse the food processor to crumble the mixture.
3. Add the egg and briefly run the food processor to combine everything.
4. Pour onto the work surface, smear the dough as for sweet pastry by creaming, and gather it into a ball.
5. Divide into two dough portions, flatten slightly, and wrap in plastic film.
Technique for lining tart ring
Gianluca Fusto
1. Remove the dough from the refrigerator and let it soften slightly.
2. Roll out between parchment paper.
3. Roll it out to a thickness of 3 mm (0.11 in ) for the tart base. Try to flour as little as possible.
4. Use 3 mm ( 0.11 in ) rulers to control the thickness of the dough. You can also use a rolling pin with rings of different thicknesses.
5. Put the dough back in the refrigerator to firm up. Cut out a disc that is one centimeter smaller than your ring.
You can also see the classic lining technique on this article: Classic pastry lining technique
Tart ring of 20 cm (7.9 in) for example ➡️ dough disc of 19 cm (7.5 in)
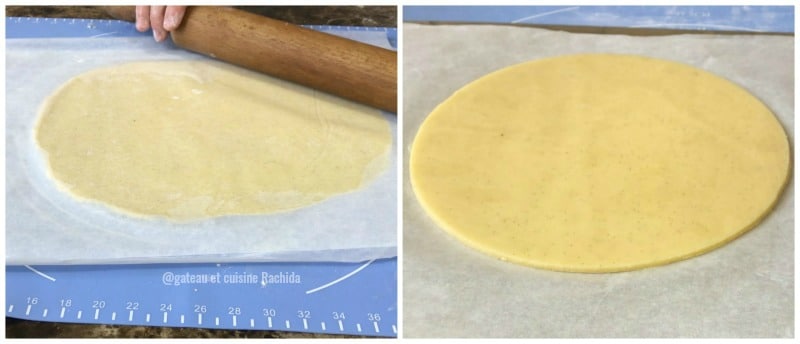
6. Rework the scraps, and roll out again, to a thickness of 2 mm ( 0.08 in ) if you want fairly thin edges.
7. Firm up the dough a little and cut strips around the circumference of the tart ring.
8. For a 21 cm sur 2 cm tart ring (8.26 in x 0.8 in ) , you need a length of 63 x 2,5 cm ( 24.8 x 0.98 in) in 2 or 3 strips.
9. Place in the refrigerator to firm up.
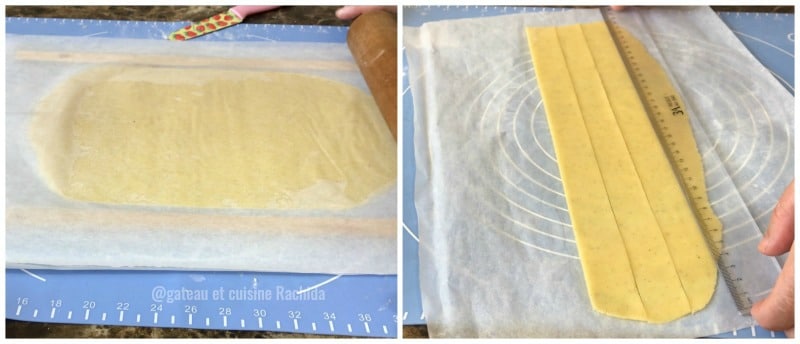
10. Lightly grease the tart ring and place it on the perforated baking sheet with the silicone baking mat.
11. Position the strips against the sides of the tart ring, pressing lightly to adhere.
12. Moisten the joints to ensure that the strips adhere well to each other. Don’t superimpose them, but just stick them next to each other to weld them together by pressing.
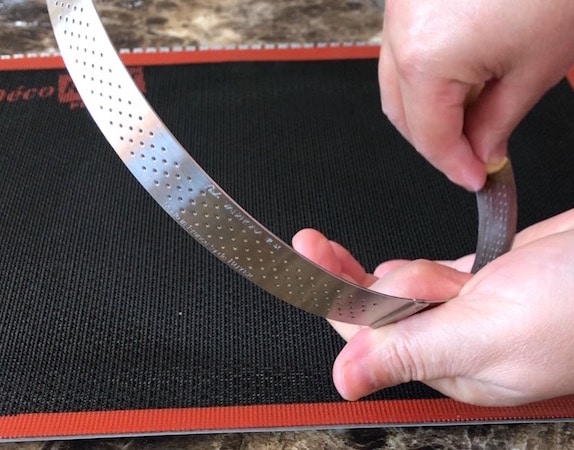
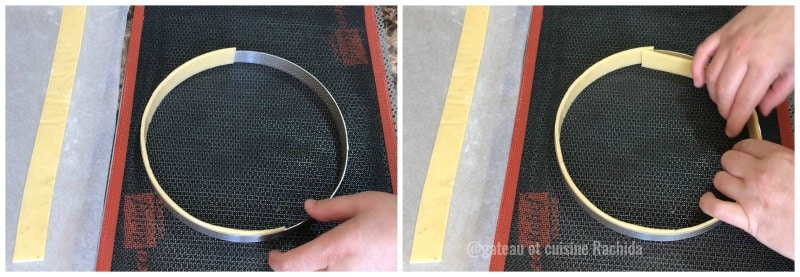
13. Moisten the edges of the circle of dough and position it in the middle of the tart ring.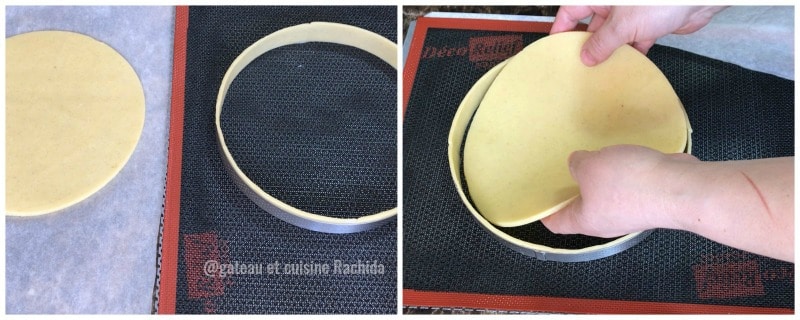
14. Push from the center to the edges to make the disc stick to the edges. Refrigerate to firm up if dough becomes sticky.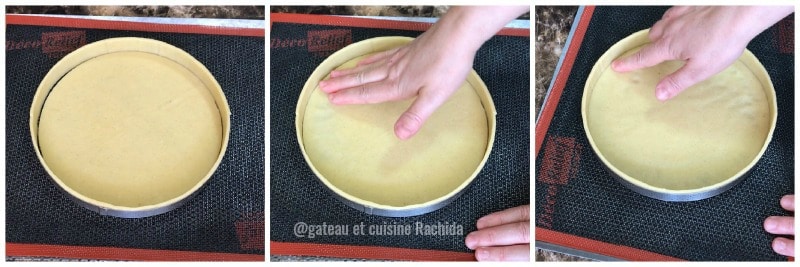 15. Run your finger along the sides to ensure the strips adhere well, without leaving a mark, hence the importance of having a firm dough.
16. Trim off the excess dough that protrudes using a paring knife from the inside out.
For a clean cut, the dough should be firm.
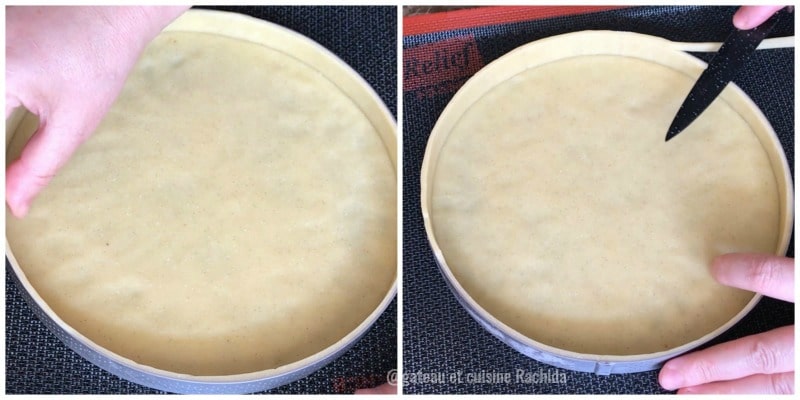
17. Let it rest for at least 2 hours in the refrigerator and 2 hours in the freezer before baking.
With this method, the edges do not move during baking.
You can prepare the sweet pastry and line the tart ring on the same day and leave it in the refrigerator until the next day. Before cooking, place in the freezer for 1 hour. ( Update : Now, i simply leave it in the freezer for 1 hour and it’s perfect. )
| The resting time reduces the strength of the gluten in the dough.That’s what prevents the dough from moving during baking. |
Baking the tart base
1. Preheat oven to 150°C / 160°C (302°F / 320°F ) fan-assisted or 170°C ( 340°F) conventional heat.
2. Bake for 15 to 20 minutes if you are going to seal it with an egg wash, otherwise bake for about 30 minutes, until the bottom of the tart is golden brown.
On the left bellow, you can see the tart base in the oven, and as you can see the crust has not collapsed.
On the right is the color the tart should have if you intend to fill it with almond cream before finishing baking. We’ll see soon in the strawberry tart.
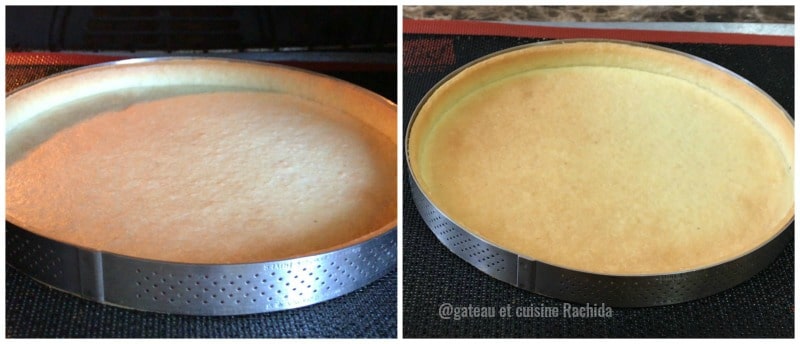
3. Remove from the oven, take off the tart ring, and let it cool.
4. Smooth out any irregularities with the back of a fine strainer. I prefer to use a strainer or a sifter, which is gentler than a grater, which is rougher.
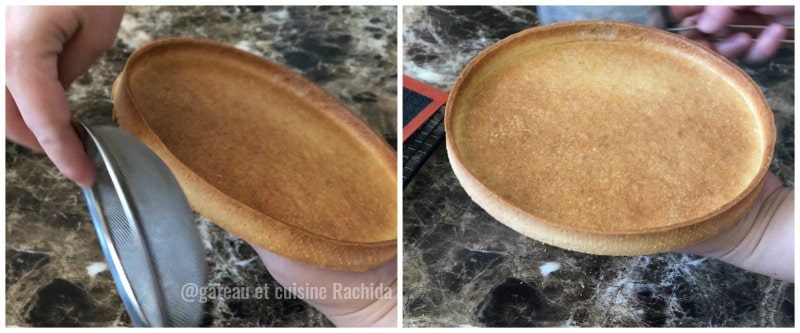
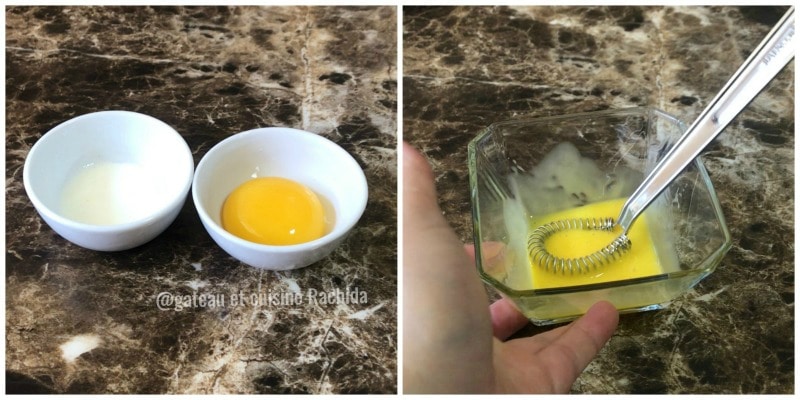
The egg wash

5. Mix the egg and cream, and using a brush, coat the bottom and sides of the tart. The egg wash seals the tart base and gives it a beautiful glossy and golden color.
6. Brush several times to remove drips. Bake for 8 min more or less until golden brown.
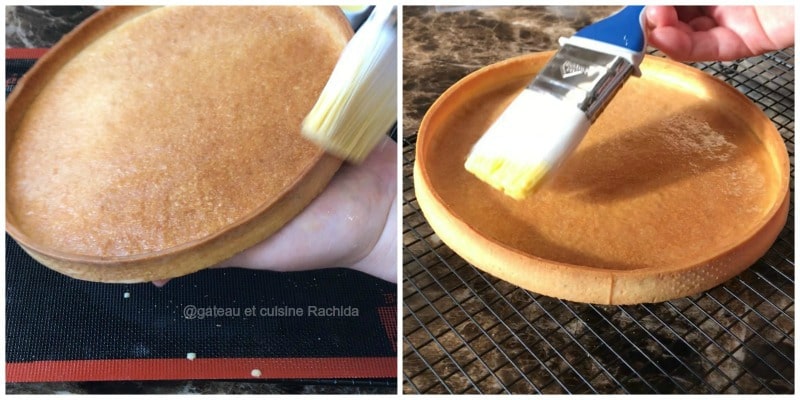
Below is the tart base with the egg wash before returning it to the oven.
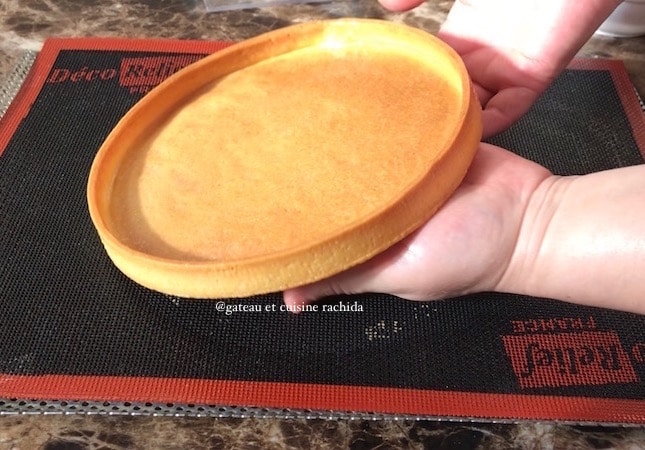
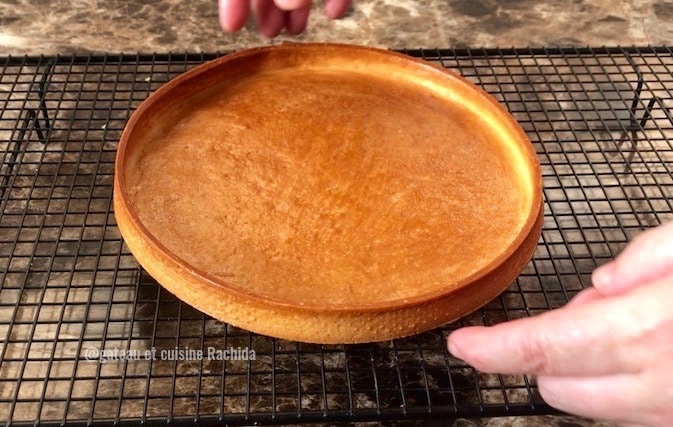
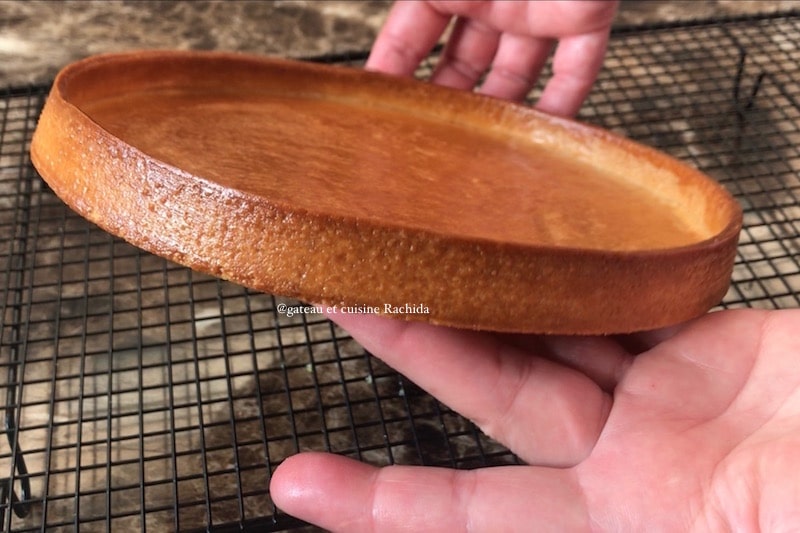
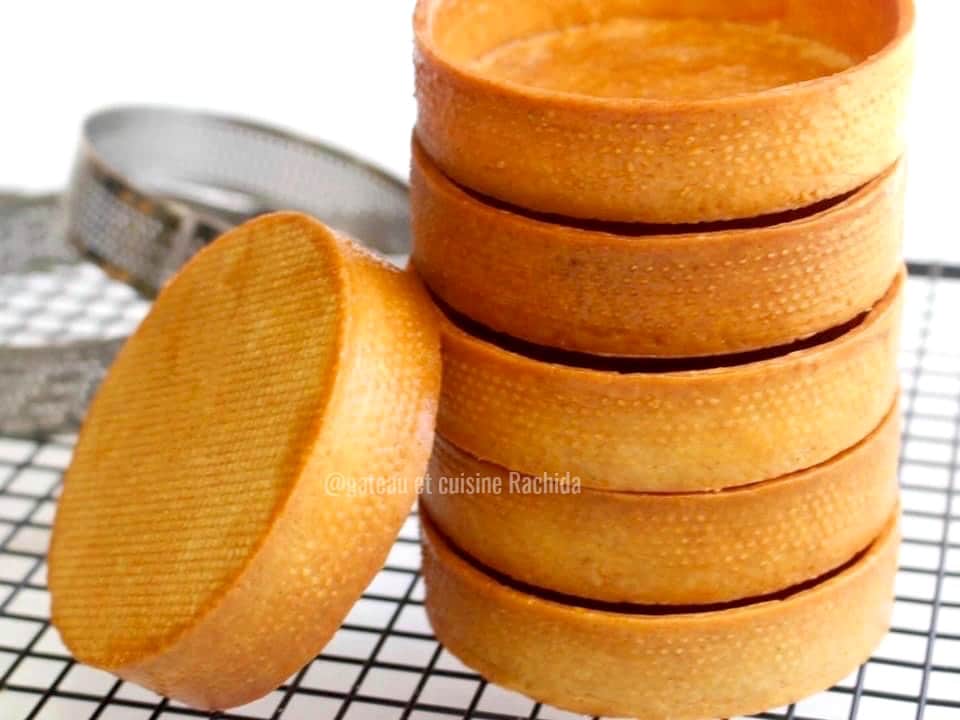
Now your tart shell is ready, golden brown on the outside and in the center. You can freeze it for up to 3 months.
7. Let it cool completely before placing it in a zip-lock freezer bag.
FAQ :
Should the tart base be pricked
I don’t prick it, the perforated Silpain mat allows the dough to breathe, and it doesn’t puff up during baking. If you’re using a regular tart pan with a bottom, or if you don’t have a Silpain mat, don’t take the risk of it puffing up, prick it. Preferably use a “dough docker” rather than a fork.
If you want to prick it, do so when you roll out the dough. When you flip the dough disc onto the ring, the holes should end up at the bottom against the baking sheet.
Parchment paper or silpain
If you often make tarts, I recommend a Silpain baking mat. You’ll achieve flawless baking. The heat conduction is excellent. I also like the small patterns it leaves on the bottom.
For parchment paper, read my advice above.
Baking tray or perforated baking sheet
As I mentioned earlier, I advise you to invest in a perforated baking sheet which will serve you well for even baking of your tarts, macarons, etc. Perforated baking sheet + Silpain mat.
➡️ That’s the winning combination !
Normal tart ring or perforated tart ring
As you may have noticed, since I’ve been aiming to make pies like the pros, I’ve invested in everything that could make my work easier. So yes for the perforated tart rings. They provide flawless baking, help prevent the dough from collapsing, and add a nice decorative touch to the tart.
Why so much resting time for the dough
The longer the dough rests before and after lining the tart ring, the less the tart crust will move from the tart ring. I haven’t tried it yet, but some achieve good results by letting the dough rest for only 2 hours in the refrigerator and then 1 hour in the freezer once it’s lined.
(Update, I’ve tested it and it’s true that you can make the sweet pastry and the lining the same day, following the instructions above).

Can we store sweet pastry dough and baked tart base
Sweet pastry dough stores very well. You can keep it in the refrigerator, well-wrapped, for 3 days, and in the freezer for up to 3 months.
Cooked tart shells can be kept for 24 hours in the fridge and up to 3 months in the freezer. The crispness remains impeccable.
Why use T55 flour for sweet pastry (pâte sucrée)?
T55 flour is weaker than T45 flour and contains less gluten. It’s the gluten that gives the pastry its strength. If the dough is too strong, you’ll have a hard time rolling it out and it will constantly shrink. It will also collapse during baking. You can use all-purpose flour; it works too.
Once you manage to make tart crusts like those of Pastry Chef Cédric Grolet or Gianluca Fusto, you’ll want to share your tarts with the whole neighborhood. Mastering the tart crust is an important phase in pastry making ! The filling and decoration are child’s play.
I hope this comprehensive article on sweet pastry wasn’t too long and that the tips and tricks for perfect tart crusts will be useful to you. If you have any questions, feel free to leave them in the comments.

Sweet Pastry / Perfect French tart crust (pâte sucrée)
INGREDIENTS
- For 2 tarts of 20 cm/22 cm (7.9 / 8.7 in ) or one large and 8 tartlets of 8 cm (3.15 in)
- 250 g (8.8 oz )all-purpose flour (I used all-purpose flour because I didn't have T55)
- 150 g (5.3 oz )very soft butter
- 95 g (3.4 oz) icing/powdered sugar
- 35 g (1.2 oz ) almond powder
- 50 g (1.8 oz )eggs
- 1 g salt (1/3 teaspoon)
- 1 vanilla pod or vanilla powder
For the egg wash
- 1 egg yolk 20 g (0.7 oz )
- 2 teaspoons heavy cream 5 g ( 0.17 oz )
PREPARATION
- Before you start, be sure to read all my advice in the article and watch the video for the technique.
Sweet pastry (pâte sucrée) by creaming
- Cream the butter and sifted icing/powdered sugar in the mixing bowl of the stand mixer fitted with the paddle attachment (K),
- Add salt, vanilla beans and almond powder. Mix and scrape the bottom of the bowl.
- Add the egg, mix a little with the spatula and then blend in the stand mixer.
- Add the sifted flour and mix briefly without kneading or gathering into a ball. The mixture is just clumping together. Don't overwork the pastry sweet.
- Stop as soon as the flour is incorporated.
- Turn the dough onto the work surface and smear it with the palm of your hand in a back-and-forth motion 2 or 3 times to combine everything.
- ⚠️ Warning : Do not overwork the dough to avoid activating the gluten network.
- The pastry will take on too much strength and become elastic. That's what causes the edges to collapse during baking.
- Gather the dough into a ball and divide it in half. Flatten each ball; this will cool the dough faster and make it easier to roll out.
- Wrap each dough ball in plastic wrap and refrigerate for at least 2 hours. It's best to make it the day before for the next day.
- Update : You can continue to follow the resting times that I explain below and in the video if you have time. However, since then, I have tested the following methods when I am in a hurry :
- Once the dough is prepared and wrapped, leave it in the refrigerator for 2 hours, then roll it out, using the cold if it starts to stick.
- Line the tart ring and let it harden in the freezer for 1 to 2 hours before baking.
- Just after preparation, roll it out to a thickness of 2 to 3 mm approximately ( 0.08 to 0.12 in) between 2 sheets of parchment paper or guitar sheet, and let it firm up for about 20 to 30 minutes, or until it can be easily handled when lining the tart ring.
- Line your tart ring following the steps below, then leave the ring in the freezer for 2 hours or overnight in the refrigerator before baking.
Sweet pastry (pâte sucrée) by rubbing
- In a food processor (fitted with a blade), crumble all the ingredients except the egg. The butter should be cold but not hard.
- Pulse the food processor to crumble the mixture.
- Add the egg and briefly run the food processor to combine everything.
- Pour onto the work surface, smear the dough as for sweet pastry by creaming, and gather it into a ball.
- Divide into two dough portions, flatten slightly, and wrap in plastic film.
Gianluca Fusto technique for lining tart ring
- Remove the dough from the refrigerator and let it soften slightly.
- Roll out between parchment paper.
- Roll it out to a thickness of 3 mm (0.11 in ) for the tart base. Try to flour as little as possible.
- Use 3 mm ( 0.11 in ) rulers to control the thickness of the dough. You can also use a rolling pin with rings of different thicknesses.
- Put the dough back in the refrigerator to firm up. Cut out a disc that is one centimeter smaller than your ring.
- You can also see the classic lining technique on this article : Classic pastry lining technique.
- Tart ring of 20 cm (7.9 in) for example ➡️ dough disc of 19 cm (7.5 in)
- Rework the scraps, and roll out again, to a thickness of 2 mm ( 0.08 in ) if you want fairly thin edges.
- Firm up the dough a little and cut strips around the circumference of the tart ring.
- For a 21 cm sur 2 cm tart ring (8.26 in x 0.8 in ) , you need a length of 63 x 2,5 cm ( 24.8 x 0.98 in) in 2 or 3 strips.
- Place in the refrigerator to firm up.
- Lightly grease the tart ring and place it on the perforated baking sheet with the silicone baking mat.
- Position the strips against the sides of the tart ring, pressing lightly to adhere.
- Moisten the joints to ensure that the strips adhere well to each other. Don't superimpose them, but just stick them next to each other to weld them together by pressing.
- Moisten the edges of the circle of dough and position it in the middle of the tart ring.
- Push from the center to the edges to make the disc stick to the edges. Refrigerate to firm up if dough becomes sticky.
- Run your finger along the sides to ensure the strips adhere well, without leaving a mark, hence the importance of having a firm dough.
- Trim off the excess dough that protrudes using a paring knife from the inside out.
- For a clean cut, the dough should be firm.
- Let it rest for at least 2 hours in the refrigerator and 2 hours in the freezer before baking.
- With this method, the edges do not move during baking.
- You can prepare the sweet pastry and line the tart ring on the same day and leave it in the refrigerator until the next day. Before cooking, place in the freezer for 1 hour. ( Update : Now, i simply leave it in the freezer for 1 hour and it's perfect. )
- The resting time reduces the strength of the gluten in the dough.That's what prevents the dough from moving during baking.
Baking the tart base
- Preheat oven to 150°C / 160°C (302°F / 320°F ) fan-assisted or 170°C ( 340°F) conventional heat.
- Bake for 15 to 20 minutes if you are going to seal it with an egg wash, otherwise bake for about 30 minutes, until the bottom of the tart is golden brown.
- On the left bellow, you can see the tart base in the oven, and as you can see the crust has not collapsed.
- On the right is the color the tart should have if you intend to fill it with almond cream before finishing baking. We'll see soon in the strawberry tart.
- Remove from the oven, take off the tart ring, and let it cool.
- Smooth out any irregularities with the back of a fine strainer. I prefer to use a strainer or a sifter, which is gentler than a grater, which is rougher.
The egg wash
- Mix the egg and cream, and using a brush, coat the bottom and sides of the tart. The egg wash seals the tart base and gives it a beautiful glossy and golden color.
- Brush several times to remove drips. Bake for 8 min more or less until golden brown.
- Below is the tart base with the egg wash before returning it to the oven.
- Now your tart shell is ready, golden brown on the outside and in the center. You can freeze it for up to 3 months.
- Let it cool completely before placing it in a zip-lock freezer bag.
Thank you for visiting my baking blog and your comments.
tarte, french pastry, fonçage, cap pâtisserie, cuisine en vidéo, recette de base, recette illustrées.


4 comments
Hi, is there anything you can use instead of vanilla powder?
Hi , You can use the seeds from a vanilla bean (even better!), 1 teaspoon of vanilla extract, or a packet of vanilla sugar. It’s mainly for flavor, so you can also skip it if you prefer.
great, thank you so much.
Bonjour, merci infiniment, la précision les détails, l’explication est claire, quelle travail vous avez donnée
pour nous, je garde précieusement tout ces conseilles.
Françoise