
TART CRUST
After my article on sweet pastry and how to line a tart ring using Gianluca Fusto’s lining technique for a perfect pie crust, we’ll now see the traditional method of lining a tart ring, the one we all know. This is the technique that is most commonly used, especially when using ordinary tart pans with bottoms.
Lining a tart ring involves rolling out the sweet pastry into a sheet, then rolling it onto the rolling pin or using parchment paper to center it on the tart ring. Then, the pastry must be carefully pressed to adhere to the ring.

Indeed, what is most challenging in lining a tart is to have a tart crust with a right angle between the pastry and the ring.
The sweet pastry will adhere well to the sides of the ring and will not move during baking. It will not shrink or collapse. I talk about other tips to prevent the sweet pastry from collapsing by one centimeter in the ring in the article I mentioned above. You will get a perfect tart crust.
I have used this method in the almond tart, the Parisian flan (custard pie), and the quiches, for example.
If the dough is successful and not brittle, you get good results by following certain rules.
Difficulty : medium
Table of Contents
Materials required
- Food processor with flat whisk (K) or your hands will suffice to prepare the sweet pastry
- Rolling pin
- Tart ring (preferably perforated)
- SILPAIN mat preferably for baking
- Perforated baking tray preferably
- Pair of 3 and 2 mm thick strips preferably
- Knife
- Ruler
- Parchment paper
- Microplane or fine strainer
Preparation steps :
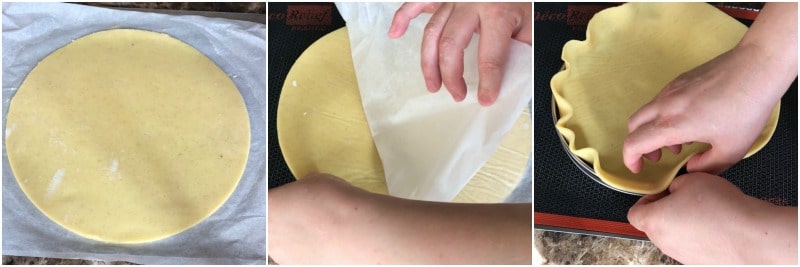
1. Roll out the dough on a lightly floured work surface if you want to do it like the chefs. I prefer to use a silpat or roll it out between two sheets of parchment paper, which is very practical and requires very little flour. Choose what suits you best.
2. Roll out the dough, turning it a quarter turn each time, and pass the rolling pin to make a disk larger than the tart ring. The thickness of the rolled-out dough should not exceed 3 mm. After rolling out the dough, if it has warmed up and is harder to handle, place it back in the fridge for a few minutes.
The dough should be supple, but still firm enough to easily line the tart ring without breaking.
3. The disk must measure the dimension of your tart base (here 21 cm) and the dimension of each edge (here 4 cm on both sides) along with an additional margin of at least 2 cm, to ensure comfort when lining the tart pan. The excess will be trimmed with a paring knife for a clean edge.
4. Place your greased tart ring on a baking sheet with a Silpain mat. Using the parchment paper, flip the dough disk onto the ring. Center the disk on the ring. Remove the parchment paper. Gently press the dough into the tart ring by lifting it and pushing it down into the ring.
5. Go all around the ring, lifting it slightly and pushing the dough towards the bottom to form a right angle. The dough should fit the shape of the ring.
You will get a kind of flower shape. Let it firm up for a few minutes before trimming the excess dough.
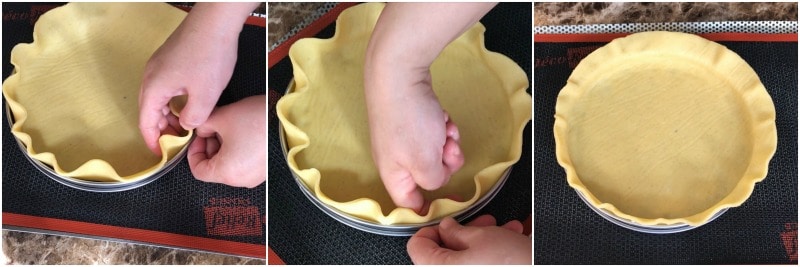
6. Trim the excess dough that extends beyond the ring with a sharp paring knife for a clean edge. Trim the edges of the dough (cut flush with the ring) from the inside out.
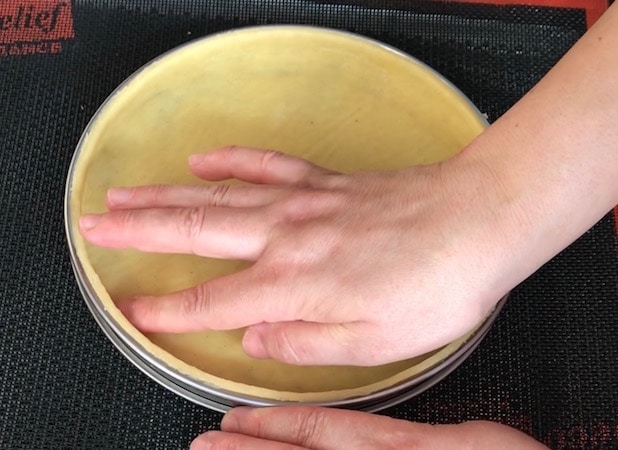
7. Run your fingernail between the dough and the ring to make it easier to unmold. Place the lined ring in the refrigerator until ready to bake. Follow the baking and refrigeration instructions mentioned earlier.

8. Use your index finger to firmly press the dough into a right angle between the edges and the bottom of the ring.
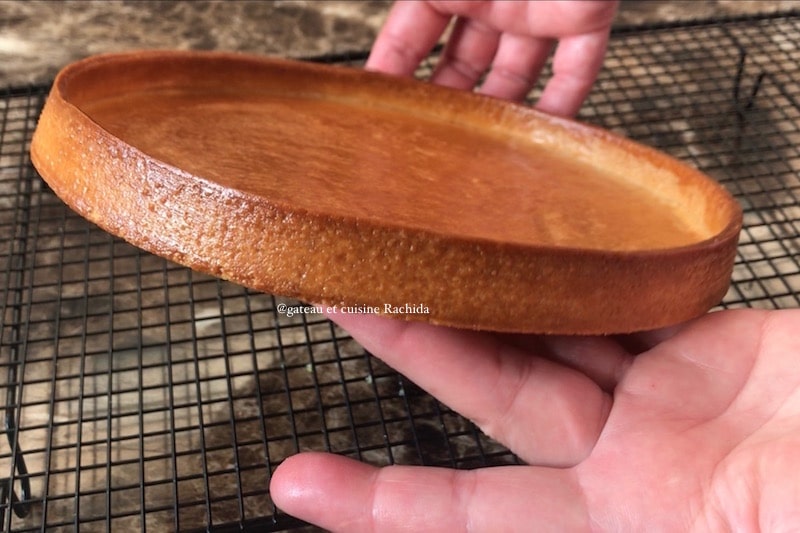
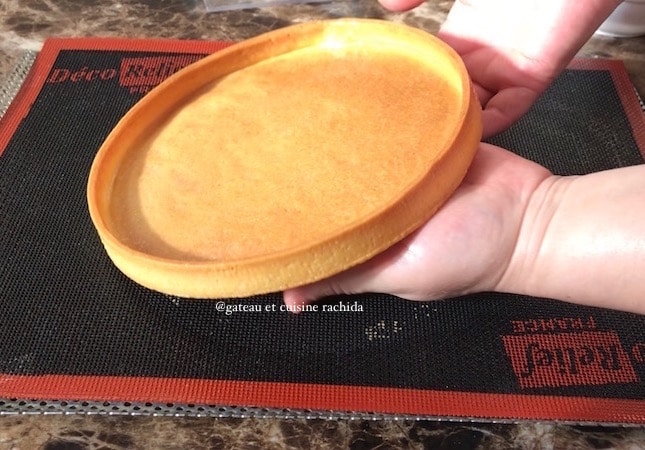
Here is your tart ring lined and ready to be baked. You will find detailed instructions on how to apply an egg wash and continue with the baking process in this comprehensive article 👉 sweet pastry

How to easily line a tart ring
PREPARATION
- Roll out the dough on a lightly floured work surface if you want to do it like the chefs. I prefer to use a silpat or roll it out between two sheets of parchment paper, which is very practical and requires very little flour. Choose what suits you best.
- Roll out the dough, turning it a quarter turn each time, and pass the rolling pin to make a disk larger than the tart ring. The thickness of the rolled-out dough should not exceed 3 mm. After rolling out the dough, if it has warmed up and is harder to handle, place it back in the fridge for a few minutes.
- The dough should be supple, but still firm enough to easily line the tart ring without breaking.
- The disk must measure the dimension of your tart base (here 21 cm) and the dimension of each edge (here 4 cm on both sides) along with an additional margin of at least 2 cm, to ensure comfort when lining the tart pan. The excess will be trimmed with a paring knife for a clean edge.
- Place your greased tart ring on a baking sheet with a Silpain mat. Using the parchment paper, flip the dough disk onto the ring. Center the disk on the ring. Remove the parchment paper. Gently press the dough into the tart ring by lifting it and pushing it down into the ring.
- Go all around the ring, lifting it slightly and pushing the dough towards the bottom to form a right angle. The dough should fit the shape of the ring.
- You will get a kind of flower shape. Let it firm up for a few minutes before trimming the excess dough.
- Trim the excess dough that extends beyond the ring with a sharp paring knife for a clean edge. Trim the edges of the dough (cut flush with the ring) from the inside out.
- Run your fingernail between the dough and the ring to make it easier to unmold. Place the lined ring in the refrigerator until ready to bake. Follow the baking and refrigeration instructions mentioned earlier.
- Use your index finger to firmly press the dough into a right angle between the edges and the bottom of the ring.
- Here is your tart ring lined and ready to be baked. You will find detailed instructions on how to apply an egg wash and continue with the baking process in this comprehensive article 👉 sweet pastry
Thank you for visiting my blog and your comments.
shortcrust pastry, tarte, French pastry, fonçage, cap pâtisserie, cuisine en vidéo, recette de base, recette illustrées